| • | As with all Data Entry Forms with MKMS, Yellow indicates a mandatory field that must be completed for the record to be saved. |
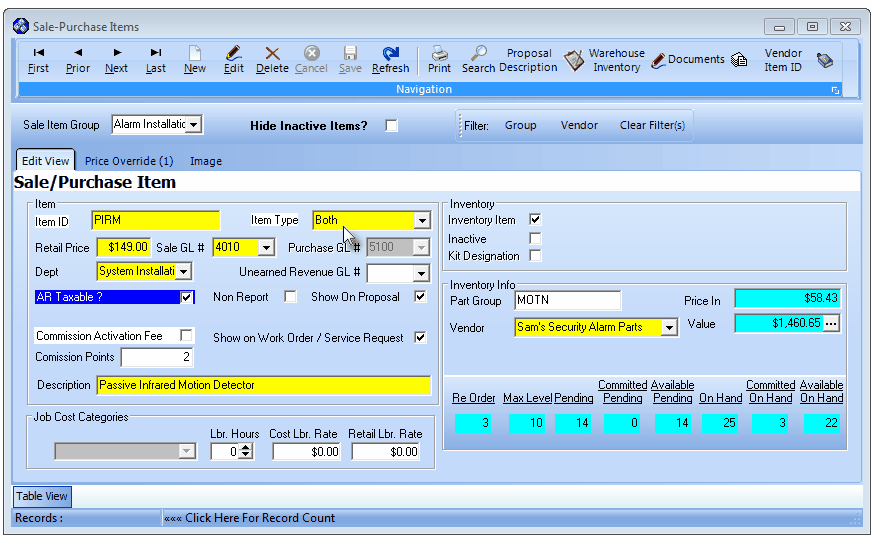
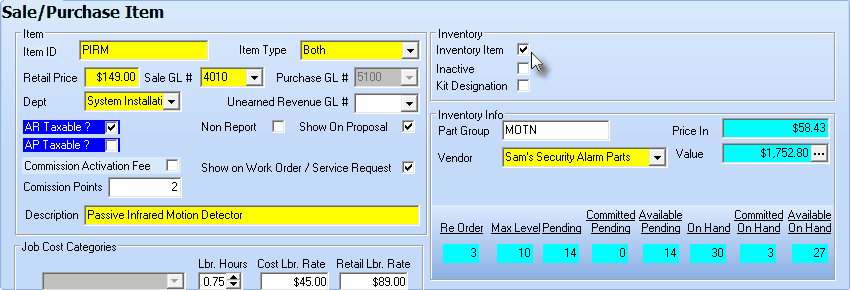
Sale-Purchase items Form - Inventory Item
| • | This Sale-Purchase Items Form may be Re-sized by Dragging the Top and/or Bottom up or down, and/or the Right side in or out. |

| • | This Navigation Menu provides the normal Record Movement, New, Edit, Delete, Cancel, Save, and Refresh options; as well as Print, Search, Proposal Description, Warehouse Inventory, Documents and Vendor Item ID functions. |
| • | Defining Inventory Item: |
| ▪ | Then complete the Inventory related additions or exceptions explained below. |

| • | Sale Item Group - Optionally, you may enter a Sale Item Group using the Drop-Down Selection List provided. |
| ▪ | If you have a large quantity of Sale-Purchase Items, this Sale Item Grouping feature allows you to Select the desired Sale-Purchase Item from a filtered list (based on the Sale Item Group assigned to it). |
| ▪ | The Advanced Sale Item Lookup function (accessed with Alt+F2 from within the Sale-Purchase Item Drop-Down Selection List on Sales, Proposal, Purchase Order and Purchases forms) lets you Select from a list of items limited to a specific group - thereby presenting a much shorter list from which to choose. |
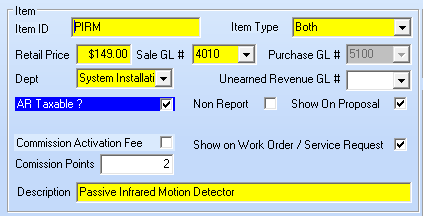
Sale Purchase Item - Item section
| • | Item ID - Enter a unique Item ID of up to 40 alpha-numeric characters (most punctuation marks are also permitted). |
| ► | Note: Create a generic Sale-Purchase Item named Parts assigning it the code Parts. |
This becomes the Default Parts Code which should then assigned as such within the Inventory Options tab of the User Options Form.
| • | Item Type - This is an Inventory Item and so will be used Both for recording a Sale and a Purchase. |
| ▪ | Once an Inventory record is saved, if a User changes the Item Type field of an Inventory related Sale-Purchase Item to Sale rather than Both, the record cannot be saved without Un-Checking the Inventory Item box on the Sale-Purchase Item Form, and confirming that it is no longer an Inventory Item. |
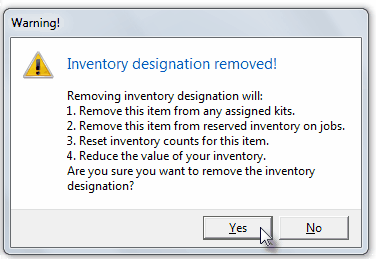
Inventory designation removed!
| • | Retail Price - Enter the usual Retail Price for this item. |
| • | If you are using the General Ledger System, these fields will be highlighted in Yellow indicating a mandatory entry. |
| ▪ | Dept - If you have initiated the use multiple Departments, enter the appropriate Department number using the Drop-Down Selection List provided. |
| ▪ | Purchase GL # - If this Sale-Purchase Item is assigned an Item Type of Purchase, or represents Both a Sale and a Purchase item, both the Sale GL # and the Purchase GL # must be entered using the Drop-Down Selection List provided. |
| • | Check boxes - There are several Check Boxes that may, or may not be needed based on the specific Purpose of this Inventory Item: |
| ▪ | Non Report - Check Non Report if this Inventory Item should not be included in certain Sales Analysis Reports. |
| ▪ | Show on Work Order / Service Request - Check the Show on Work Order / Service Request box if this Sale-Purchase Item has been assigned an Item Type of Sale or Both and might be needed when recording the use of Inventory and/or Materials on a Service Request. |
| o | By Not Checking this box, this Inventory Item will not be included in the Drop-Down Selection List lists that are provided to a Technician working in the field using the Web Tech Service or to any User recording information within the Inventory and/or Materials tab on a Service Request Form. |
| o | The result is that any Sale-Purchase Items that are defined to identify Purchases or Sales that are unrelated to providing Service to Subscribers will be eliminated from the list - making that Selection process easier and faster, thus reducing the Drop-Down Selection List list to a manageable size, and more importantly, with a definable content. |
| ▪ | Show on Proposal - Check the Show on Proposal box if this is coded as a Sale item (or Both) and it may be used on a Proposal (also see Proposal Description below). |
| ▪ | Inactive - Located within the Inventory section of the Sale-Purchase Item Form, this Check box identifies an Inventory Item as Inactive and therefore no longer in use. |
| o | The Inactive Check box is provided because, once entered and used, a Inventory Item cannot be deleted because it has become part of the Transaction "History" of the system. |
| o | Checking this box will remove this item from the Drop-Down Selection List es normally used to Choose a specific Inventory Item for a Sale or Purchase. |
| • | Taxable? - Check this box if this item is taxable, the default state. If this item is never taxed, be sure to Uncheck this box. |
| • | Commission Points - Enter a Point Value (representing its approximate cost) if this Sale-Purchase Item can earn Banked Commissions Points for the Salesperson or Technician when it is sold. |
| ▪ | The Commission Points assigned to a Sale-Purchase Item should represent an approximate Cost for the acquisition and installation of the Inventory Item. |
| ▪ | Commission Points are assigned a Point Value - on an Employee by Employee basis - in the Personal tab of the Employee Form. |
| • | Description - Enter a clear, somewhat concise description of this Inventory (Sale-Purchase) Item entry. |
| ▪ | Up to 70 alpha-numeric characters may be entered, upper and lower case letters are allowed, most punctuation marks, with spaces also permitted. |
| ▪ | For Sale-Purchase Items defined with an Item Type of either Both or Sale, a more detailed Description using the Proposal Description Icon on the Navigation Menu at the top of this Sale-Purchase Item Form may be defined. |
Inventory Item defined on Sale-Purchase Items Form with Active General Ledger
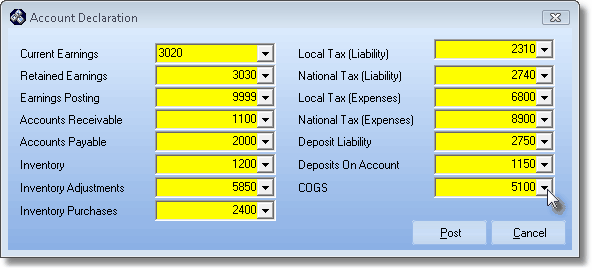
Mandatory Account Declaration entries
| ▪ | Once this record is saved, the Purchase GL # will be locked and shown in Gray. |
| • | Dept - If you are a General Ledger System User and have initiated the use of multiple Departments, enter the appropriate Department number using the Drop-Down Selection List provided. |
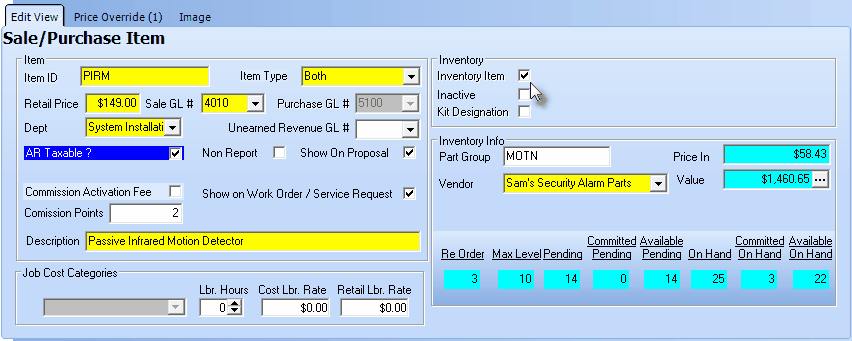
| □ | Understanding the Inventory and Inventory Info Sections: |
| • | Completing the Inventory Section: |
| • | Inventory Item - Check the Inventory Item box. |
| ▪ | When you Check Inventory Item, the Sale-Purchase Item Form will require additional information needed to properly track Parts as actual Inventory. |
| ▪ | If an Inventory Item is entered, and saved, and subsequently a User attempts to Remove this Check mark, a Warning will be displayed. |
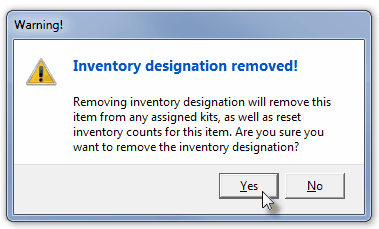
Warning - Inventory designation removed
| ▪ | Answer appropriately using special care. |
| • | Inactive - Never Check the Inactive box unless this Inventory Item is no long used. |
| ▪ | Do not Delete an Inventory Item once it has been used in an Invoice (either for Sales or Purchases). |
| ▪ | If you will no longer order or sell the Inventory Item, just mark it as Inactive. |
| • | Kit Designation - Check the Kit Designation box if this is an Inventory Item that actually consists of several individually ordered and sold parts that you have designed as an internal "Kit". |
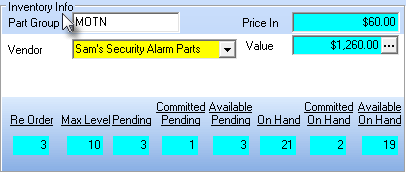
| • | Completing the Inventory Info Section: |
| • | Part Group - Enter a Part Group code. |
| ▪ | This is a user definable code which has no associated link to any predefined data set. |
| ▪ | It is for internal use only, as appropriate, to accommodate the Company's needs. |
| ▪ | This field may be used within a filter expression defined in the Report Builder module. |
| ▪ | Right-Click in this field to Choose the Search By method (Vendor Name or Vendor ID). |
| ▪ | This Search By selection will determine whether the chosen Vendor's Name or their Record ID number will be displayed in the Vendor field. |
| • | Enter the Price In for this item, regardless of whether it is Both a Purchase and a Sale, or just a Purchase which will be the default price used for the Inventory Item when entering a Bill. |
| ◆ | How and whether the Price In and/or Value fields will be displayed within the Inventory Info box is based on which Inventory Valuation Method has been elected. |
| o | If the Price In Inventory Valuation Method is in effect, the contents of this field will remain unchanged unless modified manually. |
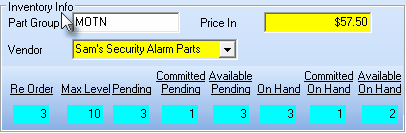
Inventory Info box - LIFO or Price In Inventory Valuation Method selected
Inventory Info box - Average Cost Inventory Valuation Method selected
| • | Committed Available - The Inventory Quantities & Status information shown at the bottom of the Inventory Info box displays information that cannot be changed without accessing the Warehouse Inventory Icon (see below). |
| ▪ | If the actual On Hand level is less than the established Re-Order level for this Inventory Item, an 'On Hand' Low message will be displayed. |
| • | Sale Item Group - Optionally, you may also enter a Sale Item Group using the Drop-Down Selection List provided at the top of the Form. |
| ▪ | If you have a large quantity of Sale-Purchase Items, Sale Item Grouping allows you to use the Advanced Sale Item Lookup feature to select the desired Sale-Purchase Item from a pre-limited list (based on the Sale Item Group assigned to it). |
| • | Click the Save (<) Icon on the Image tab to record this entry. |
| • | These type of Non-Inventory Expenses are identified with a Job Cost Category |
| • | As you define your Sale-Purchase Items, if your Job Costing System is active, you will - as needed - enter the Job Cost Category for the item by using the Drop-Down Selection List provided. |
| • | The Job Cost Category field is not available when you are defining an actual Inventory Item or Kit. |

Job Cost Categories section for Purchase Categories which are Inventory Items
| • | The field is Gray - as in the example Inventory Item in the illustration below - because Inventory usage is tracked separately and automatically. |
| ► | Note: If using the Commission Tracking System and charging an Activation Fee (defined as part of a Proposal Package), the individual Inventory Items - which will be included in a Proposal Package - should have Commission Points assigned but should not have Labor related information defined (because Labor is included in the Activation Fee - see below). |

| • | The Non-Inventoried Job Cost Categories are: |
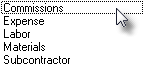
Job Cost Categories
| • | Expense Category options and their purpose are: |
| o | This Commissions Job Cost Category will usually not have Labor component defined. |
| o | This Expenses Job Cost Category will usually not - but may - have a Labor component defined. |
| o | This Labor Job Cost Category will almost always have a Labor component defined |
| d) | Materials - Identifies this Purchase Category as charges for various Material used for a Job (such as wire, batteries, other electrical supplies, conduit, clamps, etc.). |
| o | This Materials Job Cost Category will usually not - but may - have a Labor component defined |
| e) | Subcontractor - Identifies charges of Subcontractor bills that will be charged against a Job (such as telephone line installations, pre-wiring, CCTV, independent alarm installer, etc.). |
| o | This Subcontractor Job Cost Category will usually not - but may - have a Labor component defined. |
| • | Where appropriate, enter Labor information: |
| o | Labor Hours - ("Lbr. Hours") - This field is used to define - when this is an Inventory Item - the average number of Labor hours that are required to install this Part. |
| o | Cost Labor Rate - ("Cost Lbr. Rate") - This field is used to define - when this is an Inventory Item - the average internal Cost for each hour required to install this Part. |
| o | Retail Labor Rate - ("Retail Lbr. Rate") - This field is used to define - when this is an Inventory Item - the average Retail Charge for each hour required to install this Part. |
| o | Labor Hours - ("Lbr. Hours") - This field is used to define the average number of Labor hours that are required for the designated Job Cost. |
| o | Cost Labor Rate - ("Cost Lbr. Rate") - This field is used to define the average internal Cost for each hour required for the designated Job Cost. |
| o | Retail Labor Rate - ("Retail Lbr. Rate") - This field is used to define the average Retail Charge for each hour required for the designated Job Cost. |
| • | Click the Save (<) Icon to record this entry. |
| □ | In addition to the Edit View tab, there are two other tabs on the Sale-Purchase Items Form that are related to Inventory Items: |
| • | Price Override tab - As shown in the illustration below, the Price Override tab is used to enter a different set of Pricing Mark Up/Down Percentages for previously defined Pricing Mark Up Groups, as appropriate. |
| • | The Price Overrides tab will display the number of entries within the tab. |
| ▪ | If the User answers Yes, the Price Override value will be applied. |
| • | To define a Price Override: |
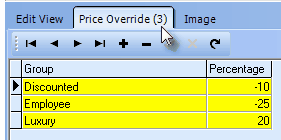
Price Overrides tab on Sale Purchase Items Form
| 2. | Group - Using the Drop-Down Selection List provided, Choose one of the previously defined Pricing Mark Up Groups. |
| 3. | Percentage - Enter the Override Mark Up/Down Percentage Rate - as a positive or negative value - indicating that the regular Retail Price entered for this Sale-Purchase Item should be increased or decreased respectively, as described in the Pricing Mark Up Groups chapter. |
| 4. | Save - Click the Save ("ü") button to record this Price Override. |
| • | Image tab - As shown in the illustration below, the Image tab is used to enter a picture of the Sale-Purchase Item, when appropriate. |
| • | By using this Image tab to identify an Inventory Item or Kit, it provides the User access to an actual picture of that Part. |
| • | Images attached to a Sale-Purchase Item record my also be included on a printed Proposal based on the options selected when Printing a Proposal. |
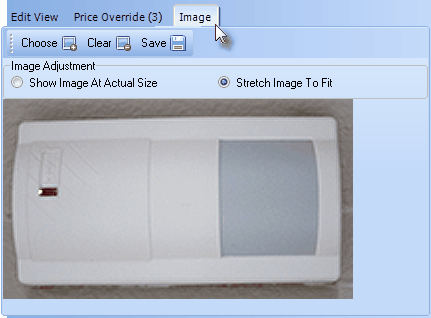
Sale Purchase Items - Image tab
| 1. | Choose - Click the Choose button and, using the standard Windows® dialogue box provided, locate the desired file. |
| o | This should be a BMP or JPG file approximately 5 x 5 inches at 72 ppi. |
| 2. | Image Adjustment - Once the Sale-Purchase Item's BMP or JPG file is selected, Choose the Image Adjustment method that best displays your Sale Purchase Item in the display box by alternately Clicking Show Image At Actual Size and Stretch Image To Fit. |
| • | Click the Save (<) Icon on the Image tab to record this entry. |
| □ | Understanding the Inventory related Special Icons: |

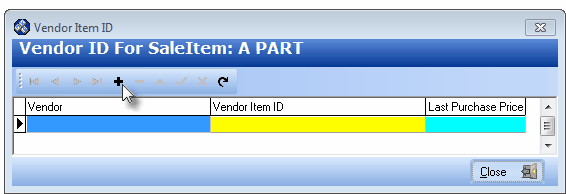
Vendor Item ID dialog accessed from the Sale-Purchase Items Form
| • | Vendor Item ID - Click the Vendor Item ID to open the Vendor Item ID dialog. |
| ▪ | Vendor - Use the Drop-Down Selection List to Choose the Vendor whose Part Number you are entering. |
| ▪ | Vendor Item ID - Enter the Part Number used by this Vendor to identify the selected Sale-Purchase Item. |
| ▪ | Last Purchase Price - This is a system maintained field. |

| ▪ | Click Save ("ü") to record the entry. |
| ▪ | Repeat this process until you've identified the Part Number used by each of the Vendors from whom this item is purchased. |
| • | Proposal Description - Click the Proposal Description at the top of the Form to create a longer and more detailed description of this Inventory Item. |
| • | The expanded description entered here will be printed in addition to the Description field information (described above), on all Proposals containing this Inventory Item. |
| • | Warehouse Inventory - Accessing the Warehouse Inventory Form (See the Warehouse Inventory chapter for complete information about using the Warehouse Inventory Form) |
| • | To see the current status by Warehouse of the currently displayed Inventory Item, Click the Warehouse Inventory on the Navigation Menu of the Sale-Purchase Items Form to display the Warehouse Inventory Form. |
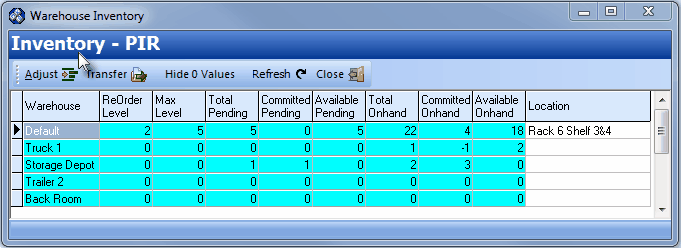
Warehouse Inventory
| • | Warehouse - column showing the places defined as Warehouses. |
| • | Location - To enter the specific Location within this Warehouse |
| ▪ | Click the Ellipse button  (to the right of the Location field). (to the right of the Location field). |
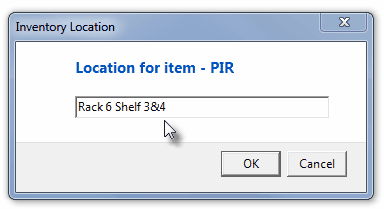
| ▪ | Enter a specific Location where this Inventory item is stored within the selected Warehouse. |
| ▪ | Click OK to record this entry. |
| • | Status Line - row (next to the Warehouse column) displays a series of columns with the current status (counts) of this Inventory Item. |
| • | Click the Warehouse Information to view this form. |

| • | Adjust - Edit Warehouse Inventory Values - Allows you to (Re-)Set the rules for Reordering Inventory items, and to adjust actual counts based on the results of a physical Inventory Counting process. |
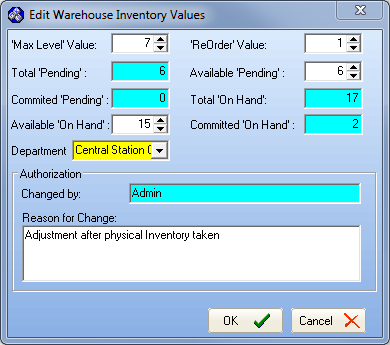
Edit Warehouse Inventory Values
| • | Click on the Inventory Count field(s) to be revised. |
| ▪ | 'Max Level' Value: - The maximum number of this Inventory Item that should be in-stock (Available 'On Hand') at any time. |
| ▪ | 'ReOrder' Value: - The number of this of this Inventory Item which is in-stock (Available 'On Hand') that triggers a Re-Order Request (documented in the Inventory Reorder Report). |
| ▪ | Available 'On Hand': - The number of this Inventory Item that is in-stock at any time. |
| ▪ | Available 'Pending': - The number of this of this Inventory Item which has been ordered but is not already committed to a Job, but has not be received (Also see Reserved Inventory and Purchase Orders). |
| • | Adjust these numbers, as required. |
| ▪ | Department - Use the Drop-Down Selection List to Choose the Department that normally uses this Inventory Item. |
| • | Authorization - Enter the Reason for Change |
| • | Click OK to save the change or Cancel to abort the revisions. |
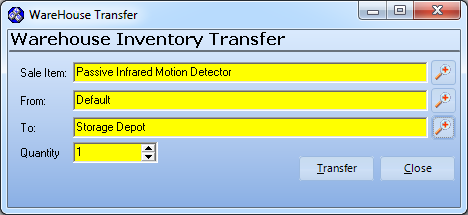
Warehouse Transfer Form
| • | Moving Inventory Item(s) from one Warehouse to another. |
| • | Sale Item - The Inventory Item you want to relocate. |
| • | From - Click the Warehouse Search Icon to locate the appropriate Warehouse Location FROM which to move this item from. |
| ▪ | Search By - Use the Drop-Down Selection List to Choose the search method which may be by Name or by Warehouse ID number. |
| ▪ | Search Value - Enter the characters with which to perform the search. |
| ▪ | Click the OK button to close the Warehouse Search dialog which will also insert the selected record into the From field. |
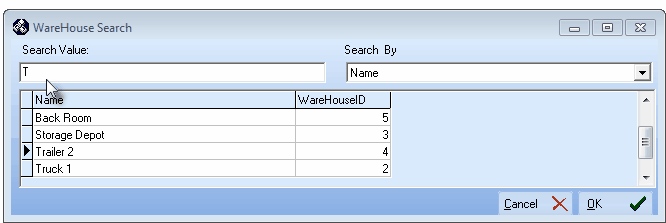
Warehouse Search dialog
| • | To - Click the Warehouse Search Icon to locate the appropriate Warehouse Location TO which to move this item. |
| ▪ | Search By - Use the Drop-Down Selection List to Choose the search method which may be by Name or by Warehouse ID number. |
| ▪ | Search Value - Enter the characters with which to perform the search. |
| ▪ | Click the OK button to close the Warehouse Search dialog which will also insert the selected record into the TO field. |
| • | Quantity - Enter the Quantity to be Transferred. The default value will be 1. |
| • | Transfer - Click the Transfer button to execute the move. |
| • | Close - Click the Close button to exit the Form. |
| • | Hide 0 Vaues - Click the Hide 0 Values button to eliminate all Inventory Items, with no values in any columns, from the Warehouse Inventory display. |
| • | Show All Values - If the Hide 0 Vaues has been Clicked, the button name changes to Show All Values, which may be Clicked to do just that. |
| • | Refresh - updates the displayed on the Form to the most current information (in case another person made a change since you opened this Form). |
| • | Close - Click the Close to close the Warehouse Inventory Form. |

