| □ | User Defined Kits - Manufacturers frequently offer pre-configured Kits for specific purposes (CCTV installations, basic Alarm System packages, etc.). |
| • | However, you may want to define your own "Kits" that represent the typical installation needs for the many Inventoried Items required to install various types of Jobs (e.g., a basic Commercial package, a basic Residential package, a basic Medical Alert package). |
| • | The solution is the ability to Design Your Own Parts Package(s): |
| • | An example of an (internally designed) User Defined Kit might include the appropriate Inventory [e.g., Control Panel, Gel Cell, Keypad(s), Motion Detector(s), Sounding device, RJ31X jack] for a specific type of "standard" installation. |
| • | The advantage here is that, once you've created this User Defined package of Inventory Items as a Kit, when you Job Cost or Invoice the Sale of a User Defined Kit, all of the individual Inventory Items which make up that Kit will be accounted for automatically. |
| • | In addition, there is an Inventory Reorder - Kits report that will assist you in replenishing all of the Components required to make up those Kits. |
| • | Once User Defined Kits are created, these Kits may be used as follows to: |
| • | Invoice a Kit purchased on a Bill Form using the Buy Kit button. |
| • | Add a Kit as a Detail Line Item on a Proposal. |
| • | Add a Kit as a Detail Line Item on a Sale. |
| ▪ | When a Kit is recorded as a Detail Line Item on a Sale, it is shown as one item on that Invoice. |
| o | Each individual Component of the Kit, |
| o | The Amount for which it was Sold, and |
| □ | Planning a User Defined Kit: |
| ► | Note: You must first define each of the proposed Kit's individual component parts as a Sale Purchase Item, |
To have a Sale Purchase Item be identified as an available component in a User Defined Kit, the Inventory Item box must be Checked.
Do Not Check the Kit Designation box for any Component that will become a component within a User Defined Kit.
| • | Each Kit will need to be Named with a description that is clear and concise. |
| • | Before starting any data entry, be sure to carefully Plan the User Defined Kit's Components. |
| • | The Style of the Kits that are designed may be any combination of: |
| • | Detailed - Almost every Inventory Item that might be needed, will be identified for the Kit. |
| □ | To create a Kit, on the Main Menu, Select Maintenance and Choose Sale Purchase Items. |
| • | Click the New (/) Icon and enter a unique Item ID of up to 40 alpha-numeric characters (most punctuation marks are also permitted). |
| • | Complete the information described below to create a User Defined Kit: |
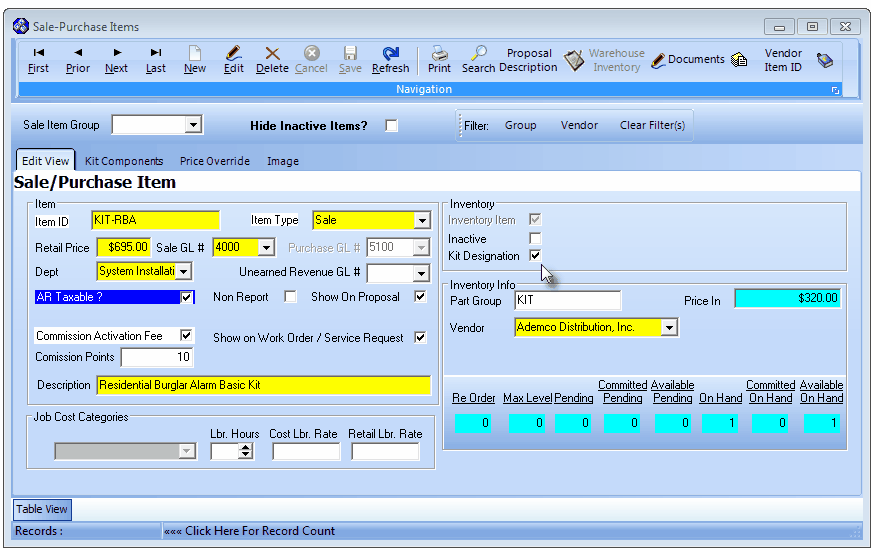
Sale/Purchase Items Form - Inventory Item & Kit Designation options (Checked)
| • | Defining the Kit Designation - its Name and Code: |
| • | Item Type - Sale Purchase Item entries that are User Defined Kits are assigned an Item Type of Sale. |
| ▪ | However, to be able to access the Inventory Item field (see "The Inventory box on the Sale Purchase Items Form" below), you must initially set this field to Both. |
| ▪ | Once this Sale Purchase Item has been designated as an Inventory Item and the Kit Designation box has also been Checked, the Item Type field is automatically reset to Sale. |
| • | Retail Price - Enter the usual Retail Price for this User Defined Kit (see Note below "About the Labor Hours & Rates fields"). |
| ▪ | Dept - If you have initiated the use multiple Departments, enter the appropriate Department number using the Drop-Down Selection List provided. |
| • | Show on Proposal - Check Show on Proposal if this Kit might be used to create a Proposal. |
| • | Description - This will be the Name of the Kit as it appears on an Invoice and/or Proposal which may be up to 70 characters in length and should be a clear and concise explanation of this Kit. |
| • | Proposal Description - Click the Proposal Description at the top of the Form to create a longer and more detailed Description of this Kit Designation. |
| ▪ | This expanded description will be printed, in addition to the Description information you enter, on all Proposals containing this Kit Designation. |
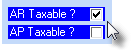
| • | AR Taxable? - Check this box if this Sale-Purchase Item is normally Taxable when making a Sale. |
| • | AP Taxable? - Under Development - If present (it is not in the Sale/Purchase Item Form illustration above), Check this box if this Sale-Purchase Item is normally Taxable when making a Purchase. |
| ▪ | When entering a Sales Invoice: |
| a) | If AR Taxable? is Checked, whenever this Sale-Purchase Item is entered on a Sales Invoice, the appropriate Tax Code & Tax Percentage Rate will be inserted automatically, based on the Sales Tax information entered in the Accounting Info Tab for that Subscriber. |
| b) | If Not Checked, whenever this Sale-Purchase Item is entered on a Sales Invoice, the Tax Code will be entered as N (Non) and the Tax Percentage Rate set set at 0%, regardless of the Sales Tax information entered in the Accounting Info Tab for that Subscriber. |
| ▪ | When entering a Bill (Purchase Invoice) Under Development: |
| a) | If AP Taxable? is Checked, whenever this Sale-Purchase Item is entered for a Bill (Purchase Invoice), the appropriate Tax Code will be inserted, and the Tax Percentage Rate will be used to calculate the Sales Tax Amount based on the Sales Tax information entered in the Vendor Tax Information tab for that Vendor. |
| b) | If Not Checked, whenever this Sale-Purchase Item is entered for a Bill (Purchase Invoice), the Tax Code will be entered as No and the Tax Amount set at 0%, regardless of the Sales Tax information entered in the Vendor Tax Information tab for that Vendor. |
| • | Commission Activation Fee - Do not Check this box if this record is defining a Kit. |
| • | Commission Points - Enter a Point Value (representing its approximate cost) if this Sale-Purchase Item earns Commissions Points for the Salesperson when it is sold. |
| ▪ | The Commission Points assigned to a Sale-Purchase Item should represent an approximate Cost for the acquisition and installation of the Inventory Item. |
| ▪ | Commission Points are assigned a Point Value - on an Employee by Employee basis - in the Personal tab of the Employee Form. |
| • | Job Cost Category - No Job Cost Expense Category can be entered because this Sale-Purchase Item record has been specifically designated as a Set of Parts - a Kit. |
| o | Labor Hours - ("Lbr. Hours") - This field is used to define - when this is an Inventory Item - the average number of Labor hours are required to install this Part. |
| o | Cost Labor Rate - ("Cost Lbr. Rate") - This field is used to define - when this is an Inventory Item - the average internal Cost for each hour required to install this Part. |
| o | Retail Labor Rate - ("Retail Lbr. Rate") - This field is used to define - when this is an Inventory Item - the average Retail Charge for each hour required to install this Part. |
| o | Labor Hours - ("Lbr. Hours") - This field is used to define the average number of Labor hours required for the designated Job Cost. |
| o | Cost Labor Rate - ("Cost Lbr. Rate") - This field is used to define the average internal Cost for each hour required for the designated Job Cost. |
| o | Retail Labor Rate - ("Retail Lbr. Rate") - This field is used to define the average Retail Charge for each hour required for the designated Job Cost. |

| • | Inventory Item - Check Inventory Item box. |
| ▪ | When you Check Inventory Item, the Form will require additional information needed to properly track Parts as actual Inventory. |
| • | Inactive - Never Check the Inactive box unless this Kit is no longer used. |
| ▪ | If you will no longer order or sell the Kit, just mark it as Inactive. |
| • | Kit Designation - Check the Kit Designation box because this is defining a set of Inventory Items. |
| ▪ | The Components of this Kit will be several individually ordered and sold parts that you will identify as an internally created User Defined Kit. |
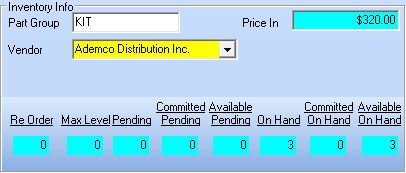
| • | Part Group - Enter a Part Group code. |
| ▪ | This is a user definable code that has no predefined data. |
| ▪ | It is for your use as you see fit. |
| • | Price In is maintained by the system based on the cost of the Components and the Quantity of each that are required to make one Kit. |
| • | Vendor - Enter the Vendor Form whom the Components of this Kit are generally purchased using the Drop-Down Selection List provided. |
| ► | Note: You also must enter at least one Inventory Item - although there should obviously be more - for this Kit. |
See the "Defining the Inventory Items that make up the Kit:" section below for instructions on how to do this.
| • | Sale Item Group - Optionally, you may also enter a Sale Item Group using the Drop-Down Selection List provided. |
| • | If you have a large quantity of Sale-Purchase Items, Sale Item Grouping allows you to use the Advanced Sale Item Lookup feature to select the desired Sale-Purchase Item from a pre-limited list (based on the Sale Item Group assigned to it). |
| • | The Advanced Sale Item Lookup function (accessed with Alt+F2 from with the Sale-Purchase Item Drop-Down Selection List on Sales, Proposal and Purchases Forms) lets you pick from items only in a specific group - thereby presenting a much shorter list. |
| • | Inventory Quantities and Status - The Inventory Quantities and Status information for this Kit is located at the bottom of the Sale Purchase Items Form and is presented for information purposes, but cannot be changed. |
| • | Based on the Quantities of each Inventory Item that are required for this Kit, the Inventory Quantities and Status will reflect the number of these Kits that could be assembled using the current Inventory available. |
| • | Based on the Price In of the Components that are required for this Kit, the Inventory Quantities and Status will reflect the Cost of the Kit as designed. |
| • | Click the Save (<) Icon to record your initial Kit entry. |
| □ | Defining the Inventory Items that make up the Kit: |
| • | Kit Components - A Kit Components tab is added to the Sale Purchase Items Form when an Inventory Item is designated and the Kit Designation box is Checked. |
| • | Click the Kit Components tab. |
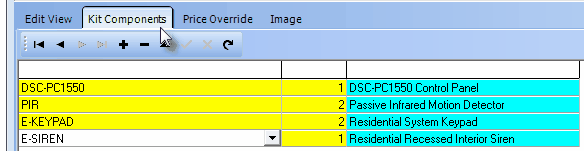
Sale Purchase Item Form - Kit Components tab
| • | Click Add ("+") to enter a Component of a Kit. |
| • | Sale Item ID - Use the Drop-Down Selection List to select the Sale Item ID of the first component of this Kit. |
| ▪ | Right-Click the Sale Item ID list to Choose the Order (Item ID or Description) in which they are listed in the Drop-Down Selection List . |
| • | Qty - Enter the Quantity of this item that is required to make up this Kit. |
| • | Description - The Description is inserted automatically. |
| • | Click Save ("ü") to record your initial Kit component entry. |
| • | Repeat this procedure until you have defined all of the necessary Inventory Items that will make up this Kit. |
| • | Once they are defined, these User Defined Kits may be ordered on a Purchase Order Form using the Order Kit button, and purchased on a Bill Form using the Buy Kit button. |
| □ | Checking the Status of a Kit: |
| • | Inventory Quantities and Status - The Inventory Quantities and Status information for a Kit is located at the bottom of the Sale Purchase Items Form and is presented for information purposes, but cannot be changed. |
| • | Based on the Quantities of each Inventory Item that are required for this Kit, the Inventory Quantities and Status will reflect the number of these Kits that could be assembled using the current Inventory available. |
| • | Based on the Price In of the Components that are required for this Kit, the Inventory Quantities and Status will reflect the Cost of the Kit as designed. |
| • | On the Warehouse Form, Select the appropriate Warehouse Location, |
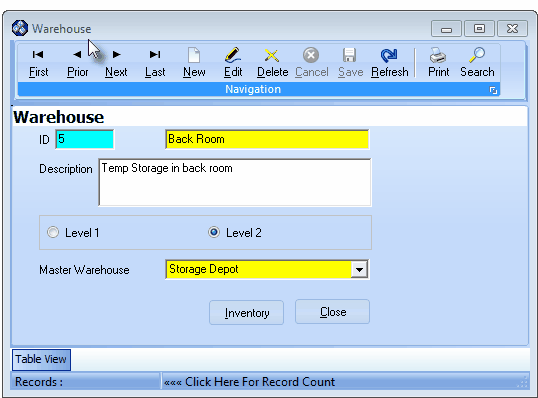
Warehouse information Form
| • | Click the Inventory button on the bottom of the Form to view the Status of all Inventory Items (Kits included) for a specific location. |
| • | Select a Kit to view it's Inventory Status. |
| • | A Kit Item message will be displayed at the top of the Warehouse Inventory Form when a predefined Kit is Chosen. |
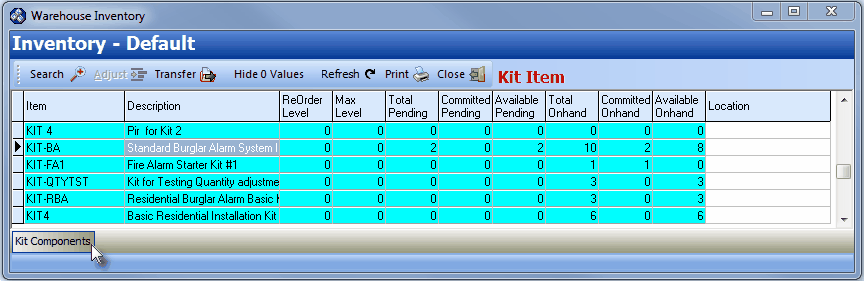
Warehouse Inventory (by location) Form
| • | Kit Components - Click the Kit Components (see bottom left side of the illustration above) button to see the Quantity required for each Kit Component, and the number that are Available to make up the Kit. |

Kit Components list

