| • | Purchase Categories are the codes and descriptions (and usually prices) for what your business buys such as Parts, Recurring Purchases, General Expenses, Shipping Charges, Finance Charges, etc. that must be categorized, bought and later included in expense related reports. |
| □ | Your business must have accurate reports of your Purchases, and other Expenses to know where your Revenue is being spent. |
| • | Proper reporting first requires proper filing (categorization) of these Purchase, and other Expense transactions. |
| • | Your Purchase Categories may be as broad as O/S (for Office Supplies) or D&S (for Dues and Subscriptions). |
| • | You do not have to enter every part and item you purchase at this time - you can always add more as needed. |
| • | However, you should enter most all of the more general Purchase Categories that you are currently using (keeping in mind that NOW is the time to refine them). |
| ► | Note: If you are not currently using the General Ledger module (even if you do plan on doing so in the future), you may skip the GL # fields. |
| • | If the Sale-Purchase Item is assigned an Item Type of Both (because it is used as a Sale and a Purchase item), both the Sale GL # and the Purchase GL # must be entered using the Drop-Down Selection List provided. |
| • | Otherwise, if the Item Type is Sale, assign only a Sale GL #, or if the Item Type is Purchase, assign only a Purchase GL # using the Drop-Down Selection List provided. |
| □ | You have probably entered many Sale-Purchase Items while preparing to use the Accounts Receivable and/or Service Tracking modules and so have learned much about the Sale-Purchase Items Form shown below. |
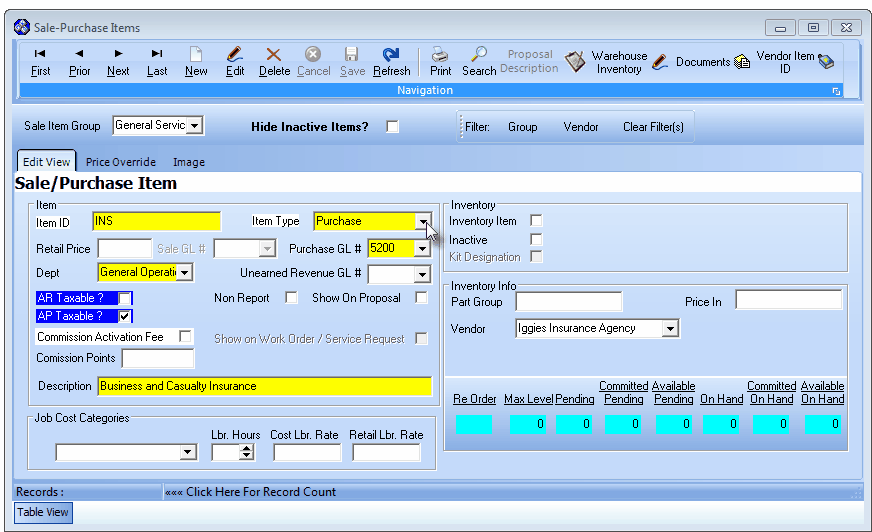
Sale-Purchase Items Form with a (non Inventory) Purchase Item example
| • | This Sale-Purchase Items Form may be Re-sized by Dragging the Top and/or Bottom up or down, and/or the Right side in or out. |
| • | Navigation Menu - The Navigation Menu is located at the top of the Sale-Purchase Items Form. |

| • | This Navigation Menu provides the normal Record Movement, New, Edit, Delete, Cancel, Save, and Refresh options; as well as Print, Search, Proposal Description, Warehouse Inventory, Documents and Vendor Item ID functions. |
| • | Record Editing section - The details of the currently selected record are displayed below the Navigation Menu at the center (Main Body) of the Sale-Purchase ItemForm. |
| • | Table View tab - A tabular (spreadsheet style) Table View of the currently defined Sale-Purchase Items is accessible by Clicking the Table View tab at the bottom of the Sale-Purchase Item Form. |

| • | To display a specific Sale-Purchase Item record in the Record Editing section, Click on that record within the Table View section. |
| • | This Table View information may be Pinned in Place by Clicking the Pin Icon on the right. |

Sale-Purchase Items Form - with Table View tab Pinned Open
| ▪ | You may Un-Pin this Table View by Clicking the Pin Icon again. |
| ▪ | Click on any listed record to display that information in the center (Main Body) of the Form. |
| • | Each data column's Header Name describes the data contained in that column. |
| ▪ | Clicking on a Header Name will set the order in which the (Sale-Purchase Items) data will be listed. |
| ▪ | Clicking on the same Header Name will set the order in the opposite direction (ascending vs. descending). |

| ▪ | The Header Name that is determining the Order of the (Sale-Purchase Items) data, will have an Icon - indicating the Order in which it is displayed - to the right of that Header Name. |

| ▪ | Use the Slide Bar at the bottom of the Purchase Items list to see the data listed in all of the columns. |
| • | There are eight columns of data in this Purchase Items listing: |
| 1) | Sale Item ID - The Code representing this Sale-Purchase Item. |
| 2) | Description - The Description of this Purchase Item. |
| 3) | Item Type - B = Both; S = Sale; P = Purchase |
| 4) | Price - The Retail Price for this Purchase Item. |
| 5) | Part - If this Sale-Purchase Item entry represents an Inventory Item it will be True ("T"), otherwise it will be False ("F"). |
| 6) | Price In - This is the Wholesale (Cost) of this Purchase Item. |
| 7) | APID - This is the record number of the Vendor from whom this Purchase Item is generally purchased. |
| 8) | SA Account - For General Ledger System Users: this is the General Ledger Sales Account - if assigned to this Purchase Item entry. |
| □ | Filter buttons - There are two Filter buttons on the Sale-Purchase Items Form. |
| • | These Filter buttons may be used individually, or together, to limit which Sale-Purchase Items are available for review. |

Group and Vendor Filter buttons on the Sale Purchase Items Form
| 1. | Group - Click the Group button to limit the Sale-Purchase Items listed on the Table View tab, and therefore available to be seen on the Edit View tab, to only those that are assigned to the selected Sale Item Group(s). |
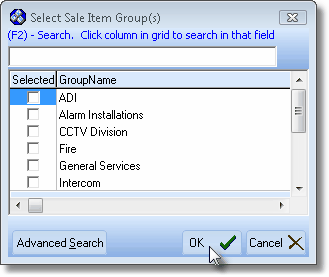
Select Sale Item Group(s) dialog
| • | Using the Select Sale Item Group(s) dialog, Check one or more Group Names, that the Sale-Purchase items you want to view, are assigned. |
| • | Click the GroupName header bar to re-order the list, alphabetically (first Click displays last to first, second Click returns it to first to last - alphabetically). |
| • | (F2) - Search - If the complete list of names cannot be seen on this screen: |
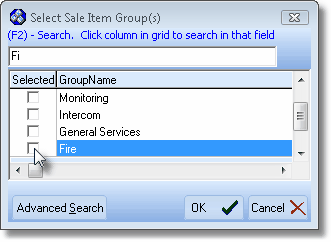
(F2) Search function on Select Sale Item Group(s) dialog
| ▪ | Click on any name within the GroupName list. |
| ▪ | Type the first few letters of that desired Group Name. |
| ▪ | Based on your entry, the record will be highlighted so that you may easily Check it. |
| • | Advanced Search - You may also use the Advanced Search dialog to Select a specific Group Name. |
| • | Click the OK ü button to save your Group filter selection(s). |
| 2. | Vendor - Click the Vendor button to limit the Sale-Purchase Items that are available for viewing to those whose preferred Vendor matches (one of) the Selected Vendor(s). |
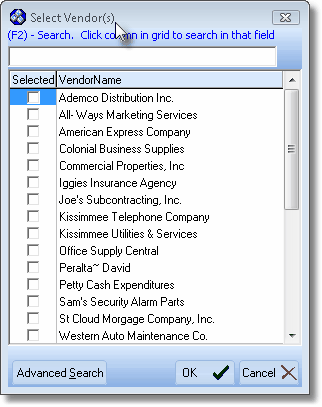
Select Vendor(s) dialog
| • | Using the Select Vendor(s) dialog, Check one or more Vendor Names, that the Sale-Purchase items you want to view, are assigned as their preferred Vendor. |
| • | Click the VendorName header bar to re-order the list, alphabetically (first Click displays last to first, second Click returns it to first to last - alphabetically). |
| • | (F2) - Search - If the complete list of names cannot be seen on this screen: |
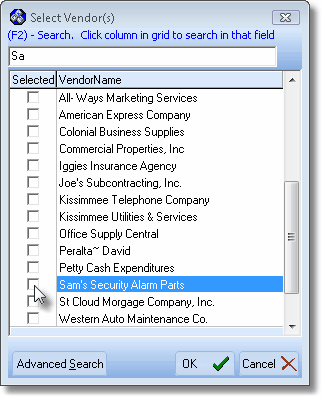
(F2) Search function on Select Vendor(s) dialog
| ▪ | Click on any name within the VendorName list. |
| ▪ | Type the first few letters of that desired Vendor. |
| ▪ | Based on your entry, the record will be highlighted so that you may easily Check it. |
| • | Advanced Search - You may also use the Advanced Search dialog to Select a specific Vendor. |
| • | Click the OK ü button to save your Vendor filter selection(s). |
| 3. | Clear Filter(s) - You may use these Filter buttons individually, or together. |
| • | Once a filter has been set the Clear Filter(s) button is displayed (see mouse pointer in illustration above). |
| • | If you want to be able to view all of the Sale Purchase Item records you must Click the Clear Filter(s) button (which is only available if a Filter is active). |
| □ | There are three general types of Sales-Purchase Items that you will need to define so you can record the Expense transactions in the Accounts Payable System. |
| 1. | General Expenses such as Office Supplies, Phone Bills and the like. |
| 2. | Recurring Purchases - similar in concept to billing Recurring Revenue except that it represents bills you get regularly for the same amount each month such as Rent and Vehicle Payments. |
| 3. | Inventory items (usually Parts - and so they are often used as both Sale and Purchase items). |
| • | Inventory items are entered in the same manner as the ones above but are generally assigned an Item Type of Both. |
| • | Both indicates that the Sale-Purchase Item represents an item you both Buy and Sell (like system parts purchased for resale). |
| □ | To create a Purchase Category: on the Main Menu Select the Maintenance Menu and Choose Sales - Purchase Items |
| • | Click the New (/) Icon to start the Purchase Category entry. |
| • | Item ID - and enter a unique ID consisting of up to 40 alpha-numeric characters, with spaces and most punctuation marks permitted, also. |
| • | Item Type - Enter the type of Purchase Item as either a Purchase or Both (which indicates this item is a Part or Service that could be bought and sold and so would be used for Both cases) using the Drop-Down Selection List provided. |
| • | Purchase GL # - If this Sale-Purchase Item is assigned an Item Type of Purchase, or represents Both a Sale and a Purchase item, both the Sale GL # and the Purchase GL # must be entered using the Drop-Down Selection List provided. |
| • | Dept - If you are using the General Ledger System and have initiated the use of multiple Departments, enter the appropriate Department using the Drop-Down Selection List provided. |
| ▪ | If you have implemented multi-departmental accounting, this field is also Mandatory. |
| • | Retail Price - Enter the usual Retail Price for this item (suggested, but not mandatory, unless this is a item that will be part of your Inventory and you're using the Inventory Tracking System) |
| • | Non Report - If the Item Type is Purchase, do not Check this box. |
| • | If the Item Type is Both Check the Non Report box if this item should not be included in certain Sales Analysis Reports. |
| • | Show on Proposal - If the Item Type is Purchase, do not Check this box. |
| • | If the Item Type is Both, Check Show on Proposal if this is Both for a Purchase and a Sales item that might need to be included on a Proposal. |
| • | Description - Enter a clear, concise description of this Purchase Item. |
| • | You may enter up to 70 alpha-numeric characters, upper and lower case letters are allowed, most punctuation marks, with spaces permitted, also. |
| • | Proposal Description - If the Item Type is Purchase, this button will not be available. |
| • | If the Item Type is Both, Click the Proposal Description at the top of the Form to create a longer and more detailed description of this Sale-Purchase Item. |
| • | This expanded description will be shown in addition to the Description field information on all Proposals containing this Sale-Purchase Item. |
| • | Price In - Optionally, you may enter the Price In for this item, regardless of whether it is Both a Purchase and a Sale, or just a Purchase. |
| • | This will be the default price for the item when entering a Bill. |
| ▪ | If Average Inventory Costing is selected as the Inventory Valuation Method, the system maintained Price In field is the Average Price Paid for this Inventory Item, and the system maintained total Value field is computed by multiplying that Price In Amount by the On Hand Quantity. |

| ▪ | When entering a Sales Invoice: |
| a) | If AR Taxable? is Checked, whenever this Sale-Purchase Item is entered on a Sales Invoice, the appropriate Tax Code & Tax Percentage Rate will be inserted automatically, based on the Sales Tax information entered in the Accounting Info Tab for that Subscriber. |
| b) | If Not Checked, whenever this Sale-Purchase Item is entered on a Sales Invoice, the Tax Code will be entered as N (Non) and the Tax Percentage Rate set set at 0%, regardless of the Sales Tax information entered in the Accounting Info Tab for that Subscriber. |
| • | AP Taxable? - Under Development - If present, Check this box if this Sale-Purchase Item is normally Taxable when making a Purchase. |

| ▪ | When entering a Bill (Purchase Invoice) Under Development: |
| a) | If AP Taxable? is Checked, whenever this Sale-Purchase Item is entered for a Bill (Purchase Invoice), the appropriate Tax Code will be inserted, and the Tax Percentage Rate will be used to calculate the Sales Tax Amount based on the Sales Tax information entered in the Vendor Tax Information tab for that Vendor. |
| b) | If Not Checked, whenever this Sale-Purchase Item is entered for a Bill (Purchase Invoice), the Tax Code will be entered as No and the Tax Amount set at 0%, regardless of the Sales Tax information entered in the Vendor Tax Information tab for that Vendor. |
| • | Commission Points - Enter a Point Value (representing its approximate cost) if this Sale-Purchase Item earns Commissions Points for the Salesperson when it is sold. |
| ▪ | The Commission Points assigned to a Sale-Purchase Item should represent an approximate Cost for the acquisition and installation of the component. |
| ▪ | Commission Points are assigned a Point Value - on an Employee by Employee basis - in the Personal tab of the Employee Form. |
| • | Optionally, you may also assign a Sale Item Group using the Drop-Down Selection List provided. |
| • | If you have a large quantity of Sale-Purchase Items, Sale Item Grouping allows you to select the desired Sale-Purchase Item from a pre-limited list (based on the Sale Item Group assigned to it). |
| • | The Advanced Sale Item Lookup function (accessed with Alt+F2 from within the Sale-Purchase Item Drop-Down Selection List on Sales, Proposal and Purchases Forms) lets you pick from items only in a specific group - thereby presenting a much shorter list. |
| • | Vendor Item ID - The Vendor Item ID button at the top of the Form allows you to enter the Part Numbers used by each of the Vendors from whom you order this Purchase Category. |
| • | If you selected Purchase or Both and are using the Accounts Payable System, Click the Vendor Item ID and Add the Part Number (Vendor's specific Part # ID) for each of the Vendors from whom you make this purchase. |
| • | Click the  Icon to record this Purchase Category entry. Icon to record this Purchase Category entry. |
| • | Any number of additional Purchase Category records may be defined. |
Inventory Tracking & Job Costing considerations
| • | Job Cost Categories: For Purchase Items that are not Inventory Items, but would still be used for Job Costing Expenses, complete this information. |

Sale-Purchase Item Form - Job Cost Categories section
| • | Expense Category - Use the Drop-Down Selection List to Choose the appropriate Job Cost Category. |

| • | Labor Hours - ("Lbr. Hours") allows you to define - when this is an Inventory Item - the number of hours this Part takes to be installed. |
| • | Cost Labor Rate - ("Cost Lbr. Rate") allows you to define - when this is an Inventory Item - the cost for each hour this Part takes to be installed. |
| • | Retail Labor Rate - ("Retail Lbr. Rate") allows you to define - when this is an Inventory Item - the retail price for each hour this Part takes to be installed. |
| • | Click the  Icon to record this Purchase Category entry. Icon to record this Purchase Category entry. |
| • | Inventory - Complete the Inventory related fields. |

Sale-Purchase Item Form - Inventory section
| • | Inventory Info - Complete the Part Group, Preferred Vendor and Price In information. |
| ► | Note 1: The illustration below may be different based on the Inventory Valuation Method selected (see the "Inventory Valuation Methods" chapter) which in this case is LIFO. |

Inventory Info section - LIFO Valuation Method
| ► | Note 2: The illustration below may be different based on the Inventory Valuation Method selected (see the "Inventory Valuation Methods" chapter) which in this case is the Average Inventory Item Valuation Method. |
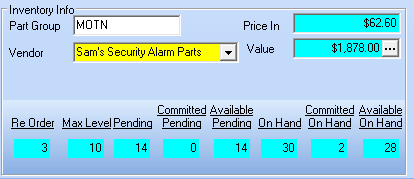
Inventory Info section - Average Inventory Item Valuation Method
| • | Click the  Icon to record this Inventory Item as a Purchase Category entry. Icon to record this Inventory Item as a Purchase Category entry. |


![]()

![]()
![]()
![]()


![]()


