| □ | Sales Analysis - the process of carefully reviewing by whom, within what department or division, what you have sold, and when. |
| • | The Sales Analysis Report provides all the answers to all of those questions. |
| • | To Print the Sales Analysis Report, from the Main Menu, Select Reports, Choose the Accounts Receivable sub-menu, and Click Sales Analysis. |
| □ | Sales Analysis Report tabs - There are three tabs on the Sales Analysis Report dialog. |
| • | Options - Initially only the Options tab is shown (until you make your Options selections and Select Print). |

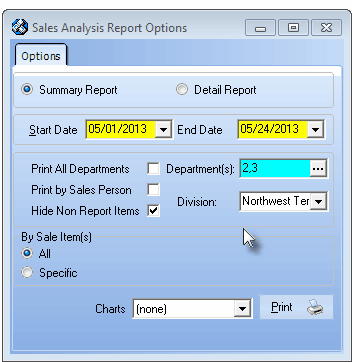
Sales Analysis Report - Options tab
| • | Report Type - By default, Summary is selected. |
| ▪ | Click Detail to include the Line Item Detail for each (requested) Invoice item that was created. |
| • | Period To Preview - By default, the Start Date will be the first day of the current month, and End Date will be Today. |
| ▪ | If required, use the Drop-Down Date Selection Box to enter a different Date Range. |
| • | Print All Departments - By default, all Departments will be included. |
| • | Department(s) - To print a Sales Analysis Report for a specified set of (one or more) Departments: |
| ▪ | Uncheck the Print All Departments box. |
| ▪ | Click the Ellipse in the Department(s) field to open the Select Department dialog. |
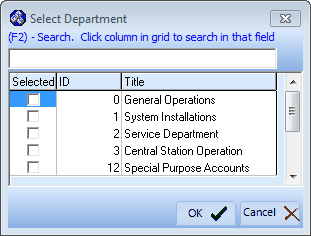
Select Department dialog
| ▪ | Check the Selected box for each Department that is to be included in the report. |
| ▪ | Click the OK ü button to Close the Select Department dialog. |
| ▪ | The Selected Department Number(s) will be inserted into the Department(s) field. |

| ◆ | Once the Print All Departments option is Un-Checked, printing the report for a User Specified set of (one or more) Department(s) becomes the default. |
| o | To return the default to Print All Departments, Re-Check that box. |
| • | Print by Sales Person - By default, this Sales Analysis Report will print in Sales Category Code order. |
| ▪ | Check the box to print in Sales Person order, and within ear Sales Person - in Sales Category Code order. |
| ▪ | Once the Print by Sales Person default setting is changed, printing the report in Sales Person order becomes the new default. |
| ▪ | To return the default to Sales Category Code order, Un-Check the Print by Sales Person box. |
| • | Hide Non-Report Items - By default, all Sales Category Codes are included in the Sales Analysis Report. |
| ▪ | Check this box and the Sale-Purchase Items marked as Non Report items will be excluded from this report. |
| ▪ | Once the Hide Non-Report Items default setting is changed, this becomes the new default. |
| ▪ | To return the default to including all Sales Category Codes, Un-Check the Hide Non-Report Items box. |
| • | Division - By default, no Division is selected, therefore all Divisions will be reported. |
| ▪ | Use the Drop-Down Selection List to Choose to report only the Sales entered for a specific Division, or |
Sales Analysis Report Options - options entered
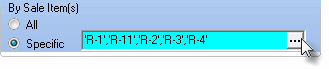
| • | By Sale Item(s) - Sometimes, it may be useful to print this Sales Analysis Report for a selected set of Sales Category Codes. |
| ▪ | All - Click this button to include all of the Sales Category Codes (or all except those that have been Hidden based on the Hide Non-Report Items option). |
| ▪ | Specific - Click this button and then Click the Ellipse to select any number of Sales Categories using the Select Sale Items dialog provided. |
| o | If the Specific option was selected the last time this report was printed, it will be the default choice until the All option is selected as the most recent By Sale Item(s) choice. |
| o | If the Specific option was chosen the last time this report was printed, the Select Sale Items selections made at that time will become the new default. |
| o | In either case, the All or Specific options may be chosen and the Select Sale Items selections may be changed, as needed. |
| • | Charts - Using the Drop-Down Selection List provided, you may request that a Pie or Bar Chart be included as part of this report's output (see sample below). |
| ▪ | This Chart capability is offered with the Sales Person, Division and/or Department options available above. |
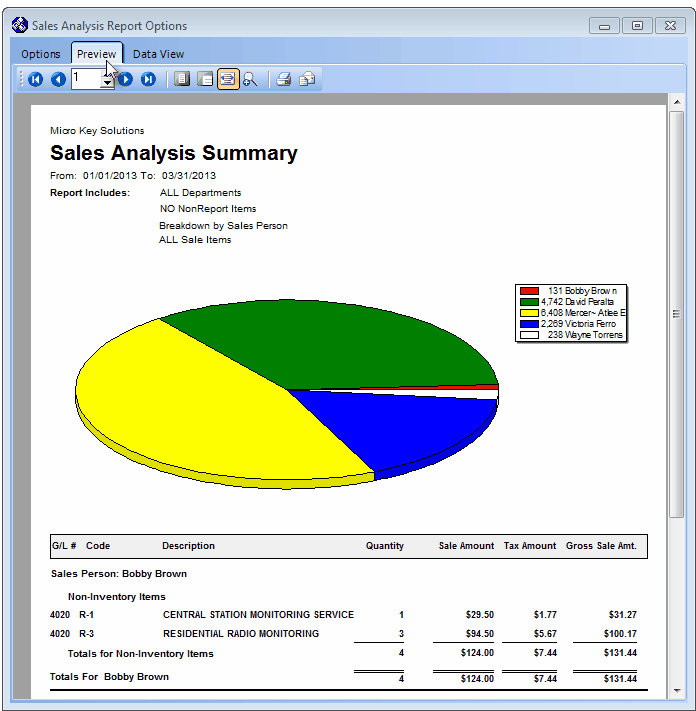
Sales Analysis Report - Preview tab showing Pie Chart style sorted by Sales Person
| • | Print - Click the Print button  to Preview and optionally Print (to a File or a Printer) this Sales Analysis Report (see sample below). to Preview and optionally Print (to a File or a Printer) this Sales Analysis Report (see sample below). |
| ► | Note: The report is automatically divided by Non-Inventoried Items and then Inventory Items sold. |
| • | Preview - The Preview tab presents the report which resulted from the Options you've selected. |
| • | Up Arrow/Down Arrow - hi - Moves the report one line up, or one line line down, respectively. |
| • | Page Up/Page Down - Moves the report to the previous or next page, respectively. |
| ◆ | If the Summary report option is selected, when Previewing the Sales Analysis Report you may Click any Sales Category Code listed on the report to expand that item to include all of the associated Line Item Detail. |
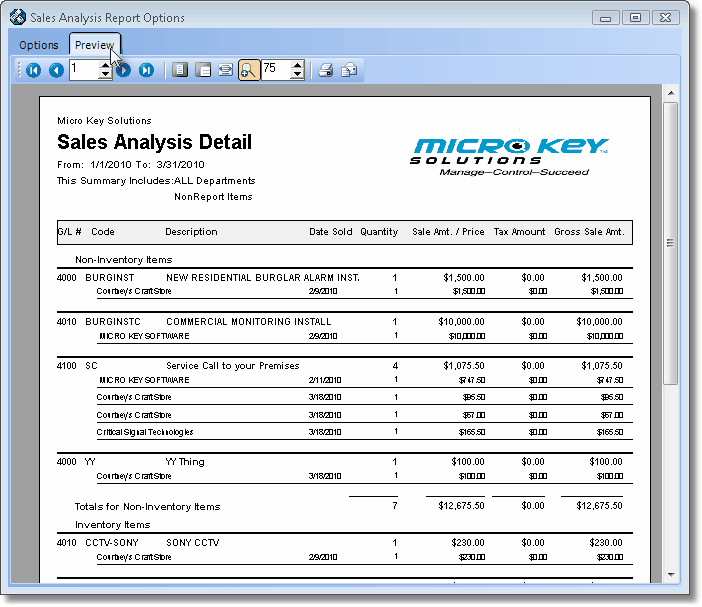
Sales Analysis Report - Detail Preview
| • | Home -  - Using either the screen or your Keyboard's Home key, moves the report to the top of the first page. - Using either the screen or your Keyboard's Home key, moves the report to the top of the first page. |
| • | End -  - Using either the screen or your Keyboard's End key, moves the report to the bottom of the last page. - Using either the screen or your Keyboard's End key, moves the report to the bottom of the last page. |
| • | Arrows - The arrows allow you to move back and forth, from page to page. |
| • | Number - Indicates the page number you are viewing. |
| ▪ | You may also type in a specific page number, Press 8 Enter and that page will be displayed immediately. |
| ▪ | If you enter an invalid page number, it will be ignored. |
| • | Fit To Page - Click the first button after the arrows to size a full page of the report to fit the screen. |
| • | Zoom To 100% - Click the second button after the arrows to display the page at 100% (of the printed view). |
| • | Fit To Page Width - Click the third button after the arrows to size the page of the report to fit the full width of the screen. |
| • | Zoom To Percentage - Click the fourth button after the arrows to re-size the page of the report by percentage. |

| ▪ | When you Click the Zoom To Percentage button, the Percentage selector will be displayed. |
| ▪ | You may then Click the Up or Down ‚ arrow to set the exact amount of Zoom you want. |
| • | Print - Click the Print button to Print (to a File or a Printer)  the displayed Sales Analysis Report. the displayed Sales Analysis Report. |
| • | Email - Click the Email button  to send the Report to an Email Address of your choosing. to send the Report to an Email Address of your choosing. |
| • | To Exit the Preview tab and Close this Report dialog Form, Click the Close button x on the right at the top of the Preview tab. |
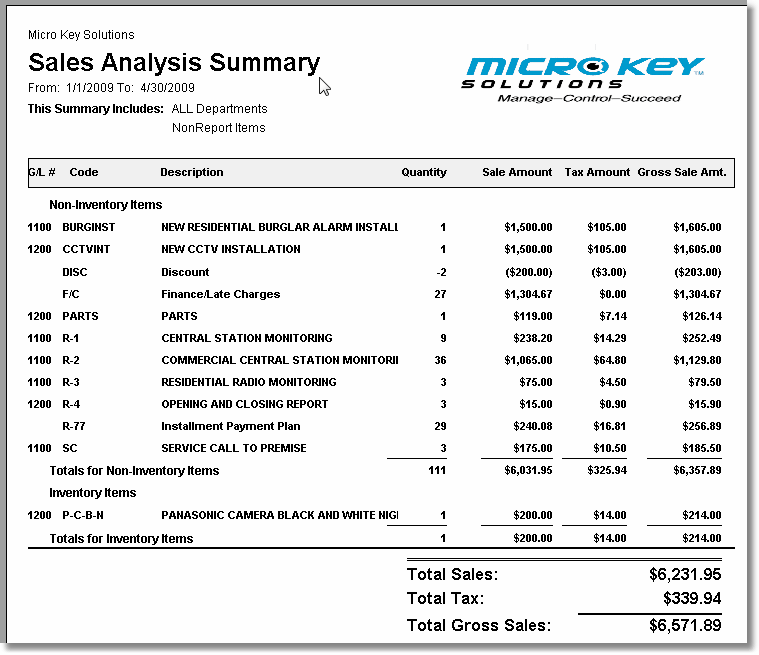
Sales Analysis Report Summary sample
.
| • | Data View - This view provides a tabular (spreadsheet style) presentation of the selected data. |
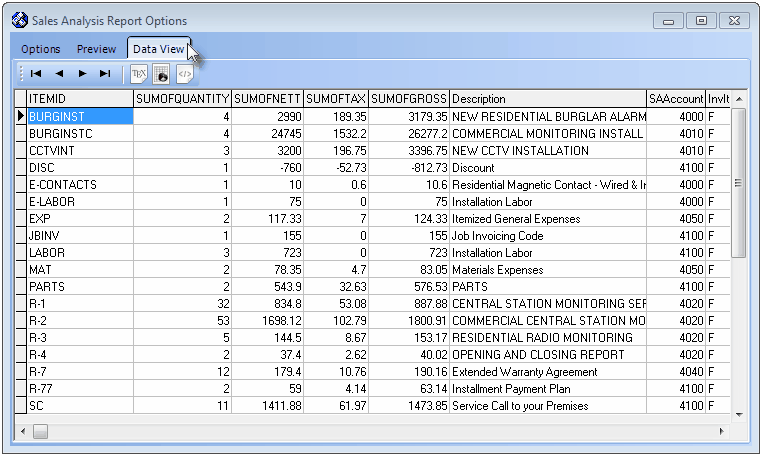
Sales Analysis Report - Data View
| • | Arrows - Click the arrows to move through the record. |
| • | Export - Exporting the data from this Data View tab (note the "fly-over" help available on these buttons): |
| ▪ | Export to CSV - Click the first button after the arrows to export the data to a Comma Separated Values (CSV) file format. |
| ▪ | Export To Excel - Click the second button after the arrows to export the data to an Excel (.xls) file format. |
| ▪ | Export To Html - Click the third button after the arrows to export the data to an HTML formatted file. |
| • | To Exit the Data View tab and Close this Report dialog Form, Click the Close button x on the right at the top of the Data View tab. |

