| □ | Many Companies create separate business Divisions: |
| • | Divisions allow a Company to define and separate certain business related entities within their Company - either for territorial reasons or for product line differentiation - into specific Company Divisions. |
| • | Divisions also allow a Company to perform Dealer Billing for the companies for whom they are providing Contract Monitoring Services. |
| • | This is accomplished by having each Dealer's Company Name (and your Company's PO Box) automatically printed on the Recurring Revenue Invoices being mailed (or Emailed) to the Dealer's Subscribers. |
| • | When payment is received for the Dealer's Invoices, your Company can subtract the Contract Monitoring Service Fees and send the Balance of those Receipts to the Dealer. |
| ◆ | Divisions are generally implemented to identify specific business related entities, regions (territorial or functional) or any other sub-divisions within the Company, and/or to allow the creation of custom Invoice and Work Order headers to accommodate multiple offices within the same Company, and/or to accommodate Dealer Billing. |
| • | Each Division Group may have any number of Divisions as Members of that Group. |
| • | A Subscriber may only be assigned to one Division. |
| ◆ | Departments, unlike Divisions, are used specifically for Financial Transaction Tracking purposes only - usually to identify a Work Group or Profit-Center within the Company. |
| • | To accommodate this, any number of Division Codes may be created. |
| • | Once created, these Division Codes will be assigned to Subscribers for future sorting, billing and reporting purposes. |
| • | In addition, these Company Divisions may each have their individual Company Return Address Information printed on their Subscriber's Invoices and Statements. |
| • | The ability to Print individualized Division return addresses eliminates the need to have multiple sets of Invoice Forms - one for each different Division's (or Dealer's) return address. |
| • | This capability allows you to bill the Recurring Revenue for those Dealers who have contracted for monitoring services with your Company, because each Dealer will have their own individualized Invoices. |
| ► | Note 1: Division Codes normally used to manage Dealer Billing may - if you do not need to do Dealer Billing - have other uses instead such as providing for the grouping of your Subscribers for many reasons (ex. Service Areas, System Types, Language spoken, etc.). |
| ► | Note 2: However, regardless of whether you are performing the Alarm Dealer's Recurring Revenue Billing Service, if your Company is providing Contract Monitoring Services for other Alarm Dealers, the actual Alarm Dealer information must also be defined. |
| ◆ | See the Dealers Chapter for more information. |
| • | From the Main Menu Select the Maintenance Menu and Choose the Accounts Receivable Sub-menu. |
| • | Click on the Divisions option to view the Divisions Form shown below. |
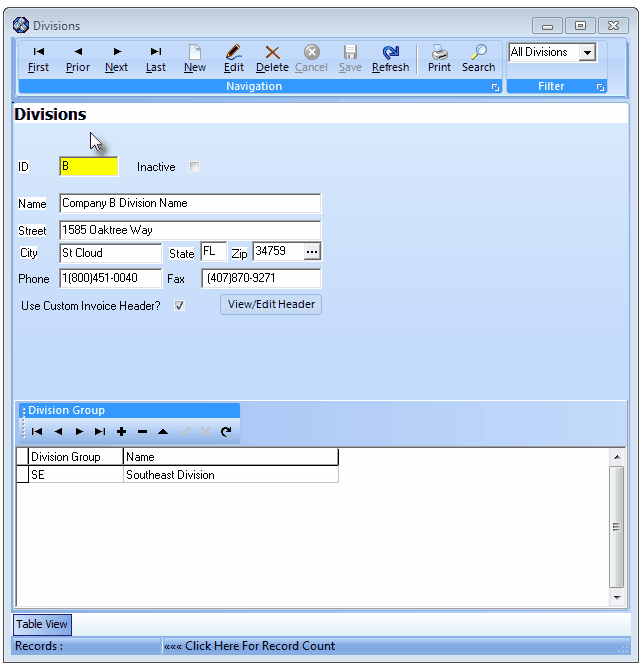
Divisions Form
| • | This Divisions Form may be Re-sized by Dragging the Top and/or Bottom up or down, and/or the Right side in or out. |
| • | Navigation Menu - The Navigation Menu is located at the top of the Divisions Form. |

| • | This Navigation Menu provides the normal Record Movement, New, Edit, Delete, Cancel, Save, and Refresh options; as well as special Print, Search and Filter functions. |
| • | Record Editing section - The details of the currently selected record are displayed below the Navigation Menu at the center (Main Body) of the Divisions Form. |
| • | Table View tab - A tabular (spreadsheet style) Table View of the currently defined Divisions is accessible by Clicking the Table View tab at the bottom of the Divisions Form. |

| • | To display a specific Division record in the Record Editing section, Click on that record within the Table View section, or use the Search Icon (see the "Using the Special Functions" section later in this chapter). |
| • | This Table View information may be Pinned in Place by Clicking the Pin Icon on the right. |
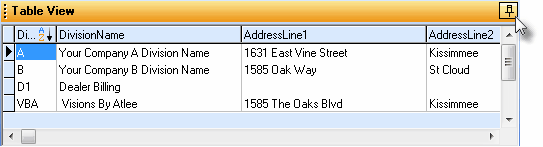
Divisions Form - with Table View tab Pinned Open
| ▪ | You may Un-Pin this Table View by Clicking the Pin Icon again. |
| ▪ | Click on any listed record to display that information in the center (Main Body) of the Form. |
| • | There are ten columns of data in this Divisions Record Listing: |
| 1) | Division - The unique Tax Rate ID of up to fifteen (15) alpha-numeric characters - typically the State Code, sometimes plus an additional letter or number. |
| 2) | Division Name - The Name for this Division |
| 3) | Address Line 1 - The first address line (actual street number and name) for this Division |
| 4) | Address Line 2 - The City for this Division |
| 5) | Address Line 3 - The State for this Division |
| 6) | Zip - The Zip code for this Division |
| 7) | Phone - The telephone number for this Division |
| 8) | Fax - The fax number for this Division |
| 9) | Use Custom Invoice Header - True ("T") if a Custom Header is defined. False ("F") if not. |
| 10) | Custom Invoice Header - A Memo field containing the Custom Header formatting information which may be displayed by Double-Clicking the field. |
| 11) | Inactive - A True/False column indicating whether this is an Inactive (True), or Active (False) Division. |
| • | Each column's Header Name describes the data contained in that column. |
| ▪ | Clicking on a Header Name will set the order in which the Divisions will be listed. |
| ▪ | Clicking on the same Header Name will set the order in the opposite direction (ascending vs. descending). |

| ▪ | The Header Name that is determining the Order of the list will have an Icon indicating the Order displayed next to that Header Name. |
| • | To define a Division to be used for identifying a section of the Company, or an Alarm Dealer: |
| • | Click the  Icon to start a Division entry in the Record Editing section. Icon to start a Division entry in the Record Editing section. |
| ▪ | ID - Enter a unique Division ID composed of 1 - 4 alpha-numeric characters. |
| o | Letters will NOT be capitalized automatically so if you want a capital letter, enter it as such. |
| o | Normal punctuation such as a dash, underline or asterisk are permitted. |
| ▪ | Inactive - Check this box if this Division is no longer being used. |
| o | A Filter (see "Using the Special Functions" below) may be applied whereby All Divisions, only Active Divisions, or only Inactive Divisions may be viewed. |
| ▪ | Name - Enter the Name for this Division |
| ▪ | Street - Enter the Street Address |
| ▪ | State -Enter the State code (or appropriate governmental entity name). |
| ▪ | Zip - Enter the Zip (or Postal) code. |
| ▪ | Phone - Enter their main telephone number |
| ▪ | Fax - Enter their dedicated Fax line number. |
| ▪ | Use Custom Invoice Header - Check this box to activate a Custom Header. |
| o | See the "Creating a Custom Header for this Division" section below. |
| • | Click the  Icon to to record this Division. Icon to to record this Division. |
| • | Any number of additional Divisions may be identified, as required. |
| □ | Creating a Custom Header for this Division: |
| • | If you want to create a customized header for their Sales Invoices so that each Division's Invoices and Statements are printed with their own Invoice/Statement Header information |
| • | Check Use Custom Invoice Header? |
| • | Click the Icon to save Use Custom Invoice Header? Check mark. |

| • | Click the View/Edit Header button to design the header. |
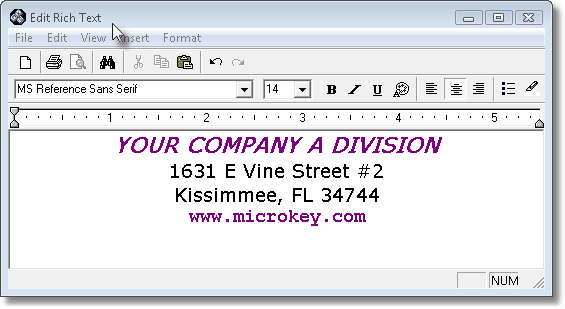
| • | Create the desired header using the Edit Rich Text screen (shown immediately above) which allows word-processor style selectivity of text fonts, sizes, centering and coloration. |
| • | Click File then Save and Exit, or simply Press the Control key and the letter "S" (Ctrl+S). |
| • | If asked, Click Yes to record this new/revised Custom Invoice Header information. |
| • | If the Division Codes feature is being used to provide individualized Invoice Headers, you also must update the Company Options information to recognize this Invoice format change: |
| • | From the Main Menu, select Maintenance and Click User Options. |
| • | Uncheck the Use Pre-Printed Invoices? box to allow MKMS to insert the Division Custom Invoice Header information in lieu of what would be on a pre-printed Invoice Form. |

| • | Click OK to save the change. |
| • | Therefore, you may use Custom Invoice Header information instead of Pre-Printed Invoices for every Invoice/Statement/Service Request you print. |
| • | As seen above, individualized Invoice Headers may be created for any number of your Company's Divisions. |
| • | In addition, you may also create a generic Invoice Header for any Subscriber who has not been assigned to a Division - thus eliminating the need for using any pre-printed Invoice Forms. |
| ▪ | Check the Use Custom Invoice Header? box. |
| ▪ | Click View/Edit to create the Custom Invoice Header information (see the instructions above) |

| ▪ | Click OK to save the Invoice Header. |
| ◆ | Pre-Printed Invoice Forms versus using Custom Invoice Headers: |
| ▪ | You may use Pre-Printed Invoices for those Subscribers that have NOT been assigned a Division code, and still have Custom Invoice Headers printed for those Subscribers that DO a Division code assigned. |
| ▪ | Or you may define a generic Custom Invoice Header for use by all Subscribers except those that have been assigned a Division's Custom Invoice Header thereby eliminating the need for any Pre-Printed Invoice Forms. |
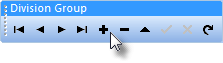
| • | Just below the Division Group bar: |
| • | Click Add ("+") and then Click on the blank Division Group field. |
| ▪ | Division Group - Using the Drop-Down Selection List provided, Choose the appropriate Division Group Code. |
| ▪ | Name - Press the Tab D key and that Division Group's Name will be inserted. |
| • | Click Save ("ü") to record your entry. |
| • | Repeat as needed to identify all of the Division Groups to which this Division is to be assigned. |
| □ | Using the Special Functions - Located on the Navigation Menu at the top of the Divisions Form: |
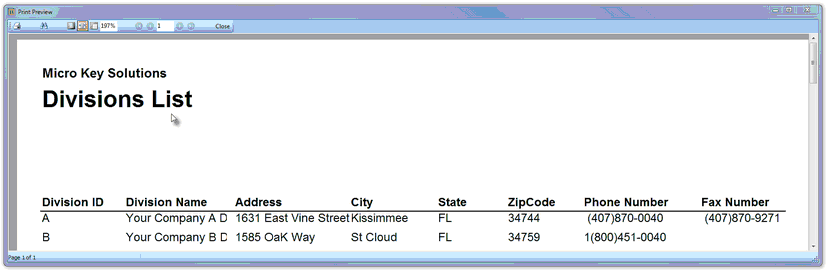
| • | Print - Click the Print Icon to View and/or Print a list of the Divisions. |
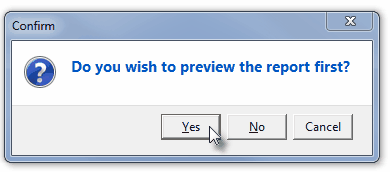
| • | Yes - Click the Yes button to View a copy of the report. |
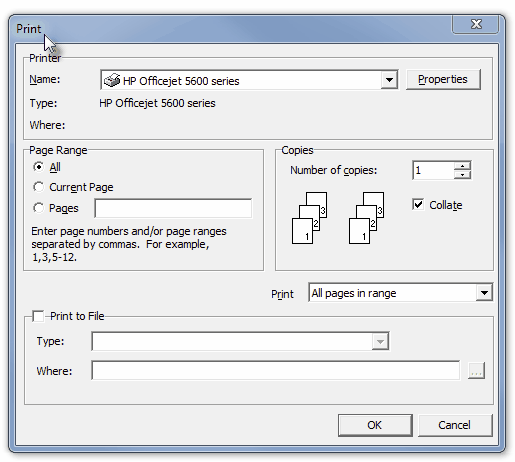
| • | No - Click the No button to open the Windows® Print dialog where a copy of the report may be sent to a selected Printer, or Printed to a File. |
| • | Cancel - Click the Cancel button to close this Print question and return to the Form. |
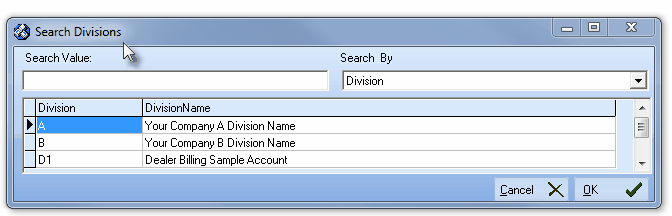
| • | Search - Click the Search Icon to open the Search Divisions dialog. |
Search dialog
| • | See the "Using the Generic Search dialog" section in the Advanced Search Dialog chapter for more information about this Search dialog. |
| • | Filter - Because certain Divisions may no longer be used - and have been marked as Inactive (see above) - when viewing this General Ledger Accounts Form the User may specify whether to see All Divisions, only Active Divisions, or only Inactive Divisions, as needed. |
| • | Use the Drop-Down Selection List provided to Choose the desired type of Division records. |

