| □ | There are two methods available to post Receipts from your Subscribers. |
| • | This selection is for posting Receipts one at a time - such as when you are entering the initial Sale and the associated Receipt from a new Subscriber. |
| • | This selection is for posting a group of Receipts in the quickest manner possible. |
| 3. | Choose the Receivable Quick Access Menu bar on the Subscribers Form. |
| 4. | Click the Receipts to display the Receipts Form shown below. |
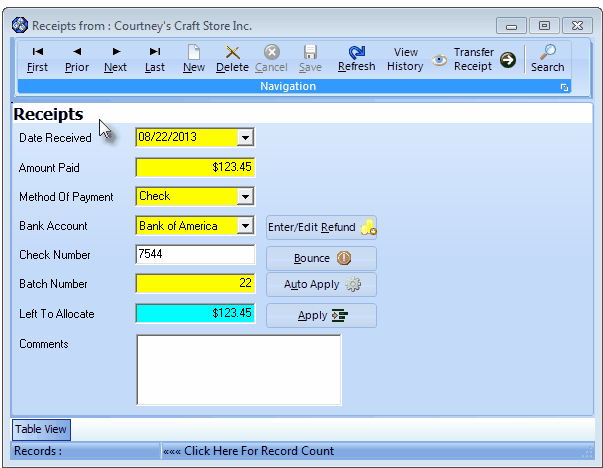
Receipts Form
| • | This Receipts Form may be Re-sized by Dragging the Top and/or Bottom up or down, and/or the Right side in or out. |
| • | Navigation Menu - The Navigation Menu is located at the top of the Receipts Form. |

Receipts Form - Navigation bar
| • | This Navigation Menu provides the normal Record Movement, New, Edit, Delete, Cancel, Save, and Refresh options; as well as a Transfer Receipt and Search function. |
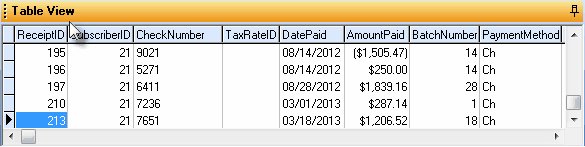
| • | Table View tab - Click the Table View tab at the bottom of the Receipts Form to display a tabular (spreadsheet style) Record Listing of the currently definedReceipts. |

| • | To display a specific Receipt record in the Record Editing section, Click on that record within the Table View section, or use the Search Icon (see the "Using the Special Functions" section later in this chapter). |
| • | There are many columns of data in this Receipts Record Listing: |
Receipts Form - Table View tab
| • | Each column's Header Name describes the data contained in that column. |
| ▪ | Clicking on a Header Name will set the order in which the Receipts will be listed. |
| ▪ | Clicking on the same Header Name will set the order in the opposite direction (ascending vs. descending). |

| ▪ | The Header Name that is determining the Order of the list will have an Icon indicating the Order displayed next to that Header Name. |
| • | Receipts are initially recorded as an Amount Paid to your Company on a Subscriber's Account - a Deposit. |
| • | Basically, the Receipt entry documents when (the day received and the batch number it was assigned to), how (check, credit card, cash, etc.) it was paid, how much was paid, and where (into which Bank account) it was deposited. |
| • | Once recorded, the Receipt may be Allocated to specific Invoices, to the oldest Invoice with an outstanding balance, or however else you choose. |
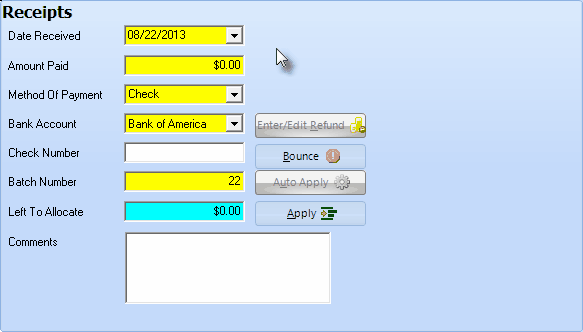
| ▪ | Receipts that have been fully Allocated will show a Left To Allocate balance of $0.00. |
| ▪ | Receipts that were automatically posted and Allocated using the Auto Draft feature will have a message identifying that process next to the Date Received field. |
| • | Click the  Icon to start the Receipt entry in the Record Editing section. Icon to start the Receipt entry in the Record Editing section. |
| ▪ | Date Received - Today is the default, but - using the Drop-Down Date Selection Box - another Date may be Chosen. |
| ▪ | Amount Paid - Enter the Amount of the Receipt. |
| o | A negative Amount [i.e., -1.00, or (1.00)] is not permitted. |
| ▪ | Method Of Payment - Check is the default, but - using the Drop-Down Selection List - another Payment Method may be Chosen. |
| o | The eight Methods of Payment are: |
| 1) | American Express - charged to this Credit Card |
| 2) | Cash - received an actual Cash payment |
| 3) | Check - paid with a Business or Personal Check |
| 4) | Discover - charged to this Credit Card |
| 5) | Electronic Transfer - received Direct payment from Subscriber's Bank |
| 6) | MasterCard - charged to this Credit Card |
| 7) | Visa - charged to this Credit Card |
| 8) | Other - paid via "In-Kind" or with something else of value |
| o | If needed, use the Drop-Down Selection List to Choose a different Bank Account into which these funds will be deposited. |
| ▪ | Check Number - Enter the Check's Number, or any other appropriate identifying number (such as the last 4 digits of a Credit Card) for this Receipt. |
| ▪ | Batch Number - Enter the appropriate number which, by default, will be today's date number but may be changed as needed. |
| o | Batch Numbers may be assigned from 1 to 32637 (this limitation is a function of the field type into which you are entering this Batch Number). |
| a) | You may start a new numbering sequence each month (using the current Date's Day number), so the same Batch Number will be used in multiple Months but the date will be different. |
| b) | In some cases, you may use the same Batch Number for more than one day to group certain of these types of payments together. |
| c) | You may use multiple Batch Numbers within the same day to separate Credit Card transactions from Cash Receipts, and to separate those Receipts from EFT funds. |
| d) | You may start from 1 and increment the Batch Number perpetually (if you used 2 batch numbers for two deposits every day, 5 days a week, it would take over 60 years to use all of the numbers). |
| e) | The down side of the second method is that you must keep track of the next number to be used. |
| f) | MKMS automatically records Receipts in an individual Month & Year group to keep them differentiated. |
| ▪ | Comments - Enter any appropriate Description or Notation relating to this specific Receipt. |
| o | This field may be used by General Ledger System Users to enter a comment that will appear in the Internal Note field of each Detail Line Item on the Transaction File Form that lists the Financial Transactions associated with, and therefore posted for, this Receipt. |
| o | This Internal Note (Comment) may be entered or modified "after the fact" (i.e., even later, after the Receipt was initially saved) in this Receipt Form and that change will appear, but cannot be modified in, the Transaction File Form. |
| • | Click the  Icon to record this Receipt entry. Icon to record this Receipt entry. |
| ▪ | Left To Allocate is listed as $0.00 until the transaction is saved. |
| ▪ | Once saved, Left to Allocate will initially be set as the Amount of this Receipt. |
| ▪ | A Receipt is essentially recorded first as a Deposit. |
| ▪ | Then, this Receipt is Allocated to (used to Pay for) a specific Invoice or perhaps toward a group of Invoices. |
| ▪ | Use either the Auto Apply or the Apply button to allocate this Receipt (see Allocating Receipts to Specific Invoices below, and the Allocate chapter). |
| ▪ | The Left to Allocate value will be maintained by the system as the Receipt is allocated. |
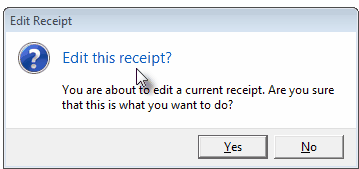
| • | Modifying a Receipt record: |
| • | Once a Receipt record is saved, if a User attempts to modify any of these fields, an Edit this receipt? dialog will be displayed to ensure that this is what the User intended to do. |
Edit this Receipt?
| ▪ | If this modification was started in error, Click the No button. |
| ▪ | If an modification is required, Click the Yes button and proceed as needed. |
| • | If the Receipt record has already been Allocated, a different Edit Receipt? dialog will be presented. |

Edit Receipt? - Receipt has been allocated
| ▪ | If this modification was started in error, Click the No button. |
| ▪ | If a modification is required, Click the Yes button. |
| ▪ | An Authorize Transaction dialog will be displayed requesting that the User specify the reason for this modification. |
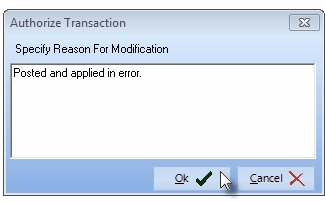
| ▪ | Enter the appropriate reason for this modification and Click the OK übutton to proceed with the required modification. |
| ▪ | Then, make the required changes and Click the Icon to record those changes. |
| o | If the Receipt is not unallocated, and a Mandatory field is changed, an error message will be displayed. |
| o | The modified record may not be saved and the Cancel button must be Clicked. |
| □ | Allocating the Receipt to one or more Invoices: |
| ◆ | Receipts must eventually allocated (i.e.,applied) to one or more Invoices. |
| ◆ | This process is referred to as "Allocating a Receipt" or "Applying a Receipt" to an Invoice. |
| • | There are three ways available for Allocating a Receipt to an Invoice: |
| 1. | Click the Auto Apply button on this Receipts Form if you want the full amount of the Receipt to be applied automatically to the Subscriber's unpaid Invoice(s), applying these funds to the oldest Invoice first, then the next, and next, until the total Amount of the Receipt has been used. |
| 2. | Click the Apply button to use the Allocated Receipts to Invoice(s) procedure to designate which Invoice(s) and/or specific Detail Line Items on Invoice(s) are to be paid with this Receipt. |
| • | Automatically Allocating the Receipt - If you want the full amount of the Receipt to be applied automatically to the Subscriber's unpaid Invoice(s), applying these funds to the oldest Invoice first, then the next, and next, until the total of the Receipt amount is used, Click Auto Apply . |
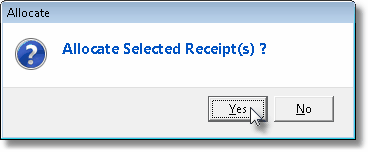
| • | Click Yes to start the Auto Allocate process or No to cancel. |
| ▪ | Allocate Receipt? - If, and only if the ChangeAllocationDate option in the Company Setting Form is set to True ("T"), the Allocate Receipt? dialog will be displayed and you may accept (by default it is set to Today), or change the Date of Allocation by using the Drop-Down Date Selection Box provided - if required, then Click OK to continue the Auto Allocate process. |
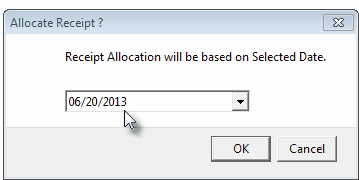
Allocate Receipt? dialog
| • | If the ChangeAllocationDate Company Setting is set to False ("F"), this dialog will not appear at all. |
| • | The Receipt will then be automatically and instantly applied, starting from the oldest Invoice and working forward, until the Receipt's value has been completely allocated. |
| ▪ | This may leave a partially paid Invoice at the end of the automatic allocation process. |
| ▪ | This may also leave a Receipt that still has a partial balance remaining to be allocated at later time, when the Subscriber has additional Invoices entered. |
| • | Manually Allocating Receipts to Specific Invoices: |
| • | Click the Apply button on the Receipts Form to use the Allocated Receipts to Invoice(s) procedure to designate which Invoice(s) and/or specific Detail Line Items on Invoice(s) are to be paid with this Receipt. |
| □ | Dealing with Bounced Checks: |
| • | Reversing Allocations because of a Bounced Check or Credit Card was Declined after an initial approval, is quick and easy - though painful in many cases. |
| • | See Bounced Checks for detailed information of how to make these changes. |
| • | See the dedicated Allocate Form's instructions for more detail on reversing Receipts that have already been allocated to Invoices. |
| • | Refunds happen, either because of an error in billing that the Account paid anyway, or caused by an adjustment offered by your Company. |
| • | See Refunds for detailed information of how to make these entries. |
| • | Sometimes Credit Memos are needed - whether to satisfy a Customer Complaint or to simply correct a Billing Error. |
| □ | Using the Special Functions on the Navigation Menu at the top of the Receipts Form: |
| • | Data entry Mistakes do happen. |
| ▪ | This includes Posting a Receipt to the wrong Subscriber. |

Receipts Form - Transfer Receipt Icon
| • | Search - Click the Search Icon to open the Search Receipts dialog. |
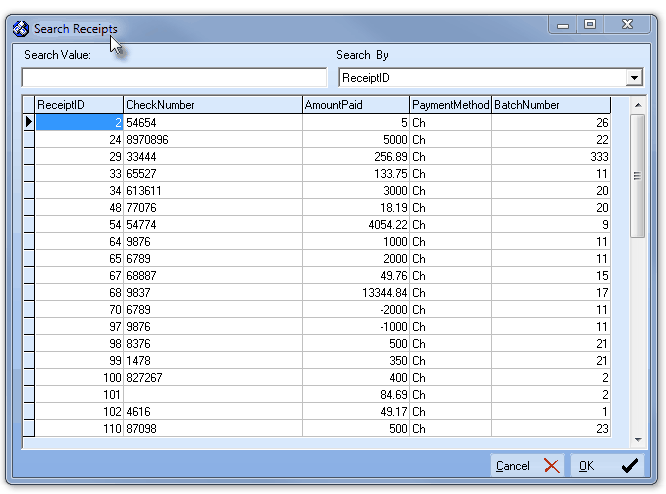
Search Receipts dialog
| • | See the "Using the Generic Search dialog" section in the Advanced Search Dialog chapter for more information about this Search dialog. |

