| □ | Fixed Term Billing (for Time-Payment Purchase Plans or internally financed fixed term equipment or full installation Leases): |
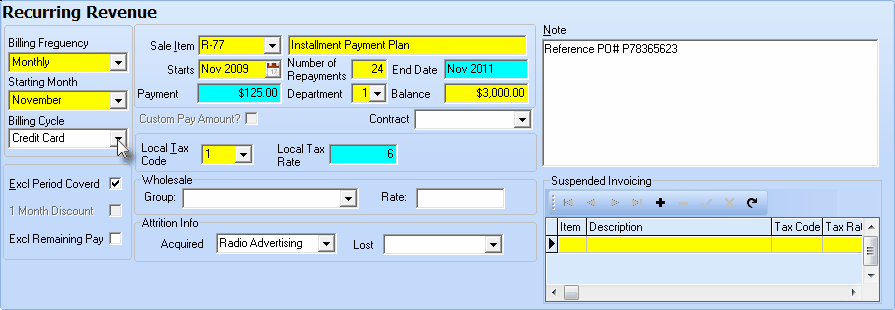
| • | The Auto Bill Form is divided into sections (sometimes surrounded by boxes). |
| • | Complete each section of this Form - as needed. |
| • | Start be Clicking the Fixed Term radio button. |

| • | The first section - the box on the upper left - deals with When and How frequently this Payment will be billed: |
| • | Billing Frequency - Using the Drop-Down Selection List, Choose how often this Payment is to be billed: |
| ▪ | Monthly - They are to be billed once a month for the installment payment. |
| ▪ | Quarterly - They are to be billed once every three months for their installment payment. |
| ▪ | Although other Billing Frequency choices are available, it would be unusual for them to be used here. See Open Term Billing above for the other choices. |
| • | Starting Month - Using the Drop-Down Selection List provided, Choose the month their Recurring Payments should be started. |
| ▪ | In the example below, this Subscriber has agreed to have their Installment Payment automatically charged to their Credit Card and so this Recurring Billing entry will be included in that batch of Recurring Revenue bills. |
Recurring Revenue Form for Fixed Term Payment entry
| • | The second section - to the right - deals with Sales information: the What they are being billed for, and how much their Payment will be. |
| • | Sale Item - Using the Drop-Down Selection List, Choose the Recurring Revenue Service to be billed from among those that you previously defined in the Sale-Purchase Items Form. If you will be offering these Installment Payment Plans, create a generic "Installment Payment Plan" (or several with the type of Payment represented) in Sale-Purchase Items. |
| • | It's Description - Enter a Description for this Payment - by default the system will enter what you defined in the Sale-Purchase Items Form. |
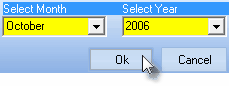
| • | Starts - Identify when the billing will start: |
| ▪ | Using the Select Month and Select Year dialogue box - with Drop-Down Selection Lists for each - enter the Month and Year this Subscriber's Payment obligation starts. |
Month & Year Selector
| ▪ | Click OK to save this Start Date information |
| • | Number of Payments - Enter the agreed upon Number of Payments for satisfying the Balance. |
| • | End Date and Payment - Calculated by the system automatically based on the Start Date, Number of Payments and the Balance Due. |
| ► | Note: The Status button at the bottom of the Recurring Revenue Form is Green (Active) when this Fixed Term item is currently being billed, and Red (InActive) when the End Date has passed. |
| • | If you are not using Departments, the default is zero ("0"). |
| • | Balance - Enter the Amount to be Financed or the Gross amount of the Lease. |
| • | Contract - If appropriate, use the Drop-Down Selection List to Choose the associated (Monitoring) Contract for which this Open Term Recurring Billing record is being created.. |
| • | The other sections - on the lower part of the Form - deal with special Invoice Formatting, detailed Descriptions, and Attrition Tracking information: |
| • | Sales Tax Rate Codes - based on the Sales Tax Class - there are two possible Sales Tax Rate & Code field sets that may be displayed: |

Sales Tax Codes & Rates for Users with only a Local Sales Tax

Sales Tax Codes & Rates for Users with both Local & National Sales Tax Rates
| ▪ | The following is a list of all of the possible Sales Tax Rate Codes: |
| o | Y = Yes the item is Taxable and there is only one Sales Tax Rate defined for this Subscriber's Sales Tax Class. |
| o | E = The Subscriber is Tax Exempt. |
| o | N = No this Subscriber is not Taxable for this item. |
| o | 1 = (2 or 3) The item is Taxable and among the multiple Sales Tax Rates defined for this Subscriber's Sales Tax Class, this is the appropriate Tax Rate |
| ▪ | Local Tax Code - Use the Drop-Down Selection List to Choose the appropriate Sales Tax Class Sales Tax Rate Code (Y,N,1,2 or 3) representing the Sales Tax Rate that must be charged. |
| ▪ | Local Tax Rate - The Sales Tax Rate will be inserted automatically based on the assigned Sales Tax Class rate code. |
| ▪ | National Tax Code - This field is only displayed if you must charge a National Sales Tax. |
| o | Use the Drop-Down Selection List to Choose the correct National Sales Tax Rate Code . |
| ► | Note: Once this (Local and/or National) Tax Code and Tax Rate information is saved, and if this information is subsequently modified on the Accounting Infomation tab of the Subscribers Form, a Rate Change Detected message will be displayed with the option to Update the affected Auto Bill records with the correct (Local and/or National) Tax Code and Tax Rate information. |
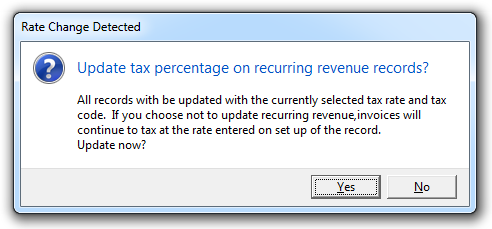
Rate Change Detected
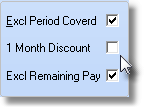
| • | Exclude Period Covered - Labeled Excl Period Covered - If you do not want the Monthly Rate and Number of Months being billed to be printed on the Invoice, Check Excl Period Covered. |
| • | One Month Discount for Annual Payment - Check 1 Month Discount to provide the Subscriber One Month Free for Annual Payment of this Fixed Term Payment. |
| ▪ | Only available for Annually billed services (see Billing Frequency above), |
| o | If selected, a One Month Free for Annual Payment message will be printed on their Invoice. |
| o | A separate line item, subtracting one monthly amount will be included on the Invoice. |
| • | Attrition Info - Indicate how you attained this Account, and if necessary, how you lost the Account by entering the appropriate Attrition Type. |

| ▪ | Acquired - Use the Drop-Down Selection List provided to Choose the appropriate Revenue Acquired Attrition Type code that best explains how you got this Account. |
| ▪ | Lost - Use the Drop-Down Selection List provided to identify the appropriate Revenue Lost Attrition Type code that best explains the reason why this Account was Lost. |
| • | Note - This information will be printed on the Invoice. This information might include: |
| ▪ | An additional explanation for, or a comment about, the installment or lease payment being billed. |
| ▪ | Their Purchase Order Number |
| ▪ | Other reference information that will help the Subscriber better understand this charge. |
| • | Click the  Icon to to record this Fixed Term Recurring Revenue record. Icon to to record this Fixed Term Recurring Revenue record. |
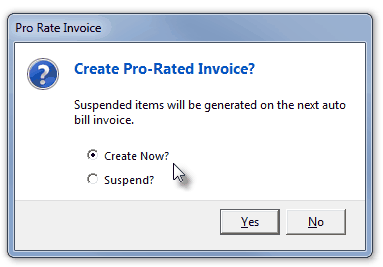
| • | You will then be asked if you want to Create a Pro-Rated Invoice? |
| • | Create Now? - Choose this option to create a Pro-Rated Invoice Invoice for the appropriate amount (see "Prorated Invoices" below) |
| • | Suspend? - Choose this option to create a Pro-Rated Invoice entry in the Suspended Invoicing section (see the "Suspended Invoicing" section below). |
Pro Rate Invoice dialog
| • | Click Yes to do so, or No to finish the process without implementing either prorated billing procedure. |
| • | Suspended Invoicing - If the Suspend? option is selected, an entry is made in the Suspended Invoicing section. |
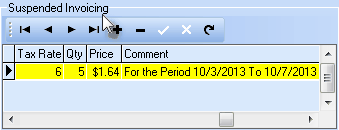
Recurring Revenue Form - Suspended Invoicing section
| • | Each Suspended Invoice entry will be inserted as a Detail Line Item when the initial (next) Automatic Billing process is executed for this Subscriber. |
| • | After billing, the Suspended Invoice entry will be deleted automatically. |
| • | Prorated Invoices - If you have chosen to Create a Pro-Rated Invoice, that Invoice will be calculated as follows: |
| 1. | An Average Month is assumed as 30 days. |
| 2. | The number of Days Remaining from today's date to the end of the Average Month is calculated and inserted as the Detail Line Item's Qty. |
| 3. | The Payment entered above is divided by 30 to establish a Daily Rate which is inserted as the Detail Line Item's Price. |
| 4. | That Daily Rate is multiplied by the number of Days Remaining to establish the Detail Line Item's Net. |
| • | The Invoice is displayed (as in the example below). |
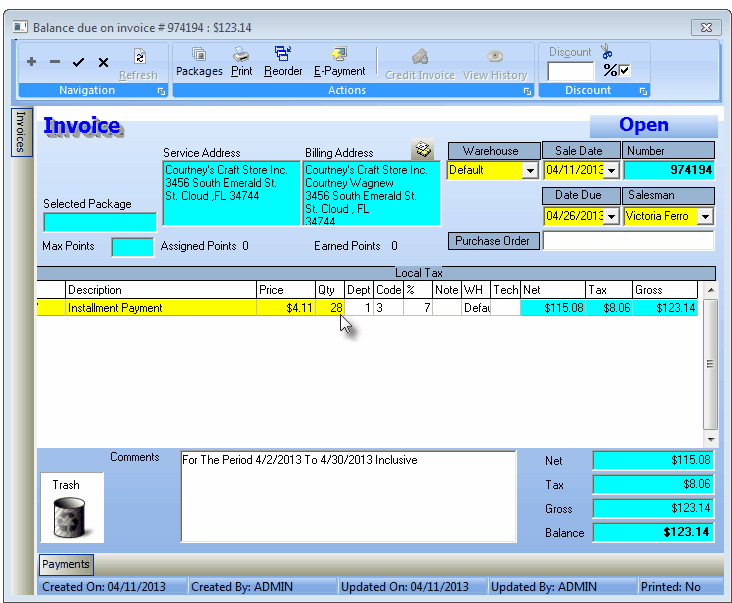
Pro-Rated Invoice showing Qty as the 28 days billed at pro-rated daily rate - the Price - and the Comment itemizing the period billed
| ▪ | To accept the Invoice as presented, Click Save ("ü"). |
| ▪ | You may also modify any part of the Invoice (except what is displayed in Teal, and then save it. |
| • | Once all but the Last Payment is billed, the final payment will automatically be calculated based on the final, unpaid, balance remaining. |

