| □ | The Method - These 6 steps are required (by the Accounts Receivable module) to define how to properly calculate and invoice for Local, State and/or National Sales Taxes: |
| • | The first three are done as part of the Start Up process. |
| 1. | Indicate how any National (Federal) and/or Local Sales Taxes (State, County, City, etc.) are handled in the User Options Form on the Tax tab. |
| 2. | For calculating and assessing Local Sales Taxes (State, County, City, etc.) when their is no National Sales Tax (for example: the US has no National Sales Tax, Canada does), create the needed Sales Tax Classes. |
| 3. | In the Subscribers Form's Accounting Info tab, enter the required Sales Tax Classification code and the appropriate Sales Tax Percentage Rate information. |
| • | The last three are simply the normal day-to-day process of recording Sales, posting Receipts, and Allocating those Receipts to the appropriate Invoices. |
| 4. | As Sales are entered, indicate which Detail Line Items will be assessed Sales Tax. |
| ◆ | By following these steps, the Sales Taxes charged on Sales will also be recorded (and be reportable) as both Billed (Invoiced) and as Paid (Collected). |
| ▪ | See "The Question" section immediately below to understand why this is important. |
| □ | The Question - What method should be implemented to Calculate & Remit these Sales Taxes? |
| • | Determine whether to Remit Sales Taxes based on each Sale's: |
| • | Invoiced Amount - Remit Sales Taxes based on the Sales that were Billed. |
| • | Allocated Amount - Remit Sales Taxes based only on those Sales which were actually Paid and Allocated to the appropriate Invoice(s). |
| • | The answer to this question must be based on the rules of the State (County, City, etc.) and/or Federal Sales Taxing Authorities that have the right to assess Sales Taxes. |
| □ | Remitting Sales Taxes - These 6 steps (using the Accounts Payable module) explain how to properly Remit the Sales Taxes which were Billed (Invoiced) and/or Paid (Collected) for those Sales Taxing Authorities: |
| 1. | Create a Vendor for each Local (and National) Departments of Revenue to whom the billed and/or collected Sales Taxes must be remitted. |
| 2. | Determine whether you are required to Remit Sales Taxes based on the Sales Invoices that were Billed (Invoiced), or on the Paid (Collected) Receipts that were Allocated - (see "The Question" section above). |
| 4. | Create Purchase Invoice(s) for the amount of Sales Tax that is due to be Remitted, based on the Sales Tax Reporting Method selected above. |
| 5. | Create a Payment for the Sales Tax Invoice(s) created above. |
| 6. | Print the Checks for these Sales Tax Remittances and mail them (or pay via an Electronic Funds Transfer) in a timely manner, and with the required reporting documentation (see step 3. above). |
Defining the State (or Province) Rules for Assessing Sales Taxes
| □ | Virtually all businesses are required to bill and collect Sales Taxes from Subscribers for Local, County, State, Provincial, and/or National government Taxing Authorities and in some cases, some combination of all of these. |
| • | It is also the seller's responsibility to remit the correct amount of those Sales Taxes to the associated Taxing Authorities. |
| • | Finally it is the seller's responsibility to Report these Sales Tax transactions accurately for business accounting purposes, and to comply with the reporting requirements of the Taxing Authorities. |
| • | The individual Local (City, County, School District, State or Provincial) Sales Tax rules are defined within the Sales Tax Classes Form (illustrated and explained in detail below). |
| • | Any number of Sales Tax Class Taxing Authority records may be entered to accommodate whatever the Sales Tax assessment rules have been implemented by those Taxing Authorities. |
| □ | Reviewing the Need for a Sales Tax Class information record: |
| • | Each Sales Tax Class may have up to three (3) Sales Tax Percentage Rates defined. |
| • | Within each of these (up to three) Sales Tax Percentage Rates should be the combined total of the Percentages assessed by each of the subordinate City, County, School District, and/or State Sales Tax Percentage Rates. |
| • | This will accommodate states like Florida that have a Sales Tax Percentage Rate which, in this case it is 6.0%, plus a County Local Option Sales Tax Percentage Rate that could be 0.5% or 1.0% additional - based on the County in which the sale is physically made. |
| • | In addition to these, Cities may also have a City Local Option Sales Tax Percentage Rate that may be up to an additional 0.5%. |
| • | In some other States, School Districts and other Special Districts (such as Fire Districts or Water Districts) may also assess a Sales Tax. |
| • | The result is that the seller is responsible for charging many different Sales Tax Percentage Rates correctly, plus reporting and remitting these taxes accurately and to the appropriate Taxing Authorities. |
| • | Fortunately, this complex situation is actually easy to define and, once defined correctly, easy to bill for, track, remit and report properly. |
| □ | Tax Classes - Defining the required Taxing Authorities: |
| • | On the Main Menu, Choose the Maintenance Menu and Select the Accounts Receivable sub-menu. |
| • | Click on Tax Class option to view the Tax Classes Form shown below. |
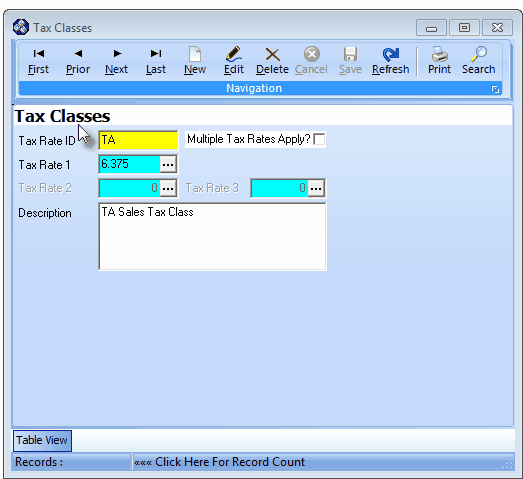
Tax Classes Form showing a single State Sales Tax Percentage Rate
| • | This Tax Classes Form may be Re-sized by Dragging the Top and/or Bottom up or down, and/or the Right side in or out. |
| • | Navigation Menu - The Navigation Menu is located at the top of the Tax Classes Form. |

| • | This Navigation Menu provides the normal Record Movement, New, Edit, Delete, Cancel, Save, and Refresh options; as well as special Print and Search functions. |
| • | Record Editing section - The details of the currently selected record are displayed below the Navigation Menu at the center (Main Body) of the Tax Classes Form. |
| • | Table View tab - A tabular (spreadsheet style) Table View of the currently defined Tax Classes is accessible by Clicking the Table View tab at the bottom of the Tax Classes Form. |

| • | To display a specific Tax Class record in the Record Editing section, Click on that record within the Table View section, or use the Search Icon (see the "Using the Special Functions" section later in this chapter). |
| • | This Table View information may be Pinned in Place by Clicking the Pin Icon on the right. |
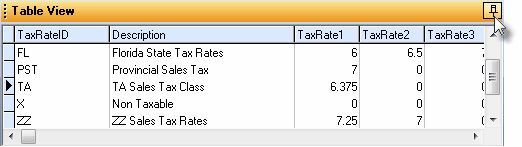
Tax Classes Form - with Table View tab Pinned Open
| ▪ | You may Un-Pin this Table View by Clicking the Pin Icon again. |
| ▪ | Click on any listed record to display that information in the center (Main Body) of the Form. |
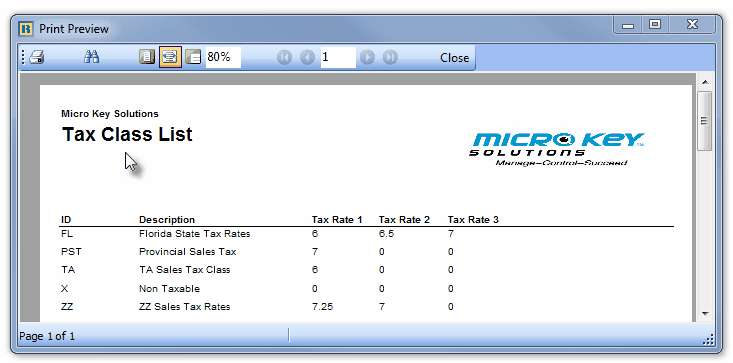
| • | There are six columns of data in this Tax Classes Record Listing: |
| 1) | Tax Rate ID - The unique Tax Rate ID of up to fifteen (15) alpha-numeric characters - typically the State Code, sometimes plus an additional letter or number. |
| 2) | Description - The description of the Tax Class, usually the name of the Taxing Authority. |
| 3) | Tax Rate 1 - The first Sales Tax Percentage Rate assessed by this Taxing Authority |
| 4) | Tax Rate 2 - The second Sales Tax Percentage Rate (if applicable) assessed by this Taxing Authority |
| 5) | Tax Rate 3 - The third Sales Tax Percentage Rate (if applicable) assessed by this Taxing Authority |
| 6) | Tax Rates - (T/F) - True (T) if Multiple Tax Rates are if effect, False (F) if not. |
| • | Each column's Header Name describes the data contained in that column. |
| ▪ | Clicking on a Header Name will set the order in which the Tax Classes will be listed. |
| ▪ | Clicking on the same Header Name will set the order in the opposite direction (ascending vs. descending). |
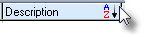
| ▪ | The Header Name that is determining the Order of the list will have an Icon indicating the Order displayed next to that Header Name. |
| • | To define a Tax Class to be used for identifying the required Sales Tax Percentage Rate(s): |
| • | Click the  Icon to start a Tax Class entry in the Record Editing section. Icon to start a Tax Class entry in the Record Editing section. |
| ▪ | Tax Rate ID - Enter a unique Tax Rate ID of up to fifteen (15) alpha-numeric characters - typically the State Code, sometimes plus an additional letter or number, as appropriate. |
| ▪ | Multiple Tax Rates Apply? - Check this box if one or more of the Sales Tax Percentage Rates (defined below) represent the Sum of various State, County, City, etc., individually assessed Sales Tax Percentage Rates |
| ▪ | Tax Rate 1 - The first Sales Tax Percentage Rate defined using the Tax Rate Items dialog. |
| ▪ | Tax Rate 2 - The second Sales Tax Percentage Rate (if applicable) defined using the Tax Rate Items dialog. |
| ▪ | Tax Rate 3 - The third Sales Tax Percentage Rate (if applicable) defined using the Tax Rate Items dialog. |
| ▪ | Description - Enter a description of the Tax Class, usually the name of the Taxing Authority (e.g., "XYZ Department of Revenue"). |
| o | This Description may up to 40 characters in length and include upper and/or lower case letters, numbers, spaces and normally used punctuation marks. |
| • | Click the  Icon to to record this Tax Class. Icon to to record this Tax Class. |
| • | Any number of additional Tax Classes may be identified, as required. |
Sales Tax Class Examples
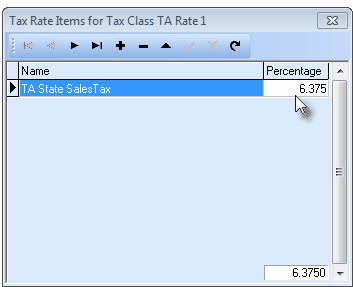
| □ | Creating the Tax Class record with the most common and simple case - a Tax Class code for a State's Sales Tax where there is only one State Sales Tax Percentage Rate - and no other County or City Sales Tax is being assessed. |
| • | Define the State's Sales Tax code. |
| • | Enter a unique Tax Rate ID of up to fifteen (15) alpha-numeric characters. |
| ▪ | Consider using the official two letter state abbreviation. (In the example above and below we used the fictitious state code of "TA".) |
| • | Enter the Description of this Taxing Authority. |
| • | Do Not Check the Multiple Tax Rates Apply box! |
| • | Click the Icon to to record this Tax Class. |
| • | Define the actual Sales Tax Rate. |
| • | Click the Ellipse (three-dotted box) in the Tax Rate 1 field (see the mouse pointer in the illustration below). |
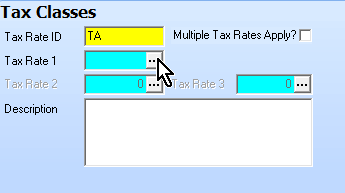
Tax Classes Form - Tax Rate 1 field's Ellipse button
| • | The Tax Rate Items for Tax Class Form will be displayed. |
Tax Classes Form - Tax Rate Items for Tax Class dialog
| • | In the Tax Rate Items for Tax Class Form, Click Add ("+"). |
| ▪ | Name - Enter the Name of the Taxing Authority |
| ▪ | Percentage - Enter the Sales Tax Percentage Rate to be assessed. |
| o | A Sales Tax Percentage Rate with up to three digits after the Decimal is supported. |
| ▪ | Click Save ("ü") to record this Tax Rate Items information. |
| ▪ | Click the Close x box in the upper right corner of the Tax Rate Items for Tax Class Form. |
| • | The Tax Rate 1 field on the main Tax Classes Form (indicated by the mouse pointer in the Tax Classes Form illustration) will be updated with that Sales Tax Percentage Rate. |
| • | This completes the One Tax for One State example. |
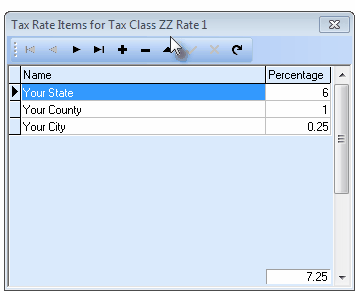
| □ | Assessing Multiple Sales tax Rates - Creating a Tax Class for a State where there is a State Sales Tax Percentage Rate and additional County and/or City Sales Tax Percentage Rates being assessed, also. |
| • | Here, based on whether or not a Subscriber making the purchase (or the seller making the sale) is located within a specific County's or City's Limits, the Gross Sales Tax rate would vary. |
| • | If the Subscriber is a County resident and the seller also is located within the County (but neither within the City Limits), that Subscriber would only be (subject to and) assessed the State and the County Sales Tax Percentage Ratse. |
| • | However, if the Subscriber making the purchase (or the seller making the sale) is located within the City Limits of a town within that County, the Subscriber would be (subject to and) assessed the State, the County, and the City Sales Tax Percentage Rates. |
| • | In this case, a Tax Rate 1 and Tax Rate 2 entry would have to be entered to accommodate this situation. |

Tax Classes Form - Tax Rate 1 & 2 - Multiple Tax Rates Apply
| • | Define (as in the previous example) the State's Sales Tax code. |
| • | Enter a unique Tax Rate ID of up to fifteen (15) alpha-numeric characters. |
| ▪ | Consider using the official two letter state abbreviation. (In the example above we used the fictitious code of "ZZ".) |
| • | Enter the Description of this Taxing Authority. |
| • | Check the Multiple Tax Rates Apply box! |
| • | Click the Icon to to record this Tax Class. |
| • | Define the State's Sales Tax Rate - including all of the Local Option Sales Tax Percentage Rates. |
| • | Click the Ellipse (three-dotted box) in the Tax Rate 1 field. |
| ▪ | In this case, Tax Rate 1 is being used to define the Gross Sales Tax Percentage Rate for areas within the State that charge all of the Local Option Sales Tax Percentage Rates. |
| ▪ | It would represent and be assigned to those Subscribers who reside within any County and City within which has implemented all the additional Local Option Sales Tax Percentage Rates. |
Tax Classes Form - Tax Rate Items for Tax Class dialog
| • | In the Tax Rate Items for Tax Class Form, Click Add ("+"). |
| ▪ | Name - Enter the Name of the State Sales Taxing Authority |
| ▪ | Percentage - Enter the Sales Tax Percentage Rate to be assessed. |
| o | A Sales Tax Percentage Rate with up to three digits after the Decimal is supported. |
| ▪ | Click Save ("ü") to record this Tax Rate Items information. |
| • | Repeat this process (Add, Enter name and Tax Rate, then Save) until you have identified all the Sales Tax Percentage Rates that will be charged in this case. |
| ▪ | Click the Tab key to insert another line and define the Name for the Local Option the Sales Tax Percentage Rate to be assessed. |
| ▪ | Continue to add lines and rates as needed. For example, when the County has a City within it that has an additional City Sales Tax Percentage Rates within that County, it would be added here. |
| ▪ | Click Save ("ü") to record this Tax Rate Items information. |
| • | Click the Close x box in the upper right corner of the Tax Rate Items for Tax Class "ZZ" Rate 1 Form (remember this "ZZ" code is only an example - you would have entered a code appropriate for your situation). |
| • | Define the cases(s) where additional Sales Tax Percentage Rates are charged at the local County but not at the City level - either because a Subscriber does not live within that City, or that particular City does Not have a Local Option City Sales Tax Percentage Rate. |
| • | Click the Ellipse (three-dotted box) in the Tax Rate 2 field. |
| ▪ | In this case, Tax Rate 2 is being used to define the Gross Sales Tax Percentage Rate for areas within the State that charge (in addition to the State's rate) only the Local Option County Sales Tax Percentage Rates. |
| ▪ | It would represent and be assigned to those Subscribers who reside within any County that only has a Local Option County Sales Tax Percentage Rate, but does not reside within the City limits of a city within that County that charges an Local Option Sales Tax Percentage Rate. |
| • | In the Tax Rate Items for Tax Class Form, Click Add ("+"). |
| ▪ | Enter the Name of the State Taxing Authority and the Sales Tax Percentage Rate to be assessed. |
| • | Click Save ("ü") to record this Tax Rate Items information. |
| • | Click the Tab key to insert another line. |
| • | Define the Name for the County Local Option Taxing Authority and the Sales Tax Percentage Rate to be assessed. |
| • | Click Save ("ü") to record this Tax Rate Items information. |
| • | Continue to add lines and rates as needed. |
| • | The total at the bottom right of this Form will include the Sum of all Sales Tax Percentage Rates defined. |
| • | Click the Close x box in the upper right corner of the Tax Rate Items for Tax Class "ZZ" Rate 2 Form. |
| • | The Tax Rate 2 field on the main Tax Classes Form will be updated with the total of all the Sales Tax Percentage Rate entered. |
| • | Repeat this process for the Tax Rate 3 field, if required. |
| □ | Creating a Tax Class for a State where there is a State Sales Tax Percentage Rate and than several additional County and/or City Sales Tax Percentage Rates assessable, also. |
| • | If there are multiple cases of County and City taxing combinations within the same State, define that State multiple times (creating multiple Tax Class records - an example would be ZZ1, ZZ2, ZZ3, etc.) to identify all of the Sales Tax Percentage Rate combinations needed to properly charge and report Sales Taxes. |
| □ | Creating a Tax Class for a State (or for Exempt Subscribers) when no Sales Tax is to be charged. |
| • | Each Subscriber record must have a Sales Tax Classification code assigned. |
| • | If a Subscriber is Tax Exempt, or if No Sales Tax at all is assessed, create one Tax Class with the Tax Rate ID "X" and a Description of "Non Taxable" and with all Tax Rates set to zero ("0"). |
| • | Assign this Tax Class to any Subscriber who is not subject to Sales Tax. |
| • | When creating an Invoice for a Sale, any Detail Line Item entered will default to an "E" (for Exempt) Tax Code and "0" as the Sales Tax % rate. |
| □ | Using the Special Functions on the Navigation Menu at the top of the Tax Classes Form: |
| • | Print - Click the Print Icon to View and/or Print a list of the Tax Classes. |
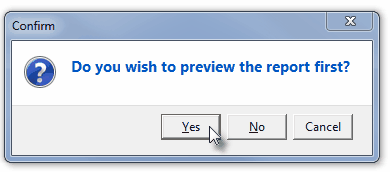
| • | Yes - Click the Yes button to View a copy of the report. |
| • | No - Click the No button to open the Windows® Print dialog where a copy of the report may be sent to a selected Printer, or Printed to a File. |
| • | Cancel - Click the Cancel button to close this Print question and return to the Form. |
| • | Search - Click the Search Icon to open the Search Tax Classes dialog. |
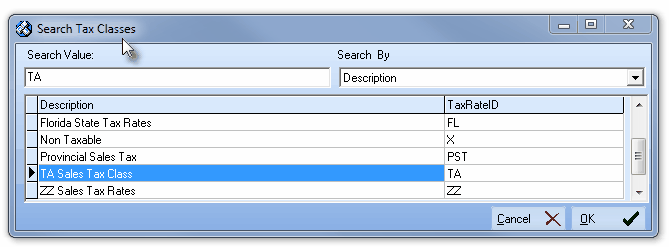
Search dialog
| • | See the "Using the Generic Search dialog" section in the Advanced Search Dialog chapter for more information about this Search dialog. |

