| □ | The Accounting Information tab on the Subscribers Form has two key functions: |
| 2. | Viewing the Account Status which includes the Last Sale's and Payment Date and Amount , Yrly RMR (Annualized Billing Amount of the Subscriber's currently defined Recurring Revenue), and the Subscriber's net Current Balance - none of which may be changed within this tab. |
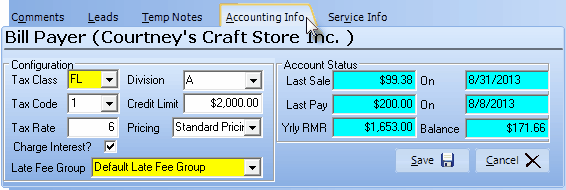
Accounting Info tab on the Subscribers Form
| □ | In many cases, as you work with a Subscriber's record, you will need access to several of the Form's tabs at the same time. |
| • | For your convenience, the Account Information tab's Form may be opened in a separate window. |
| • | Click the Receivable menu's Accounting Info to see the Form illustrated below: |
| • | The information presented (or that you will enter), is for the Subscriber record currently being displayed. |
| • | If you have multiple Subscribers displayed, |
| • | Click on the Subscriber for whom you want to access their Accounting Information to make it the Active Form. |
| • | Click that Form's Receivable menu's Account Info option. |
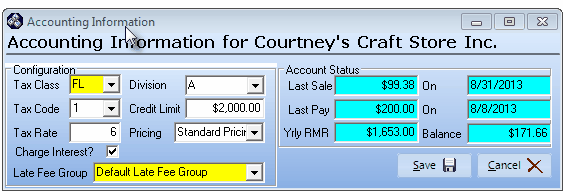
Subscriber's Accounting Information tab opened as separate Form
| □ | Configuration items relate to Sales Tax and charging Late Fees: |
| • | Tax Class - Using the Drop-Down Selection List provided, Select the appropriate Tax Class for this Subscriber. |
| • | Tax Code - Using the Drop-Down Selection List provided, Select the appropriate Tax Rate Code (from those defined for the assigned Tax Class): |
| • | Y - Yes they are Taxable and the assigned Tax Class was defined as not having Multiple Tax Rates |
| • | 1 - Yes they are Taxable and the assigned Tax Class was defined as a Multiple Tax Rates class and this code number represents the Tax Rate they are assessed. |
| • | N - No the Subscriber is Not Taxable. |
| • | E - This Subscriber is Sales Tax Exempt. |
| • | Tax Rate - will be completed automatically based on the information for that Tax Code entered in Sales Tax Classes. |
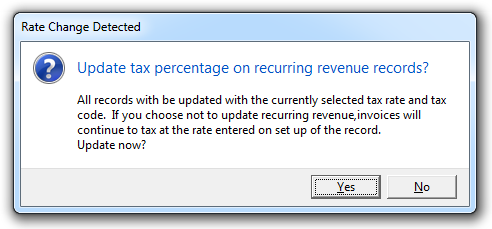
| ► | Note: Once this Tax Class, Tax Code and Tax Rate information is saved, if Auto Bill records have been defined, and if this information is subsequently modified, a Rate Change Detected message will be displayed with the option to Update those affected Auto Bill records with the correct Tax Code and Tax Rate information. |
| • | Division - If you have implemented the Division Codes functionality, using the Drop-Down Selection List provided, Select the appropriate Division code. |
| • | Credit Limit - If you want this Subscriber to be limited in how much they owe you at any given time, enter that maximum Credit Limit amount. |
| • | This is only designed to be a visual check for the User and not to prevent or discourage additional Sales entries. It does not provide an automated alert message. |
| • | Pricing - Using the Drop-Down Selection List provided, Choose the (optional) appropriate Pricing Mark Up Group. |
| • | Charge Interest - If you are assessing Late Fees for Past Due Invoices and you want this Subscriber subject to late fees if they have Past Due Invoices, Check the Charge Interest box. |
| • | Late Fee Group - If you Chose to Charge Interest, you must Select the Late Fee Group with the rules to be applied to the late fees that may be assessed to this Subscriber. |
| ► | Note: If you have elected to Charge Interest and will be billing Recurring Revenue using the Recurring Billing Cycles feature (where different groups of Subscribers may be billed for their Recurring Revenue at different times throughout the month), you should create Late Fee Groups for each of these billing cycles that you will be using to ensure that their past due status better equates to when each Subscriber was actually billed. |
| • | Click the Save button  on the Accounting Info Form to record your entries. on the Accounting Info Form to record your entries. |
| □ | Account Status items, as indicated by the Teal color of the fields, are maintained by the system and so are displayd for information only. |
| • | Last Sale - the Total Amount of the last Sales Invoice entered for this Subscriber |
| • | Date of Last Sale - the Date of the last Sales Invoice entered for this Subscriber |
| • | Last Pay - the Amount of the last Receipt entered for this Subscriber |
| • | Date of Last Pay - the Date of the last Receipt entered for this Subscriber |
| • | Balance - the Net Balance Due from this Subscriber is shown. |
| • | This is because, until a Receipt has not been allocated to an Invoice, the Amount of that Receipt must still be subtracted from the Balance field for this Subscriber (you did get the money), but the system does not know what that Receipt is for, so it does not reduce the Accounts Receivable Total (the amount of Unallocated Receipts is shown as a separate Total on Accounts Receivable Reports), |
| □ | Updating Accounting Information |
| • | Open this Form as desired (see above). |
| • | Click on the desired field to enter, delete or update. |
| • | Enter the appropriate information (see above). |
| • | Click the Save button on the Accounting Info Form to record the changes. |

