| □ | A Bill arrives from one of your Vendors. |
| • | What do you do with this Invoice? |
| • | Examine the Bill for accuracy. |
| ► | Note: Shipping Charges and Sales Taxes should be specifically coded and entered, also. |
| □ | Entering an Invoice from a Vendor: |
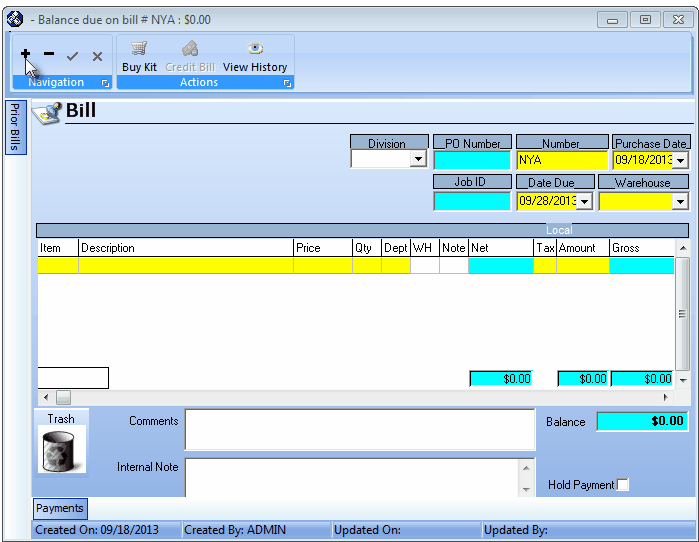
Bill Form shown as it is displayed immediately after Clicking Add
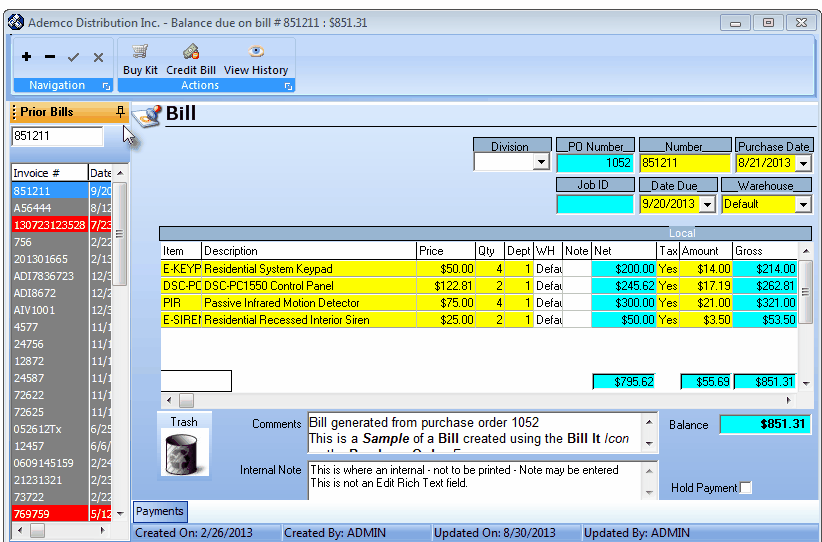
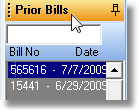
| □ | Prior Bills tab - Click the Prior Bills tab to open the list of Bills from this Vendor - in the order selected by the User - that were previously received from this Vendor. |
| • | The Prior Bills tab is located on the left of the Form |
| • | It is used to open a list of Bills from which to select and display a specific Bill that had been previously entered for this Vendor. |
| • | Click on the Prior Bills tab (to the left of the pin pointer in the illustration below) on the Bills Form to view this list of previously entered Bills from this Vendor. |
Prior Bills tab on the Bills Form
| • | You may Click the Pin Pointer (see the pin pointer in the illustration below) to keep this list of Bills displayed. |
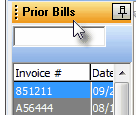
| • | Once you have pinned the list open, the Prior Bills List for each Vendor stays pinned opened until you specifically unpin it. |
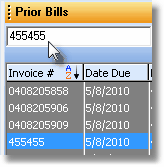
| • | Search - The Prior Bills list contains a Search box into which you may enter an Invoice Number . |
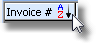
| • | Click the word Invoice# at the top of the Invoice Number column. |
| • | Enter the Invoice Number in the Search field for the Bills record you want to view. |
| • | That Bill - as long as it belongs to the currently selected Vendor and has not been deleted - will be instantly displayed on the Bills Form. |
| • | Sorting the Prior Bills List - The list of previously entered Bills may be displayed in any order you choose, based on the information in one of the columns. |
| ▪ | Click the word Invoice# at the top of the Invoice Number column to sort the records in Invoice Number Order (newest to oldest). |
| ▪ | Click the word Invoice# again to reverse the order (oldest to newest). |

| ▪ | You may sort the Prior Bills List based on the information in any available column simply by Clicking on that column's Name. |

| ▪ | This sorted order remains in effect whenever the Prior Bills List is displayed, until you choose a different sorting order. |
| • | Generally, it is best to keep the list in Invoice Number Order unless you have a specific need for a different sorted order |
| • | It is recommended that you reset it to Invoice Number Order before closing the Bills Form. |
| □ | Entering the Invoice Header Information: |
| • | Use the the Drop-Down Selection List to Choose a (new or different) Division Code, if appropriate. |
| • | Number - The default is "NYA" which stands for Not Yet Added - and so it Must Be Changed. |
| • | Do not proceed further until you have entered the appropriate Number in this field! |
| • | You may use upper and lower case letters, numbers, spaces and punctuation - up to twelve (12) characters in all. |
| • | Enter the Invoice Number of the original document. |
| ▪ | If the Invoice Number assigned by the Vendor is longer than 12 characters, use the last 12 as they are the least likely to be duplicated in the future. |
| • | Create a tracking Number for Bills that do not have an assigned number: |
| ▪ | You could use the last four digits of its account number followed by the year and month of the billing cycle ("8422-2009/07") for a Credit Card Statement (see Entering Credit Card Statements below for more information on how to enter this type of Bill). |
| ▪ | You could use the initials of the bank plus the month and year of the payment's due date ("BOA-2009/07") for a mortgage payment (see Entering Mortgage and Bank Loan Payments for more information on how to enter this type of Bill). |
| • | No Duplicates - Keep in mind that any Number you assign may not be a duplicate of a number that you assigned previously for this same Vendor. |
| ▪ | Duplicate checking is based on the specific Vendor and an Invoice Number for that Vendor. |
| ▪ | If another Vendor coincidentally uses the same Invoice Number, that will not create a problem. |
| • | Purchase Date - By default, Today's date is inserted. |
| • | Use the Drop-Down Date Selection Box provided to reset the Purchase Date to that of the actual Invoice's (or Statement's) Date. |
| • | If the Purchase Date is changed from the default, the Due Date will be reset, as well (see below). |
| • | The Purchase Date for this Bill may not be reset to a Date within a Month that has been Closed! |
| • | Job ID - If this Bill was converted from a Purchase Order initially created through the Job Costing module, it will be assigned that Job Number |
| • | Due Date - By default, this will be set based on the number that was entered in the Vendor Terms field within the General Information tab on the Vendor Information Form. |
| • | If you reset the Purchase Date, the Due Date will be automatically reset. |
| • | If required, you may specifically change a Due Date to any date from the Purchase Date you entered, onward. |
| • | Warehouse - By default, the Warehouse selection will be "Default". |
| • | You may use the Drop-Down Selection List to Choose a different Warehouse to which this Inventory Item will be assigned. |
| □ | Understanding Invoice Detail Lines: |
| ► | This is where you itemize the individual items on the Bill by assigning them a Purchase Category and describing them (or using the default description assigned to the Purchase Category), entering the price, quantity, tax status, etc., to clearly identify what was purchased. |
| ► | As you complete each Detail Line Item, Press the Tab F key and a new line will be started. |
| ► | When you have entered all the required information, Click Save ü at the top of the Form. |
| □ | Entering the Details of the Purchase: |
| • | Item - Click the Drop-Down Selection List to Choose the appropriate Purchase Category code. |
| • | The selection list will include any Purchase Category defined as a Type of either a Purchase or Both (a purchase and a sale). |
| • | The Advanced Sale-Purchase Item Lookup function - accessed by pressing Alt+F2 from within the Item Drop-Down Selection List - lets you pick from items only in a specific group, thereby presenting a much shorter list. |

Advanced Sale Item Lookup dialog for Purchase Items Only
| • | Description - By default, this will be the Description entered for the selected Purchase Category. |
| • | You may edit this as needed to better clarify exactly what was purchased. |
| • | Price - By default, it will be the Cost (labeled "Price In" on the Sale-Purchase Items Form) of the selected Purchase Category. |
| • | Modify this default Cost if the Bill from the Vendor has a different Price (Cost) than the default. |
| b) | LIFO - The Cost will be the "Price In" of the most recently purchased Inventory Item of the same type. |
| c) | Average Inventory Code - The Cost will be the system calculated "Price In" (i.e., the Average Price that has been paid) based on all of the previous purchases of this Inventory Item). |
| ▪ | In any case, be sure to enter the Price (Cost) being charged on the Bill from the Vendor. |
| • | Qty - By default, it will be 1. |
| • | You may modify the default Quantity as needed. |
| • | A minus Quantity creates a Credit line item resulting in a Net minus value. |
| • | A Bill whose Gross Balance is a minus value, is actually a Credit Note. |
| • | If you have implemented multi-departmental accounting, this field is Mandatory. |
| • | WH - By default, the Warehouse selection will be "Default". |
| • | You may use the Drop-Down Selection List to Choose a different Warehouse to which this product will be assigned. |
| • | Note - Double Click (Memo) in the Note field to open a Note Pad to enter additional information related to the Detail Line Item. |
| • | Net - Calculated by the system and equals the Price multiplied by the Quantity of this Detail Line Item. |
| • | Tax - If you have Checked the Charges Tax? box on the Vendors Form, this field offers three choices in a Drop-Down Selection List : |
| 1. | Yes - This Detail Line Item is Taxable. |
| 2. | No - This Detail Line Item is not Taxable. |
| 3. | Exempt - This Detail Line Item, or the entire Bill, is completely Tax Exempt. |
| • | Amount - Unless Yes is selected above, $0.00 will inserted automatically as this item is saved. |
| • | Gross - The total for the Detail Line Item - calculated by the system. |
| ◆ | For General Ledger System Users: The General Ledger Transactions (automatically posted in the background) for a Selected Detail Line Item of a Bill may be displayed whenever required. |
| ▪ | To do so, Double-Click the appropriate Detail Line Item. |
| ▪ | The GL Transactions Form will list each Debit and Credit required to post the Selected Detail Line Item. |
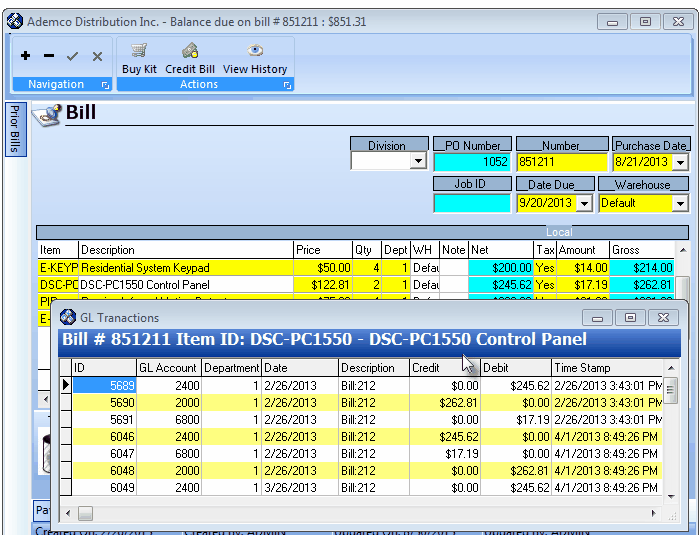
Bills Form - GL Transactions for selected Detail Line Item
| • | Once that Kit is defined, the Sale-Purchase Item Code assigned to that Kit may be selected to place an order for all of the Inventory Items required to make the Quantity of Kits that are to be Purchased. |
| • | This will insert, on this Bill, as many individual Detail Line Items and Quantities required to make up the contents (Inventory Items and individual Quantities) of the selected predefined Kit. |
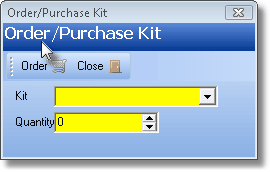
| • | To record the purchase of specific quantity of a User-Defined Kit, Click the Buy Kit button on the Actions Menu at the top of the Bill Form. |
Order/Purchase Kit dialog
| a. | Kit - Use the Drop-Down Selection List to Choose the desired Kit. |
| b. | Quantity - Enter the number of Kits that are to be purchased. |
| c. | Order - Click the Order button to execute this request. |
| d. | Close - Click the Close button to return to the Bill Form. |
| e. | The Inventory Items and Quantities required to make up the number of Kits ordered will automatically be inserted into the Bill. |
| □ | Entering the Invoice Footer Information: This is where you may enter special Comments about the Bill, delete an individual Detail Line Item, place the Bill on Payment Hold and see the net Balance. |
| • | Trash - To delete a Detail Line Item: |
| • | Drag it down to the Trash Can . |
| • | Confirm you want to delete the Line Item, when asked. |
| ▪ | An Accounting Administrator is permitted to make financial transaction reversals, deletions, and other types of Purchase Invoice changes. |
| ▪ | Without this right, the Employee will be required to get an Accounting Administrator's permission to do so. |
| ▪ | Delete Security Rights are also required to remove a line item. |
| • | Comments - Double Click to access the Invoice Comments box to enter whatever will help you better understand this purchase, its payment status, or any other information that would be useful to the Accounts Payable department. |
| • | Internal Note - This field is used by General Ledger System Users to enter a note (which is not printed on the Check) that will appear in the Internal Note field of each Detail Line Item on the Transaction File Form that has Financial Transactions associated with, and therefore posted for this Bill. |
| • | Hold Payment - Check this box to put this Bill on Payment Hold |
| • | This will prevent the Bill from being available to pay through either the Disbursements or the Payments Form. |
| • | Column Totals are displayed for all of the Detail Line Items |
| • | Net - Calculated by the system to equal the Price multiplied by the Quantity for all of the Detail Line Items combined. |
| • | Amount - Calculated by the system to equal the Sales Taxes charged for all of the Detail Line Items combined. If this Vendor is not taxable, this column will not be visible. |
| • | Gross - Calculated by the system to equal the Sales Taxes charged, and Price multiplied by the Quantity for all of the Detail Line Items combined. |
| • | Balance - Maintained by the system, this is the Gross amount of the entire Invoice, including Sales Tax, minus any Payments or Credit Notes and/or Deposits (which are simply Payments that have not been applied to an Invoice) that have been applied to the Invoice. |
| • | Click Save ("ü") to complete this Bill. |
| □ | Special on the Bill Form: |
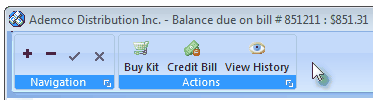
Special Icons and Information Summary on the Bill Form
| • | Summary Information - The top of the Form will display the Vendor's Name, and the currently selected Invoice's Number and outstanding Balance. |
| • | Prior Bills - To view a list (from which you may select) of all previous Bills for this Vendor, Click the Prior Bills tab. |
| • | To fix the list so it always displays, Click the Pin (it will point down). |
| • | To hide the list, Click the Pin again and move your mouse away from the area. |
| • | Buy Kit - See "Buying a Kit" above. |
| • | Credit Bill - If the currently displayed Invoice (Bill) has been written off by the Vendor (they are issuing you a credit for the entire amount), Click the Credit Bill and the Create Credit Memo? dialog will appear. |
| • | Create Credit Memo? - This dialog will allow you to select whether to: |
| o | Auto Generate - This will create an entire Credit memo to off-set the current Bill, or |
| o | Selective Generation - To enable you to select specific items on the Bill to be Credited. |
| • | Make your selection and Click Yes (or Cancel). |
| • | You may also manually create a Credit Note whenever needed. |
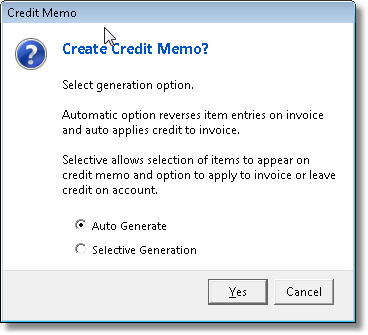
Create Credit Memo? dialog
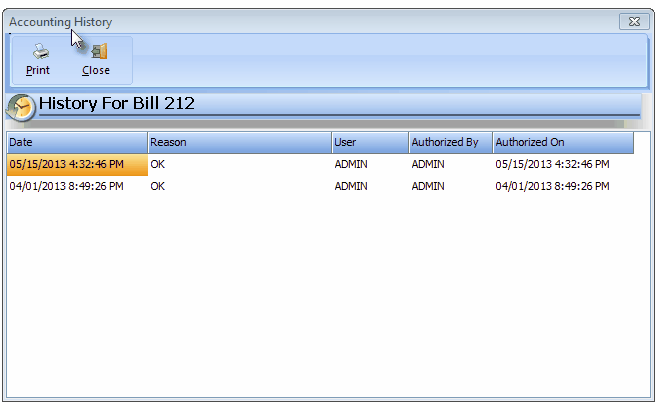
| • | View History - For any Invoice (Bill) that has been modified after it was originally entered, an Accounting History log is maintained with the information illustrated below. |
| • | Click the View History button to see a list of any authorized changes, the User who made them, and when they were made to the current Invoice. |
Accounting History - History for Bills
| • | You may Print this log whenever necessary. |
| ▪ | This option immediately sends the report to your default Printer, with no View option offered. |
| • | Click Close to exit the Accounting History log. |
| □ | Entering Credit Card Statements: |
| • | Each Credit Card Account that is used for making business related purchases must be set up as a separate Vendor. |
| • | When the Credit Card Statement is received: |
| • | Make a note of the Vendor from whom the Purchase was made |
| • | Note specifically what the Credit Card Charge had purchased. |
| • | In some cases, a single charge may actually represent several different items, many of which will have different Purchase Categories. |
| • | To properly allocate these expenses, many users will: |
| ▪ | Use the Note field [Double Click on (Memo)] to explain these details of the charges (company name, items charged, purpose, etc.). |
| ▪ | Be sure to maintain a copy of the original Invoices and Credit Card Receipts to be able to verify the proper payment of Sales and/or GST Taxes. |
| □ | Entering Mortgage and Bank Loan Payments |
| • | Amortized Payments, such as loans and mortgages, often represent two or three separate types of remuneration: |
| • | Principal - The part of the payment that actually pays off a portion of your balance. |
| • | Interest - The part of the payment that is the Interest or carrying charge for the current month for the balance still owed. |
| • | Escrow - The part of the payment that is set aside to pay taxes and/or insurance on the collateral (home, car, company boat, etc.). |
| • | When you enter the Bill for these types of obligations, be sure to create Detail Line Items for each of the above categories, as appropriate. |
| • | Mortgage and Bank Loan Payments may also be entered as Recurring Purchases and managed automatically. |
| □ | Payments tab - Click the Payments tab located at the bottom of the Bill Form to display a tabular (spreadsheet style) list of the Payments (if any) that have been Allocated to the currently displayed Bill. |

| • | This Payments information may be Pinned in Place by Clicking the Pin Icon on the right. |

Bill Form Payments tab - with Payments tab Pinned Open
| • | You may Un-Pin this Payments tab by Clicking the Pin Icon again. |
| • | You may Double-Click any listed Payment item to open the associated Payments Form |

