| □ | The Security Tab on the Employee Form is used to establish specific function related Access Rights for the Employee. |
| • | Any person needing any of these Security Access Rights must first be entered in the Employee Form. |
| □ | This is also particularly important for Virtual Operators who may not actually be an Employee of your Company. |
| • | If an Employee or Virtual Operator is required to access a particular module, the Security tab will provide the means for the System Administrator to set that Employees's Access Rights for the listed functions. |
| • | If you are not logged in as a System Administrator, you will not be able to add, delete or modify the Security information nor assign access and functionality permissions shown within the Security Tab. |
| • | To establish or modify an Employee's Security and other Access Rights, |
| • | Retrieve the appropriate Employee's record |
| • | Enter the required information |
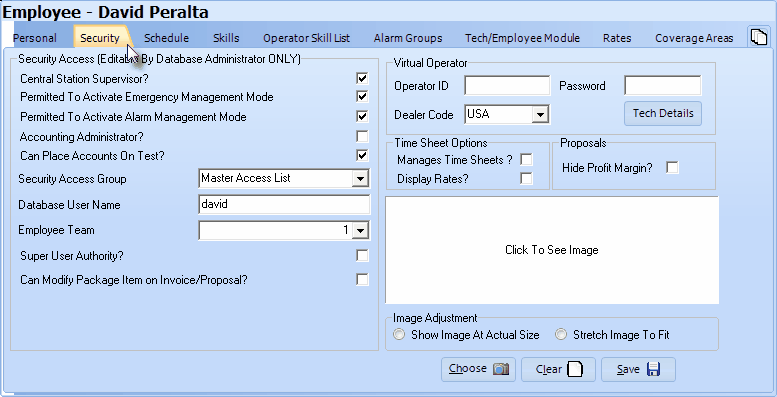
Employee Form - Security tab
| □ | Security Access (editable by Database Administrator ONLY) |
| • | Central Station Supervisor? - Check this box to identify this Employee as a Central Station Supervisor. |
| • | Permitted to Activate Emergency Management System - Check this box to allow the Employee to Activate Emergency Management Mode while working as an Operator or Central Station Supervisor. |
| • | The Emergency Management Mode feature may be used during weather and other extraordinary emergencies that might otherwise overload the Central Station with non-emergency responses during this emergency processing period. |
| • | Permitted to Activate Alarm Management Mode - Check this box to allow the Employee to Activate Alarm Management Mode while working as a Central Station Operator or Supervisor. With this assignment, an Operator will not be automatically forced into Polling Mode when they first log in to the Monitoring module. |
| • | Accounting Administrator? - Check this box to provide the Employee the rights of an Accounting Administrator. |
| • | An Accounting Administrator is permitted to make financial transaction reversals, deletions, and other types of Sale and Purchase Invoice changes after providing a reason for doing so. |
| • | Without this right, the Employee attempting to make the change will be required to get an Accounting Administrator's permission to do so. |
| • | Assign the Security Access Group for this Employee by using the Drop-Down Selection List to Choose the Security Access Rights Group to which this Employee will be assigned. |
| ◆ | This is a mandatory Second Edition UL® 1981 Standard requirement which requires that each Employee with access to Monitoring related information must be assigned to a Security Access Group whose Access Rights have been established for that purpose based on that Employee's responsibilities and "need to know". |
| • | Database User Name - Enter the actual User Name this Employee will be using to access this system through the main Login screen. |
| • | This Database User Name - their login name - must be unique to this Employee. |
| • | Identifying the Employee's login name here allows the system to know immediately - when they enter - what rights they have been assigned. |
| • | Employee Team - Using the Drop-Down Selection List provided, Choose the Employee Team to which this Employee is assigned (if appropriate). |
| • | Super User Authority? - Check this box if this Employee is to be granted Super User Authority (which provides most, but not all ADMIN authority). |
| • | Only an ADMIN may grant Super User Authority and this field is only visible to an ADMIN. |
| • | For Users of the Monitoring module that have added the Virtual Operator module, your Technicians, and those of your Alarm Dealers - if you are providing Alarm Monitoring Services for others - may telephonically access their Subscribers to put them on, and take them off Test status, and also get a telephonic report of their Subscriber's most recently sent signals - all without ever having to actually talk to an Operator at your Central Station. |
| • | For each your Technicians, and particularly for your Alarm Dealers' Technicians who will access the Virtual Operator System and or the Web Tech Service modules, create an Employee record (for Alarm Dealers you only need the basic information) and then complete the Virtual Operator section of the Form. |
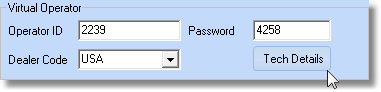
Virtual Operator information on the Security tab of Employee Form
| • | Virtual Operator (see the illustration above): |
| • | Operator ID - Enter the Operator ID for this Virtual Operator. |
| ▪ | The Operator ID is a unique four digit (numeric) code that the Technician uses to log into Virtual Operator. |
| • | Password - This Password is the PIN number (from 2 to 8 digits in length and must be unique to this Employee) used by this Employee to log in to the Virtual Operator program. |
| ▪ | If this is a Technician from your company and they need access to all Account, Do Not enter a Dealer Code. |
| ▪ | Technicians that are not assigned a Dealer Code may access any Account in the database. |
| ▪ | Therefore, any Technician that works for a specific Alarm Dealer MUST be assigned that specific Dealer's Dealer Code. |
| • | Click the  Icon on the Navigation Menu to save the record or Click Cancel ("X") to cancel the entry. Icon on the Navigation Menu to save the record or Click Cancel ("X") to cancel the entry. |
| □ | Tech Details - This button opens the Dealer Technicians Form used for entering the Names and related information of the Dealer Technicians that are employed by an Alarm Dealer. |
| • | This offers the same functionality as the Tech Details button on the Dealers Form except the Dealer Technician must be an Employee if (s)he is to be entered through this Form. |
| • | The Dealer Technician does not need to be entered as an Employee within MKMS to have them entered on the Dealers Form through the use of that form's Tech Detail button. |
| • | Click Add ("ü") and complete the Form shown below. |
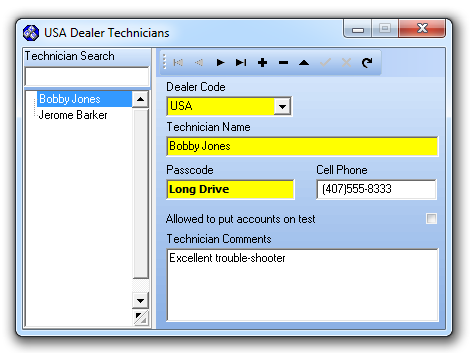
Dealer Technicians Form
| □ | Time Sheet Options - Check the appropriate boxes, if needed. |
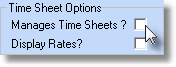
| • | Manage Time Sheets? - Check this box to allow the Employee to Manage their, or other Technician's, Time Sheets. |
| • | This Manage Time Sheets option must also be given to Employees who complete Work Orders and enter Job Costing information. |
| • | Display Rates - Check this box to allow the Employee to view and edit their, and other Technician's, Rates of Pay. |
| • | If this box is Checked this Employee will also be able to view the actual Dollar values when completing Work Orders and entering Job Costing information. |
| □ | Proposals Options - Check if appropriate box if needed: |
| • | Hide Profit Margins - Check this box if you do not want this Employee (who has access to the Proposals Form) to be able to view the Profit Margin displayed on the Estimate tab of the Proposals Form. |
| □ | Employee Image - An Image of this Employee may be imported and displayed within the Security tab. |
| • | The Image File must be either a a ".BMP" or "JPG" file type saved with 256 colors (or Less) and may be no larger than 64K. |
| • | The file must also be on your Computer (or on the File Server, if you using a Network) where the MKMS database is installed. |
| 1. | Click Choose and, using the standard Windows® dialogue box provided, locate the desired file. |
| 2. | Once theImage file is selected, choose the Image Adjustment method that best displays the Image by alternately Clicking Show Image At Actual Size and Stretch Image To Fit. |

