| □ | There are often times, throughout the day, that Technicians, Dealers and Subscribers may request that a User or an Operator Place an Account on Test. |
| • | By default, no Accounts are on test - meaning that all signals sent by all systems will be processed in the normal manner as defined in the Panel Zones, and/or the CSID Zones Form(s) |
| a. | If the Can Place Accounts On Test? option is Checked on the Employee Form's Security tab, that Employee may Place an Account on Test using this Form. |
| b. | Within MKMS by an authorized User by selecting this Place an Account On Test Form. |
| c. | Within MKMSCS by an authorized Operator using the F5 On Test option. |
| • | To Place an Account on Test within MKMS, on the Main Menu Select Maintenance, Choose Central Station, then Click Place account on test. |
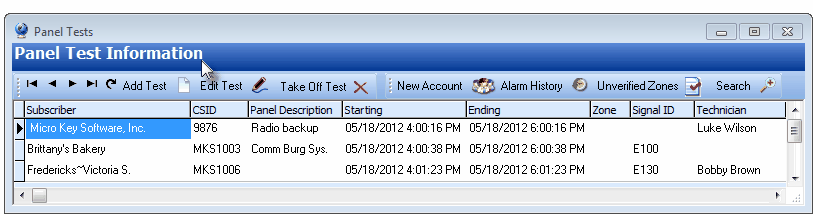
| • | The Panel Test Information Form will be displayed. |
| • | For the convenience of the Operator, this Panel Test Information Form may be re-sized. |
Panel Test Information dialog is used to Place an Account on test
| • | Panel Test Information List - If any Accounts have been placed on test, when the Panel Test Information Form is displayed, those "On Test" Accounts will be listed in the section shown above. |
| • | Sorting the List of Accounts on Test - The Order in which these Accounts are listed may be set by the User. |
| • | By default, the list of Subscriber Panel CSIDs is displayed in Ending Date & Time order. |
| • | Click on any Column's Header name to re-order the list based on the data in that column. |
| ▪ | The first Click on the Header name will set the Order of the data based on the data in that column. |
| ▪ | The next Click on the same Header name with reverse that Order. |
| • | Once you've set the Order of the data, you may Drag and Drop the Column Header that determines the Order to the first position on the Panel Test Information List. |
| ▪ | If you re-order the list based on another column's data, you will need to reposition that column, if desired. |
| • | There are several functions that may be performed on this Panel Test Information Form, accessed by Clicking one of the Icons at the top of the Form. |

Panel Test Information special function Icons
| □ | Using the Add Test icon to Place account on test: |
| • | Click the Add Test button. |
| • | Search - The Search icon dialog will be displayed. |
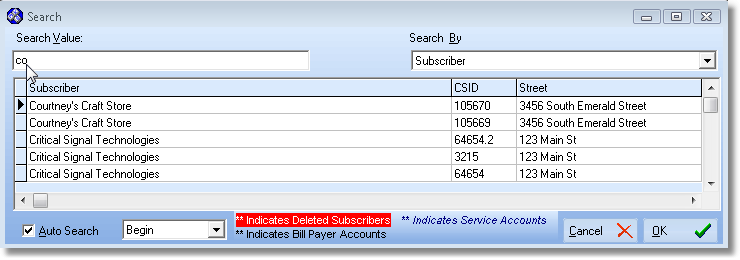
| • | The records displayed are presented in one of three formats: |
| • | Black type on a white background - representing a regular Subscriber record or a Billing Address record. |
| • | Blue Italicized type - representing a Service Address record. |
| • | White type on a red background - representing a previously deleted Subscriber record is indicated at the bottom of the Search screen but will not be available in the Search results. |
| • | Select the Search By criteria for locating the desired Subscriber. (The default criteria is initially blank, then the one used most recently.) |
| • | Your entry is not case sensitive. ("SMITH: and "smith" are viewed and searched in the same manner, because during the search, the system internally converts your Search Value entry and the Search By field to all upper case.) |
| • | By default, the Auto Search function will be set for Begin. However, using the Drop-Down Selection List , you may Choose any of three methods to locate the needed record. |
| • | Begin - The Search Value you type will be compared to the beginning of the Search By criteria you selected. |
| • | Partial - The Search Value you type will be compared to the whole line of data to find any matching set of characters in the Search By criteria you selected. As an example, entering "MIT" would locate "SMITH". |
| • | End - The Search Value you type will be compared to the end of data to find a match based on the Search By criteria you selected. What you enter will be compared from the end back to the beginning of the field selected in Search By. |
| • | If you Check Auto Search at the bottom of the form, entering the first few letters of their name will present a list of choices. |
| • | As you type, the list will be further refined based on the additional characters entered. |
| • | Click on the appropriate record. |
| • | If you Click on a record without a CSID, it will not be shown in the Panel Test Information List. |
| • | The Search form will close and the selected Subscriber's CSID will be displayed on the Add/Edit Panel Test Form. |
| □ | Working with the Add/Edit Panel Test and the Additional Panels sections: |
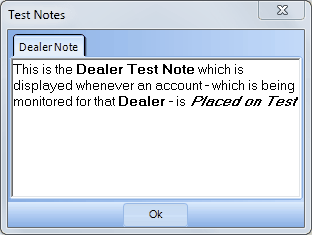
| • | Test Notes - When an Operator is requested to Place an Account on Test, if a Subscriber or Dealer Test Note has been entered on their associated Central Station Data Form, those Test Notes will be displayed for Him/Her in a special Test Notes box (as shown in the illustration below) as they start the On Test entry process. |
Test Notes box shown as an Account is Placed on Test
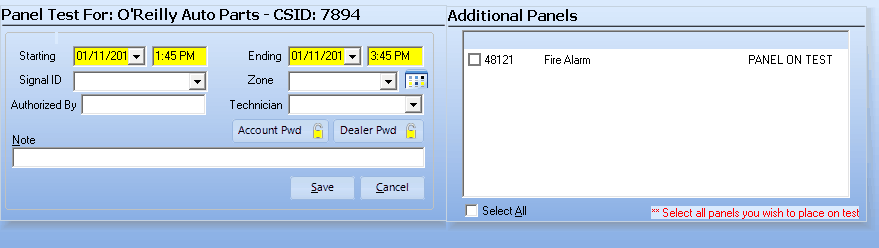
| • | Panel Test For: Subscriber Name -CSID: nnnn - This information, displayed at the top of the Panel Test For: section of the Panel Test Information Form, is filled in automatically based on the selected Subscriber and CSID. |
| • | Before proceeding ensure that the correct Subscriber and CSID combination was selected. |
Add/Edit Panel Test and Additional Panels functions
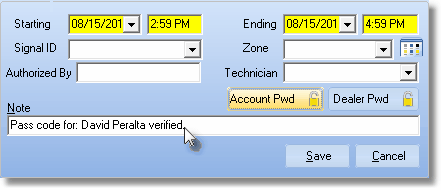
| • | Panel Test For: (Subscriber Name) - CSID - nnnnnn - This section is for entering the date and time, and associated information to specify exactly what signal(s) and/or additional CSIDs for this Subscriber, should be placed On Test: |
| • | Starting - By default, the current Date and Time - adjusted back one hour to compensate for any time differences between system, receiver and transmission time - is inserted. |
| ▪ | This information may be modified as appropriate. |
| • | Ending - By default, in the example above, the allowable time was set at two hours after the Starting time entered above is inserted (see Setting the On Test Default Options below), thus providing a two hour "window" from an hour ago, to an hour from now. |
| ▪ | This information may be modified as appropriate. |
| ▪ | Setting the On Test Default Options - The default for the Ending Time is established in the Central Station Options tab of the User Options Form within the General tab in the On Test Options sub-tab with the ability to establish an Operator On Test Default (Hours) setting and another setting for the Central Station Supervisor on Test (Hours). |
| • | Signal ID - If you are not placing the entire system On Test, using the Drop-Down Selection List provided, Choose the Signal ID to be placed On Test. |
| ▪ | The Drop-Down Selection List lists all of the CSID Zones defined for the selected CSID. |
| ▪ | Alternately, you may Manually enter a specific Signal ID which may, or may not have been previously defined (which is useful when testing a newly activated Signal ID that's being added to an existing Account) |
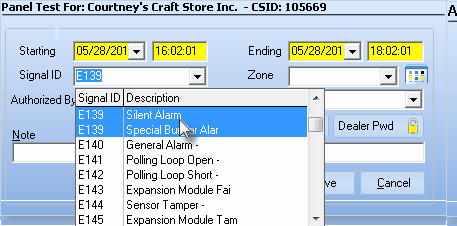
Selecting the Signal ID while Placing an Account On Test
| ► | Note: If the OverrideDropDownList option is set to True ("T") in the Company Settings dialog accessed from the Company tab on the User Options Form, you may override existing Signal IDs with a free form entry which is particularly useful when first testing a new or revised installation. |
| • | Zone - You may limit the On Test status to one, or more than one, specifically selected Zones, use either method i. or method ii. (see below) based on your need: |
| i. | If you are not putting the entire system on test, and want to put only one specific Zone on test: |
| a) | Use the Drop-Down Selection List provided to Choose the appropriate Zone. |
| b) | Alternately, you may Manually enter a specific Zone which may, or may not have been previously defined (which is useful when testing a newly activated Zone that's being added to an existing Account) |

Selecting the Zone when Placing an Account On Test
| ii. | If you are not putting the entire system on test, but want to put more than one previously defined, specifically selected Zones On Test: |
 Click the Multiple Zones button.
| o | Using the Select Zones dialog, Check all of the Zone(s) that are to be placed On Test. |
| o | To locate a specific Zone, |
| a. | Press F2 to clear any previous entry in the (F2) Search field. |
| b. | Click any Zone code in the Zones Column |
| c. | Enter the desired Zone code in the (F2) Search field. |
| d. | The first instance of that entry will be located and highlighted. |
| e. | Check that Selected box for that Zone code. |
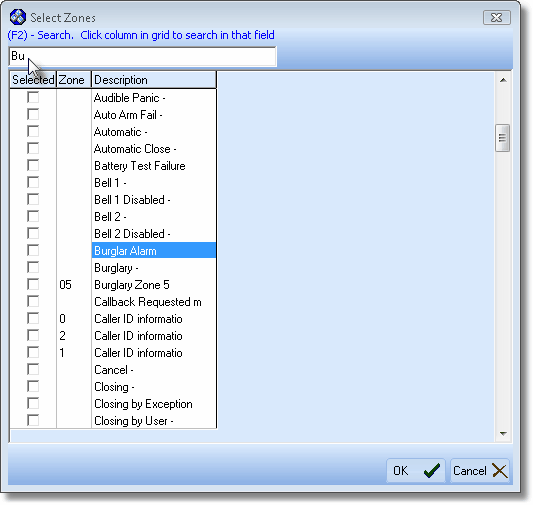
The Select Zones dialog allows multiple Physical Zones to be placed On Test
| o | To locate a specific Description, |
| a. | Press F2 to clear any previous entry in the (F2) Search field. |
| b. | Click any Description in the Description Column |
| c. | Enter the desired Description in the (F2) Search field. |
| d. | The first instance of that entry will be located and highlighted. |
| e. | Check that Selected box for that Description. |
| o | The Select Zones dialog allows multiple Physical Zones to be placed On Test without the need to place the entire Account On Test. |
| o | Check each of the Zones/Descriptions that are to be placed On Test. |
| o | Repeat until all have been identified. |
| ▪ | Click the OK button when all required Zones to be placed On Test have been Chosen. |
| • | Authorized By - Identify the person who requested that the system be on test. |
| • | Technician - Use the Drop-Down Selection List to Choose the Technician requesting to put the system on test. |
| • | Account Pwd - If the request for placing the Account on test was made by the Account (Subscriber): |
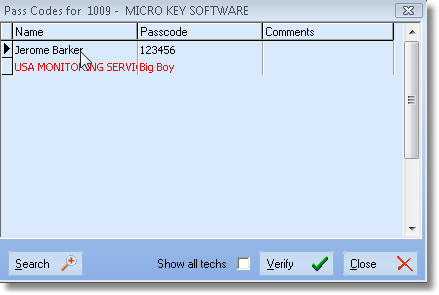
| ▪ | Click the Account Password button to view the authorized Persons and their Pass Codes for this Account. |
| ▪ | Sometimes there are so many People To Call entered for an Account they will not all fit on the Pass Codes screen. |
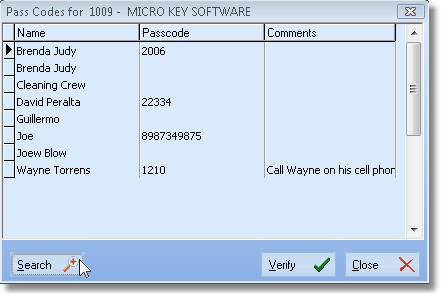
Pass Codes for Account
| ▪ | Click the Search button on the Pass Codes dialog to locate the Person who is requesting the On Test status. |
| ▪ | An Advanced Search dialog will open allowing you to Search By Name, Passcode or Comments information. |
| ▪ | Select the appropriate record. |
| ▪ | Click OK and the Search dialog will close. |
| ▪ | The selected Person will be indicated on the Pass Codes form with an arrow u. |
| ▪ | Confirm the Pass Code with the Account's requester. |
| ▪ | Click Verify ü and the Pass Codes for Account Form will Close. |
| ▪ | A Note will be inserted automatically indicating who validated the On Test request, and will be inserted into the Alarm History Detail for the Alarm Signal. |
| ▪ | Enter that person's name in the Authorized By field. |
Pass code Confirmed Note in the Add/Edit Panel Test section
| • | Dealer Pwd - If the request for placing the Account on test was made by a Technician or Alarm Dealer: |
| ▪ | Click the Dealer Password button to view the authorized Alarm Dealer's Pass Codes for this Account. |
| ▪ | Click the Search button on the Pass Codes Form to locate the Technician or Alarm Dealer who is requesting the On Test status. |
| ▪ | Confirm the Pass Code with the Technician or Alarm Dealer. |
| ▪ | Click Verify ü and the Pass Codes for Account Form will Close. |
| ▪ | A Note will be inserted automatically indicating who validated the On Test request, and will be inserted into the Alarm History Detail for the Alarm Signal. |
| ▪ | Enter that person's name in the Authorized By field. |
| • | Note - Add to or Modify the current Note information entered by the system, as needed. |
| ▪ | Once the information is Saved, this Note will be inserted into the Subscriber's Alarm History |
| ▪ | Then the Note field will be cleared so that, if edited later, a new Note may be entered and inserted as a separate line item into the Subscriber's Alarm History |
| • | If one or more of these should also be placed On Test Check the Box(es) for the CSID(s) that should be included in the On Test procedure. |
| • | If all of the Additional Panels are to be put On Test Check the Select All box at the bottom of this section (see the mouse pointer in illustration below). |

Additional Panels section of the Panel Test Information form
| • | Save - Click the Save button to enter the Panel On Test information. |
| • | Cancel - Click Cancel to abort this On Test process. |
| □ | Using the Edit Test button: |
| • | Select the desired On Test Account to be edited |
| • | Click the Edit Test button (or Double-Click the item). |
| • | Panel Test For: Subscriber Name -CSID: nnnn - This information, displayed at the top of the Panel Test For: section of the Panel Test Information Form, is filled in automatically based on the selected Subscriber and CSID. |
| • | Before proceeding ensure that the correct Subscriber and CSID combination was selected. |
Add/Edit Panel Test and Additional Panels functions
| • | Modify - Change any of the fields, as required. |
| • | Additional Panels - If the Subscriber has more than one Subscriber Panel, and one or more of these should also be placed On Test, you must Check (or Uncheck) the Box(es) for those manually, as needed. |
| • | Save - Click the Save button to record the revised Panel On Test information. |
| □ | Using the Take Off Test button: |
| • | Select the desired On Test Account. |
| • | Click the Take Off Test button. |
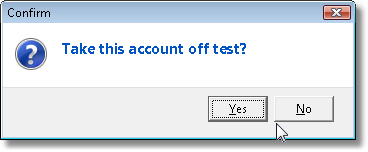
| • | Confirm you want to take the Account off test. |
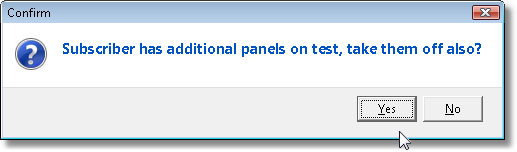
| • | If the Subscriber has more than one Panel On Test for this Account, indicate if these are to be taken off test, also. |
| □ | Viewing the Alarm History |
| • | Select the desired On Test Account. |
| • | Click the Alarm History button. |
| • | Signal History - The Signal History form will be displayed for the selected Subscriber's CSID. |
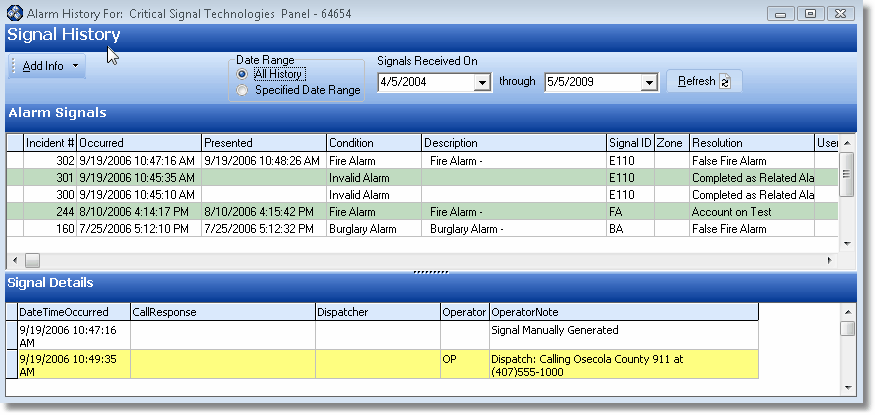
Signal History Form
| • | See the Signal History chapter for a detailed discussion of how to use this Form. |
| □ | Viewing the Unverified Zones: |
| • | Select the desired On Test Account. |
| • | Click the Unverified Zones button. |
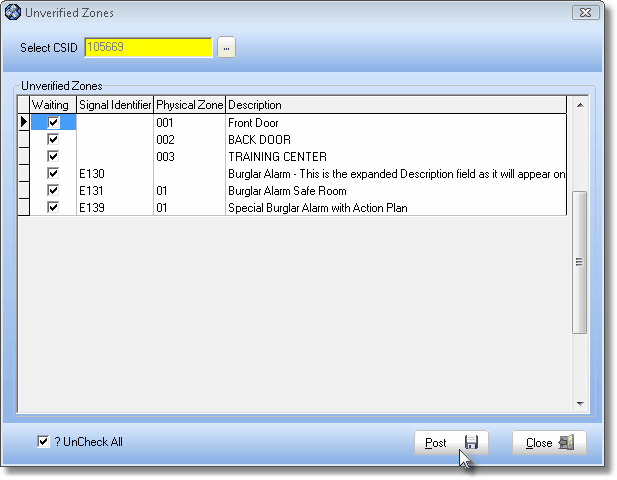
Unverified Zones dialog
| • | UnCheck All - To remove all of the Checks in the Waiting column, Check this box. |
| • | Post - Click the Post button to apply the "W" Test Status to the Checked Zones. |
| □ | Search - To Look up an Account that is already On Test: |
| • | The Search Accounts On Test Form will be displayed. |
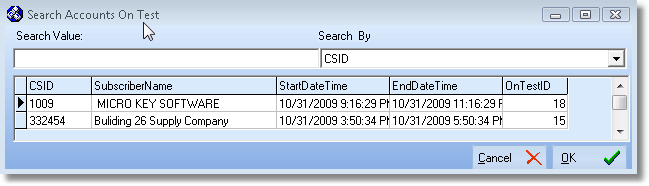
| • | The only records displayed are those that are currently On Test. |
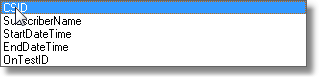
| • | Select the Search By criteria for locating the desired Subscriber from the list shown below. |
| • | Search Value - Type characters to locate the desired Subscriber in the Search Value field. |
| • | Click on the appropriate record. |

Quick Account Setup form

