| • | These Panel Zones define the preferred - Default - behavior when this Signal is received. |
| • | You may easily override this Default behavior for frequently occurring or special circumstances - based on the Day of the Week, and/or the Time of Day - by using the Panel Zones Override tab. |
| ▪ | Enter the same Signal ID (and optionally Physical Zone) currently in Panel Zones, and then define the desired behavior for this combination. |
| ▪ | It is also easy to override that CSID Zone behavior - based on the Day of the Week, and/or the Time of Day - by using the CSID Zones Override tab. |
| • | Click the Panel Zones button on the Communicator Formats Form to view the Panel Zones Form shown below. |
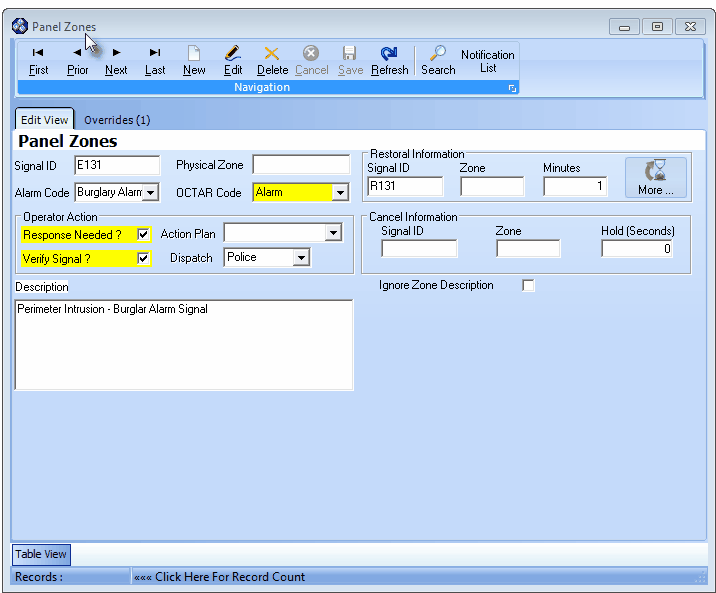
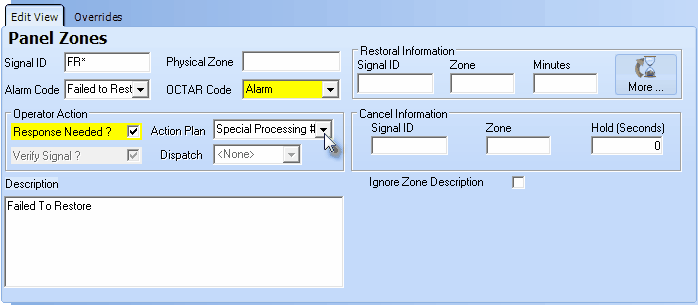
Panel Zones Form
| • | This Panel Zones Form may be Re-sized by Dragging any side (Top, Bottom, Left or Right) in or out. |
| • | Navigation Menu - The Navigation Menu is located at the top of the Panel Zones Form. |

| • | This Navigation Menu provides the normal Record Movement, New, Edit, Delete, Cancel, Save, and Refresh options; as well as special Search and Notification List functions. |
| • | Record Editing section - The details of the currently selected record are displayed below the Navigation Menu at the center (Main Body) of the Panel Zones Form. |
| • | Table View tab - A tabular (spreadsheet style) Table View of the currently defined Panel Zones is accessible by Clicking the Table View tab at the bottom of the Panel Zones Form. |

| • | To display a specific Panel Zone record in the Record Editing section, Click on that record within the Table View section, or use the Search Icon (see the "Using the Special Functions" section later in this chapter). |
| • | This Table View information may be Pinned in Place by Clicking the Pin Icon on the right. |
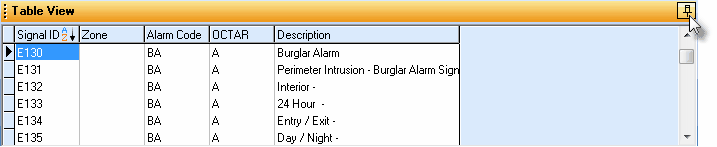
Panel Zones Form - with Table View tab Pinned Open
| ▪ | You may Un-Pin this Table View by Clicking the Pin Icon again. |
| ▪ | Click on any listed record to display that information in the center (Main Body) of the Form. |
| • | There are many columns of data in this Panel Zones Record Listing: |
| • | Each column's Header Name describes the data contained in that column. |
| ▪ | Clicking on a Header Name will set the order in which the Panel Zones will be listed. |
| ▪ | Clicking on the same Header Name will set the order in the opposite direction (ascending vs. descending). |
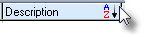
| ▪ | The Header Name that is determining the Order of the list will have an Icon indicating the Order displayed next to that Header Name. |
| • | Click the  Icon to start a Panel Zone entry in the Record Editing section. Icon to start a Panel Zone entry in the Record Editing section. |
| • | Signal ID - Enter the actual System Identifier that will be sent from the Subscriber's Control Panel to the Receiver. |
| • | Physical Zone - In some cases, in addition to the System Identifier, a Physical Zone Code is also sent by the Control Panel. |
| • | If required, enter the actual Physical Zone that will be sent from the Subscriber's Control Panel to the Receiver. |
| • | Often the Physical Zone information is entered as a CSID Zone because precise information about a specific Subscriber's Physical Zone may be entered there (rather than then ore "generic" description that would be appropriate for a Panel Zone record). |
| ► | Note: See the discussion on Areas in that chapter, and on identifying an Alarm System's User Number and User Name in the "Understanding the Special Information Tabs Requirements and Usage" section of the People To Call chapter. |
| i. | For the SIA Format Only - When an Identifier for a specific Area or User is required, consult your Receiver's Manual for the correct way to define these Zones. |
| ii. | For all Receivers - Also see the Receiver Setup Dialog chapters for information relating to the CSID Construction and identifying User Numbers and User Names. |
| • | Alarm Code - To define the specific type of Event or Alarm Signal, use the Drop-Down Selection List to Choose the signal's appropriate Condition Code. |
| • | OCTAR Code - To define the general type of this Event or Alarm Signal, use the Drop-Down Selection List to Choose one of the following: Open, Close, Test, Alarm, or Restoral. |
| • | Operator Action - If this is an Active Signal (one that needs some type of Operator Response), identify the Alarm Processing step(s) that the Operator is to execute when this Alarm Signal is received. |
| • | Response Needed? - Check this box if an Operator must Respond in some manner to this signal, thereby identifying it as an Active Signal. |
| ► | Note 1: If the Response Needed? field is not Checked: |
| i. | The Signal will be considered a Passive Signal requiring no Operator action. |
| ii. | In which case, either SPA or MKMSCS will process it automatically. |
| iii. | Although no Operator Response occurred, a record of the Signal will appear in the Subscriber's Alarm History. |
| ► | Note 2: For an Alarm Event or Signal that requires a subsequent Restoral Signal: |
| i. | Instead of Checking the Response Needed? box noted above, complete the Restoral Information section (see the "Restoral Information Overview" section below). |
| ii. | Subsequently, if the Alarm Event or Signal fails to Restore within the designated timeframe, an FR* Alarm Condition event will be generated automatically. |
| iii. | Because of this, a separate FR* Panel Zone record must be defined. |
| iv. | The Signal ID (and optional Physical Zone) for the actual Restoral must also be defined as a separate Panel Zone record, and as a Passive Signal. |
| v. | See the "Restoral Information Overview" section below for the detailed instructions. |
| ► | Note 3: Understanding Restoral Signals as they relate to Trouble Signals (See the Restoral Information chapter for more detailed information): |
| i. | Trouble Signals requiring an immediate Operator Response (these are Active Signals) - Therefore you must Check the Response Needed? box. |
| ii. | Trouble Signals requiring an Operator Response, but only if a specified Restoral Signal is not received within a specified number of Minutes - |
| a) | Do not Check the Response Needed? box. |
| b) | Complete the Restoral Information section (see "Restoral Information Overview" below) including the number of Minutes allowed before a Failed To Restore Alarm Signal is generated. |
| iii. | Trouble Signals that are actually Opening signals that may occur at a random time but must be followed up with a Closing signal within a specific number of minutes - |
| a) | Do not Check the Response Needed? box. |
| b) | Complete the Restoral Information section (see "Restoral Information Overview" below) using a Closing Signal ID and Physical Zone code and include the number of Minutes allowed before a Failed To Restore Alarm Signal is generated. |
| iv. | Trouble Signals that require follow up, but that follow-up does not have to be performed immediately and so is not required within a designated timeframe (and a Restoral Signal may subsequently be transmitted, thereby eliminating the need for any follow up) - Consult the outline below: |
| a) | These Trouble Signals are a modified type of Passive Signal and so are never presented to an Operator as a Failed To Restore signal so you Do Not Check the Response Needed? box. |
| b) | The Non-Restored Alarms Report will list Trouble Signals that reported Alarm Conditions that need to be corrected, but the Restoral Signal has not yet been received when these Trouble Signals but have no timeframe defined specifying when those Restoral Signals must be received. |
| c) | The Non Restored Accounts Form also lists these Accounts, and allows a User to manually Clear selected Accounts, when appropriate. |
| d) | An actual Restoral Signal - if received - will also Clear the Account. |
| ► | Note 4: For Communications Module Users - When using the Off Test Warning feature which notifies a Technician via Email that an Account which (s)he placed On Test is about to come Off Test, to also have an Operator get this Off Test Warning Signal as an Alarm Event, Check the Response Needed? box. |
| • | Verify Signal? - Check this box if an Operator must Verify this signal. |
| ▪ | Use the Drop-Down Selection List provided to Choose that Action Plan for processing this Alarm Signal. |
| ► | Note: Right-Click within the Action Plan field to re-set the order in which the predefined Action Plans are listed in the Drop-Down Selection List by Choosing either ID or Description order. |
| • | Dispatch - If this is an Active Signal, use the Drop-Down Selection List provided to Choose the type of Response that is needed (the list is shown below): |
| ▪ | Fire = Notify the appropriate Fire Department of the reported Fire Alarm Condition. |
| ▪ | Medical = Notify the appropriate Medical Emergency Response Service of the reported Medical Alarm Condition. |
| ▪ | Police = Notify the appropriate Police or Sheriff's Department of the reported Burglary, Silent or Hold-Up Alarm Condition. |
| ▪ | Other = Notify the appropriate Responsible Person responsible for responding to the reported Emergency Condition. |
| ▪ | None = No specific "Dispatch" related Response is needed. |
| ► | Note 5: When either Other or None is selected as the Dispatch type, special CSID Zones records may (and usually will be required to) be entered to replace this Generic Panel Zone behavior, either with a Subscriber specific Operator Guided Response procedure, or an Action Plan designed for this type of Response. |
| • | Description - Enter a clear description of the Event or Alarm Signal's purpose, condition, and/or other pertinent information. |
| • | Ignore Zone Description - This setting is used to properly process certain special types of Supervisory Signals. |
| • | When a Supervisory Signal is received, it generally consists of a Signal Identifier (which identifies the Problem or Situation), and frequently includes a Physical Zone (which does not actually represent a "real" Zone Code within the Alarm System). |
| • | Certain Communicator Formats may add a Zone Code to the Signal Identifier transmitted for some Supervisory Signals |
| ▪ | There is a possibility that this Signal Identifier + Zone Code (i.e., Signal Identifier+Physical Zone) combination might be misinterpreted as an Actual Zone in the Alarm System in use (e.g., LB+001). |
| ▪ | This could occur if the Signal Identifier+Physical Zone defined in the Panel Zones record matches a Physical Zone defined in a CSID Zones record creating something like " Low Battery / Front Door" when in reality there is no battery at the front door (it's the Control Panel that has the low battery). |
| o | The reason this occurs is that when a Signal Identifier is received with an associated Zone Code (Physical Zone) and a CSID Zone exists with that Physical Zone also defined, the normal operation is to match those two Physical Zones and attach the Description of the CSID Zone to the Signal Identifier - which is normally what you want to happen. |
| o | However, in the case where you do not want this Panel Zone > CSID Zone connection to occur, Check the Ignore Zone Description box. |
| o | In summary, Check the Ignore Zone Description box to ignore the CSID Zone's Zone Code (Physical Zone) and it's Description, and instead, use the default Description information that is defined in the Panel Zones record when this Supervisory Signal is displayed for an Operator. |
| • | Click the  Icon to to record this Panel Zone. Icon to to record this Panel Zone. |
| • | Repeat this process as often as needed. |
| □ | Restoral Information Overview (also see the separate Restoral Information chapter for more detailed information): |
| • | For an Alarm Event or Supervisory Signal which requires that a subsequent Restoral Signal also be received (thus notifying MKMSCS when everything has been "restored to normal"): |
| a. | Instead of Checking the Response Needed? box, complete the Restoral Information section (described below). |
| b. | When this Panel Zone Signal is received, because there is Restoral Information defined, it will immediately place the Signal into the Subscriber's Alarm History while waiting for that Restoral Signal. |
| c. | The amount of time that the system will wait for the Restoral Signal to be received, before creating the Failed to Restore Signal, is measured (and defined) in Minutes. |
| d. | If the Alarm Event or Signal - the Restoral Signal - that indicates this Panel Zone has been successfully restored, is not received within the required number of Minutes, an FR* Alarm Condition Alarm Event will be generated automatically by MKMSCS. |
| e. | Because of this, a separate FR* Panel Zone record must also be defined as follows. |
| ▪ | FR* - You must also create an additional "Failed To Restore" Panel Zone - with FR* entered as the Signal Identifier and also with the FR* Alarm Condition |
| ▪ | Response Needed? - Check in the Response Needed? box of the FR* Panel Zone entry. |
| ▪ | No Physical Zone information should be entered. |
| ▪ | Operator Action - Define the appropriate Operator Guided Response (i.e., Response Needed?, Verify Signal?, and Dispatch information) for this FR* Panel Zone entry. |
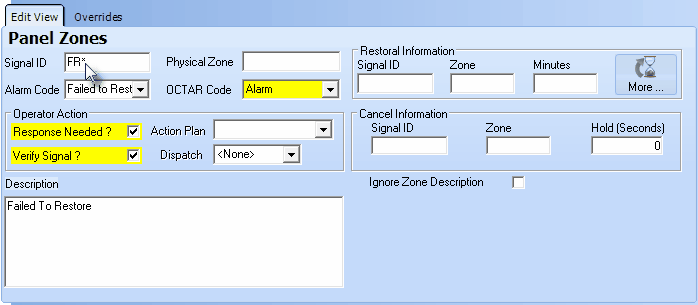
Panel Zones Form - Operator Guided Response for FR* Zone
| ▪ | Optionally, because this additional FR* record is a Response Needed? "Failed To Restore" Alarm Signal, if the fields that identify the normal Operator Guided Response (i.e., Response Needed?, Verify Signal?, and Dispatch information as shown in the illustration immediately above) are not capable of providing the appropriate instructions for the Operator, you may instead assign a predefined Action Plan to dictate the exact Signal Processing steps that are required. |
Panel Zones Form - Operator Action requiring use of an Action Plan on FR* Zone
| o | To assign an Action Plan, use the Drop-Down Selection List provided to Choose the Action Plan required to properly process this "Failed To Restore" Alarm Signal. |
| f. | The Restoral Signal record containing the Signal ID (and optional Physical Zone) that is transmitted to indicate that everything has "restored to normal", must also be defined as a Panel Zone with the following data: |
| ▪ | Response Needed? - Do not Check the Response Needed? box because this is actually a Passive Signal. |
| ▪ | Signal ID - Enter the corresponding Signal ID representing the Restoral of the originating Panel Zone's Signal ID. |
| ▪ | Zone - Optionally, enter the Physical Zone representing the Restoral of the originating Panel Zone's Physical Zone. |
| ▪ | No data is entered in any of the Restoral Information fields. |
| ► | Note 6: If the Signal ID (and optionally the Physical Zone) of the Restoral Information identified above is not defined as a separate Panel Zone: |
| i. | When this Restoral Signal is received, the Restoral Information's Signal Identifier (and optional Physical Zone) combination would be considered an Invalid Alarm. |
| ii. | Furthermore, the proper recording of the Restoral will not occur, even if it is transmitted within the proper timeframe. |
| • | Restoration Information: Enter the data requested below to identify the appropriate Restoration Information for this Panel Zone. |
| • | Response Needed? - You do not Check the Response Needed? box for this Panel Zone (which is the one reporting the problem). |
| ▪ | This is because - by completing these Restoration Information fields - it actually eliminates the need for an immediate response. |
| ▪ | Either the required Restoral Signal will be received within the allowable timeframe (thus completing the Signal automatically), and if not, the "Failed To Restore" Alarm Signal will be generated automatically. |
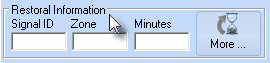
Restoral Information
| • | Signal ID - Enter the corresponding Signal ID representing the Restoral of the CSID Zone's Signal ID entered above. |
| • | Zone - Optionally, enter the Physical Zone representing the Restoral of the CSID Zone's Physical Zone entered above. |
| • | Minutes - If this Alarm Condition is not to be reported to the Operator until a specified number of minutes has passed (allowing the Subscriber's system, supervised equipment, etc., to restore to its normal mode in a reasonable period of time), enter that number of minutes here. |
| ▪ | If the Restoral signal has not been received within this time frame, a Failed to Restore (FR*) Alarm Event will be generated for the Operator indicating that the original Event or Alarm Signal was not restored within the appropriate time frame. |
| ▪ | Additional Restoral Information may be entered (by Clicking the More... button), if required (see Restoral Information for more information). |
| • | This Restoral Information and the Cancel Information (see below) are also included with the Panel Zones on the Subscriber Information Form Report. |
| □ | Cancellation Information Overview: |
| • | For an Alarm Event or Signal which has a corresponding Cancel (Abort) Code that will transmitted by the Subscriber's communicator via a system reset/disarm action on their part: |
| a. | The time the system waits for the Cancellation Signal to occur is measured (and entered) in Seconds. |
| b. | The Alarm Signal is automatically placed on Hold in the Alarm Stack until that number of Seconds has passed. |
| c. | If the Cancel Signal is received within the designated timeframe, the original Alarm Signal is taken off of Hold, and Internally completed. |
| ▪ | The Alarm Signal is Logged into the Subscriber's Alarm History table with the Cancel (Abort) Code information included. |
| d. | If not Canceled within that time period, the Alarm Signal, which was placed on Hold in the Alarm Stack, will be reset to a Pending Alarm Signal. |
| ▪ | The Alarm Signal is sent to the next available Operator in the normal manner. |
| e. | In addition, the actual Cancel Signal record, containing the Signal ID (and optionally Physical Zone) that is transmitted, must also be defined. |
| ▪ | Because this is a Passive Signal, the Response Needed? box should not be Checked for this Cancel Signal record. |
| ► | Note 7: It is important to know that: |
| i. | If an Operator manually pulls an Alarm Signal from the Alarm Stack that was previously placed on Hold pending receipt of the Cancel (Abort) Code, |
| ii. | Then, if that Operator manually places it back on Hold, |
| iii. | If (when) the Cancel (Abort) Code is subsequently received, it cannot be processed automatically. |
| iv. | It must be manually completed by an Operator thereafter. |
| • | Cancellation Information: Enter the data requested below to identify the appropriate Cancellation Information for this Panel Zone. |
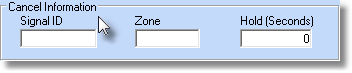
| • | Signal ID - Enter the specific Signal Identifier that would be displayed for the Operator that would indicate that the previously reported emergency condition, defined above, has been canceled by the Subscriber via a system reset/disarm action on their part. |
| • | Zone - Enter the Physical Zone Code, if one is transmitted with the Signal Identifier, that would be displayed for the Operator that would that would indicate that the previously reported physical zone code, defined above, has been canceled by the Subscriber via a system reset/disarm action on their part. |
| • | Hold (Seconds) - Enter the number of seconds that the originating Alarm Signal should be placed on Hold (automatically) while awaiting a possible Cancel (Abort) Code from the Subscriber. |
| • | Click Save ("ü") to record your entry. |
| • | This Cancel Information and the Restoral Information (see above) are also included with the Panel Zones on the Subscriber Information Form Report. |
| □ | Special Icons on the Navigation Menu of the Panel Zones Form: |
| • | Search - When you want to lookup a specific Panel Zone and there are too many to easily locate one using the Table View tab: |
 - Click the Search icon.
| • | Search By - Use the Drop-Down Selection Box provided to Choose the Search By method including the Signal Identified, Physical Zone, Description, or the Panel Zone ID (this is the system's internal record number for this Panel Zone). |
| • | Search Value - Enter the characters to locate the desired record. |
| • | Select - Click on that record when you see it listed. |
| • | Click OK to Close the form with the appropriate record selected. |
| • | Notification List - Click this button to add or update the list of those Employees who should be notified (via the Communications Module) when this Panel Zone is received. |
| • | Click the Notification button to view this dialog. |
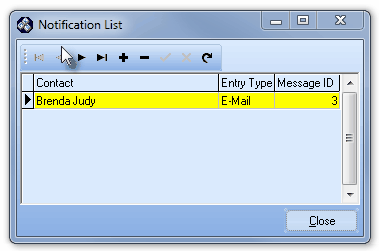
Notification List dialog
| ▪ | Contact - Use the Drop-Down Selection List provided to Choose the person to contact, selected from those entered on the SPA Subscriber's Communications tab of the People To Call form. |
| ▪ | Entry Type - Use the Drop-Down Selection List to Choose the type of message (by Pager or Email) to be sent. |
| ▪ | Message ID - Use the Drop-Down Selection List to Choose the appropriate Predefined Message you want transmitted when the event occurs. |
| • | Click the Save ("ü") icon to record the Notification entry. |
| □ | What's Next? These are the chapters that detail the requirements for additional data entry needed for each Communicator Format and its related Panel Zones: |
| • | See Panel Zones Override for information about changing the default Processing Procedures under certain, predefined date and time related situations. |
| • | See Signal Processing Order to better understand how SPA and MKMSCS attempt to validate an Alarm ( Event, Test, Restoral) Signal before declaring it an Invalid Alarm. |

