| □ | There are many types of Communicator Formats in use today, most designed and developed over many years - each version supposedly better and/or more flexible than its predecessor. |
| • | Knowing (and actually entering) every possible Signal Identifier (Signal IDs), and itemizing every possible Physical Zone number for every Subscriber, is almost an impossible task. |
| • | To greatly reduce the difficulty of this data entry necessity, MKMS allows you to define any number of "generic" Communicator Formats, each of which is assigned a set of "generic" Panel Zones |
| • | These Panel Zones identify the normal (default) purpose of the Signal IDs normally transmitted by each of these Communicator Formats. |
| • | So, with these predefined Communicator Format and Panel Zones sets, virtually all of the potential Alarm Signals and Supervisory Events that will be transmitted from a Subscriber's Control Panel can be assigned to that Subscriber's Account by simply assigning (in the Central Station Data Form's Subscriber Panel(s) section) the appropriate Communicator Format being used to transmit those Alarm Signals and Supervisory Events from that Subscriber's CSID. |
| • | By assigning a Communicator Format, the Subscriber's CSID "inherits" all of that Communicator Format's Panel Zones as if each Signal ID was identified individually and manually for this Subscriber. |
| □ | The result is that each Communicator Format has its own (somewhat) unique set of Panel Zones that represent almost all of the Alarm Signals and Supervisory Events that will be transmitted by that type of Communicator Format. |
| • | Only the exceptions to these "generic" Panel Zones will need to be identified using the CSID Zones Form. |
| • | Those exceptions are entered on a CSID by CSID basis based on need. |
| □ | To define a Communicator Format, on the Main Menu Select Maintenance and Choose Central Station, then Click Communicator Format. |
| • | Many (predefined) Communicator Formats are included with the system along with their associated Panel Zones. |
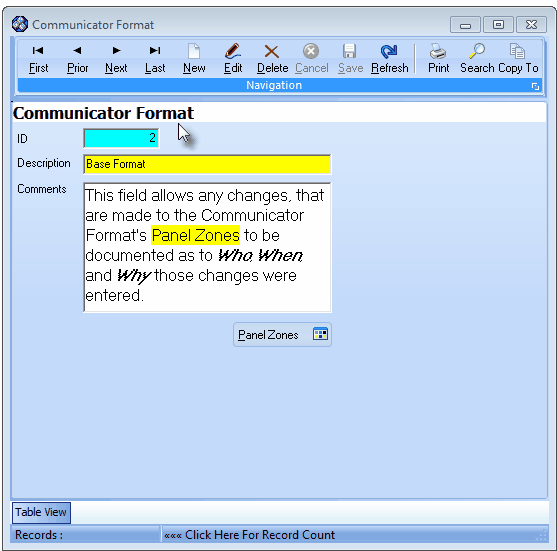
Communicator Format Form
| • | This Communicator Format Form may be Re-sized by Dragging any side (Top, Bottom, Left or Right) in or out. |
| • | Navigation Menu - The Navigation Menu is located at the top of the Communicator Format Form. |

| • | This Navigation Menu provides the normal Record Movement, New, Edit, Delete, Cancel, Save, and Refresh options; as well as a Print, Search and Copy To function. |
| • | Record Editing section - The details of the currently selected record are displayed below the Navigation Menu at the center (Main Body) of the Communicator Format Form. |
| • | Table View tab - A tabular (spreadsheet style) Table View of the currently defined Communicator Formats is accessible by Clicking the Table View tab at the bottom of the Communicator Format Form. |

| • | To display a specific Communicator Format record in the Record Editing section, Click on that record within the Table View section, or use the Search Icon (see the "Using the Special Functions" section later in this chapter). |
| • | This Table View information may be Pinned in Place by Clicking the Pin Icon on the right. |
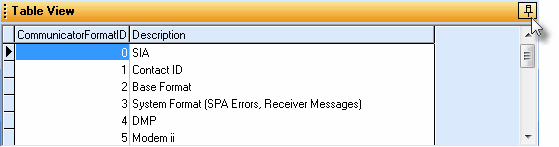
Communicator Format Form - with Table View tab Pinned Open
| ▪ | You may Un-Pin this Table View by Clicking the Pin Icon again. |
| ▪ | Click on any listed record to display that information in the center (Main Body) of the Form. |
| • | There are two columns of data in this Communicator Format Record Listing: |
| 1) | ID - The record ID assigned by the system when the Communicator Format entry was originally saved. |
| 2) | Description - The description or formal name of the of the Communicator Format. |
| • | Each column's Header Name describes the data contained in that column. |
| ▪ | Clicking on a Header Name will set the order in which the Communicator Format will be listed. |
| ▪ | Clicking on the same Header Name will set the order in the opposite direction (ascending vs. descending). |
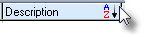
| ▪ | The Header Name that is determining the Order of the list will have an Icon indicating the Order displayed next to that Header Name. |
| • | To locate an existing Communicator Format, Click the Search Icon to open the Select Communicator Format dialog (see the "Using the Special Functions on the Navigation Menu" section below). |
| • | To define a new Communicator Format: |
| • | Click the  Icon to start a Communicator Format entry in the Record Editing section. Icon to start a Communicator Format entry in the Record Editing section. |
| ▪ | ID - This number will be assigned when the Communicator Format is initially saved. |
| ▪ | Description - Enter a brief description of up to 50 characters in length for this Communicator Format. |
| o | The Description may up to 50 characters in length and include upper and/or lower case letters, numbers, spaces and normally used punctuation marks. |
| ▪ | Comment - Enter any notes relating to any changes that are made to the Communicator Format's Panel Zones, to document Who,When, and Why this entry was created, or changes were made. |
| • | Click the  Icon to to record this Communicator Format. Icon to to record this Communicator Format. |
| ◆ | All of the Mandatory Panel Zones will automatically be created for this new Communicator Format entry. |
| • | Any number of additional Communicator Formats may be created and existing ones modified, as needed. |
| □ | Using the Special Functions on the Navigation Menu at the top of the Communicator Formats Form: |
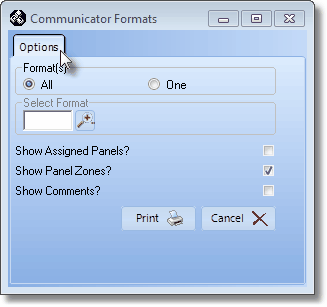
Communicator Formats - Options tab
| • | Search - Click the Search Icon to open the Select Communicator Format dialog. |

Search Communicator Format dialog
| • | See the "Using the Generic Search dialog" section in the Advanced Search Dialog chapter for more information about this Search dialog. |
| • | Copy To - When adding a new Communicator Format whose Panel Zones are very similar to an existing Communicator Format, use this Copy To feature to copy those Panel Zones to that new Communicator Format. |
| • | Enter the new Communicator Format. |
| • | Locate (using the Search feature described above) the Communicator Format whose Panel Zones are to be copied to this new Communicator Format. |
| • | Click the Copy To Icon to copy the Selected Communicator Format information to a newly created Communicator Format record. |
| • | Using the Select Communicator Format dialog tat will be displayed automatically, Select the Communicator Format to which the Panel Zones for the current Communicator Format are to be copied. |
| • | Click the OK button on the Select Communicator Format dialog and the copying process will be completed. |

| • | Once the Communicator Format has been entered and saved, Click the Panel Zones button to define the default Panel Zones. |
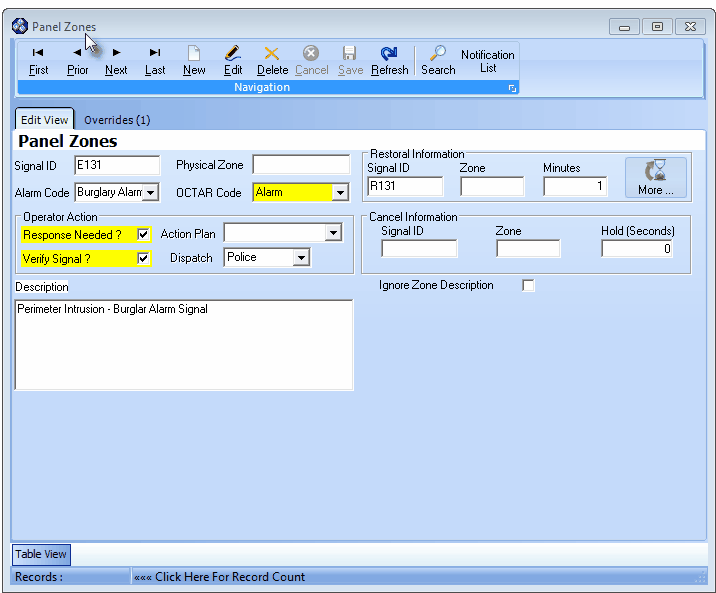
Panel Zones Form accessed from the Communicator Format Form
Understanding how to use the various Zoning Information Forms:
| • | Restoral Information - Explains the four ways to identify a Trouble Signal that requires follow up by an Operator and/or a Technician, and then to specify the type of follow-up that is actually required in each case. |
| • | See Panel Zones for a complete discussion of how to enter data in that Form. |
| • | See Signal Processing Order to better understand how SPA and MKMSCS attempst to validate an Alarm (Open, Close, Test, Restoral) Signal before declaring it an Invalid Alarm. |

