| □ | The various Subscriber Information Forms report Options provide a variety of Central Station Monitoring related data, based on the selected Options, that may be viewed, printed or exported. |
| • | To view the Subscriber Information Forms, on the Main Menu Select Reports and Choose the Central Station sub-menu then Click Subscriber Information.
|
| □ | Subscriber Information dialog's tabs - There are two tabs on the Subscriber Information dialog. |
| • | Options - Initially only the Options tab is shown (until you make your Options selections and Select Print). |
| • | Report Type - Indicate which report format is to be produced. |
| ▪ | Full Information - Click this button to be able to specify which data is to be included, and the order that it will be listed, by selecting from the many available choices (see Full Information Selections below). |
| ▪ | Short List - Click this button to get a list with no Central Station Data (except their CSID) in a concise format of one line per Subscriber unless you request address information be included (see Short List Selections below). |
| □ | Full Information Selections - |
| • | Click the Full Information button to be able to specify which data to be included, and the order that it will be listed, by selecting from the many available choices listed below: |
| ► | Note: Once a set of Options are Chosen for the Subscriber Information Report, the options that were chosen become the User's default Options. |
These default Options may be reset at any time by simply making a different set of Choices.
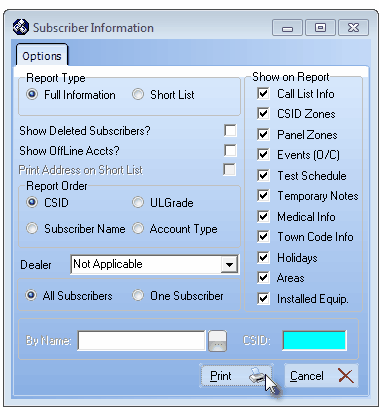
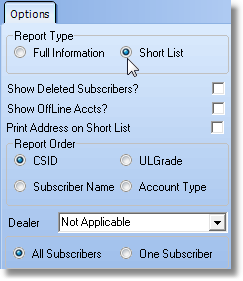
Subscriber Information Form - Options tab
| • | Show Deleted Subscribers? - To have those Subscribers that have been Deleted included in the list, Check this box. |
| • | Show Offline Accounts? - To include those Accounts that have gone off-line, Check this box. |
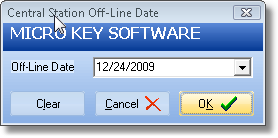
Off-Line Date is entered in Central Station Data
| • | Report Order - Select the order in which you want the Subscribers to be listed. |
| • | CSID - To list the Subscribers in CSID order, Click this box. |
| • | UL Grade - To list the Subscribers in UL® Grade order - starting with those systems that are Unclassified, Click this box. |
| • | Subscriber Name - To list the Subscribers in alphabetical order by Subscriber Name, Click this box. |
| • | Account Type - To list the Subscribers in Account Type order, and within each Account Type, in alphabetical order by Subscriber Name, Click this box. |
| • | Dealer - The four available options are complicated. You may Select to include Dealer's Accounts and not separate them from others (or have no Dealer's Accounts included), only list Accounts that are monitored for your Company (In House Accounts), only list Accounts that are monitored for other Alarm Dealers, or Choose the specific Dealer's Accounts (or all Dealer's Account's) to be included in this list. |
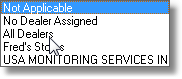
| 1. | If you do not want to separate the list of Subscribers by their Alarm Dealer - because it is not necessary or you do not offer Dealer Monitoring - keep the default selection of Not Applicable. |
| 2. | If you want to list only those Subscribers that you are monitoring for your own Company, Choose No Dealer Assigned. |
| 3. | If you want to list only those Subscribers that you are monitoring for any other Company, Choose All Dealers. |
| 4. | If you want to list Subscribers that you are monitoring for one specific Alarm Dealer, Choose that specific Dealer's Name. |
| • | All Subscribers - Based on the criteria set above all applicable Subscribers will be included if you Click this box. |
| • | One Subscriber - You may Choose one Subscriber for this Subscriber Information Form report. |
| • | Subscriber Search - Click the Ellipse next to the By Name field to open the standard Subscriber Search dialog. |
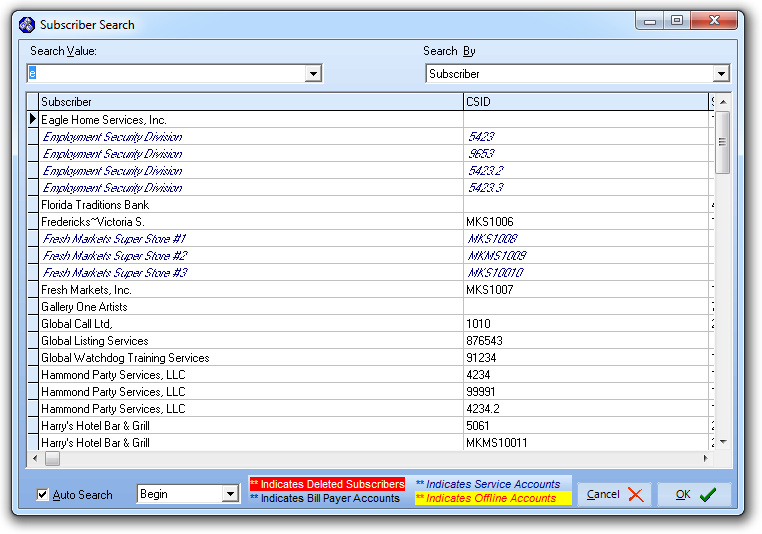
Subscriber Search dialog

| • | The selected Subscriber's Name and associated CSID will be inserted into those fields. |
| • | Show on Report - By default, when you Click the Full Information button, all will be Checked. Choose the data to be excluded for each Subscriber by Unchecking that item.. |
| a. | Call List Info - To include all of the Subscriber's People to Call information, Click this box. |
| b. | CSID Zones - To include all of the Subscriber's CSID Zones, Click this box. |
| ▪ | The Notification List is also included when the CSID Zones option is selected. |
| ▪ | If an Event relates to a specific Area, that Area information will be included. |
| ▪ | If a specific User # is assigned to the Event, that information will be included. |
| ▪ | If an Alternate Events CSID has been defined (see the Subscriber Panels chapter for more information), those Events will be included. |
| e. | Test Schedule - To include all of the Subscriber's Account Testing information, Click this box. |
| f. | Temporary Notes - To include all of the Subscriber's Temporary Notes, Click this box. |
| ▪ | To include all of the Subscriber's Town Code contact information, Click this box. |
| i. | Holidays - To include a list of all of the Subscriber's Holidays, Click this box. |
| j. | Areas - In some cases, a Subscriber's Alarm System may be divided into separate Areas - sometimes called Partitions - and each of these Areas may be Armed and Disarmed individually, and therefore Supervised individually, as well. |
| ▪ | To include a list of any defined Areas for each Subscriber, Click this box. |
| k. | Installed Equip. - To include a list of all of the Subscriber's Installed Equipment, Click this box. |
| • | Print - Click the Print button to View and/or Print (to a File or a Printer) the Subscriber Information Forms. |
| ► | Note: A word of caution, if you have chosen to list All Subscribers with Full Information, it will be a very long report that will require a long time to process, and a lot of paper to print it. |
| □ | Short List Selections - Click the Short List button to get a list with no Central Station Data (except their CSID) in a concise format of one line per Subscriber (unless the Print Address on Short List option is chosen). |
Available Short List Options
| • | Report Order - Select the order in which you want the Subscribers to be listed. |
| • | CSID - To list the Subscribers in CSID order, Click this box. |
| • | UL Grade - To list the Subscribers in UL® Grade order - starting with those systems that are Unclassified, Click this box. |
| ▪ | When the Short List format is selected, the report is ordered by UL® Grade but each Subscriber's specific UL® Grade is not included. |
| ▪ | As shown below, a Totals box listing each UL® Grade is included at the end of the Subscriber Information Forms Short List report. |
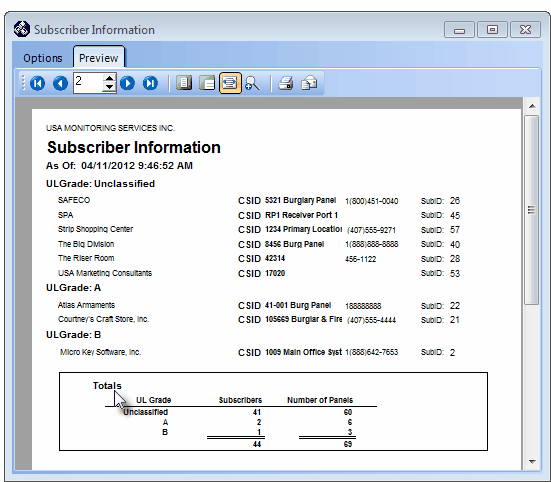
Subscriber Information Forms - Short List Summary Totals - UL Grades option
| • | Subscriber Name - To list the Subscribers in alphabetical order by Subscriber Name, Click this box. |
| • | Account Type - To list the Subscribers in Account Type order, and within each Account Type, in alphabetical order by Subscriber Name, Click this box. |
| ▪ | When the Short List format is selected, the report is ordered by Account Type each Subscriber's specific Account Type is not included. |
| ▪ | As shown below, a Totals box listing each Account Type is included at the end of the Subscriber Information Forms Short List report. |
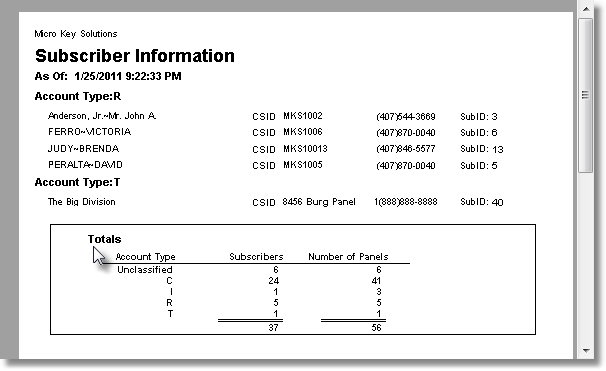
Subscriber Information Forms report with Short List Summary Totals for Account Types
| • | Dealer - Select whether or not, and if so, which Dealer's Accounts will be included in this list. |
| ► | Note: See Dealer in the Full Information section above for a complete explanation of this field. |
| • | All Subscribers - Based on the criteria set above all applicable Subscribers will be included, if you Click this box. |
| • | One Subscriber - You may select one specific Subscriber to list, if you Click this box. |
| • | By Name - Choose the By Name method and either use the Drop-Down Selection List to make that Choice based on the Subscriber's Name, or simply Type in the required Name and an incremental Search will be performed until it is located. |
| • | By CSID - Choose the By CSID method and use the Drop-Down Selection List to make that Choice based on the Subscriber Panel CSID, or simply Type in the required CSID and an incremental Search will be performed until it is located. |
| ▪ | Even if the selected CSID is for a Subscriber that has multiple Subscriber Panels defined, only the CSID that was entered will be listed. |
| • | Show on Report - None of these options are available in the Short List format. |
| • | Print - Click the Print button  to Preview and optionally Print (to a File or a Printer) this Subscriber Information Forms. to Preview and optionally Print (to a File or a Printer) this Subscriber Information Forms. |
| □ | Preview - The Preview tab presents the report which resulted from the Options you've selected. |
| • | Up Arrow/Down Arrow - hi - Moves the report one line up, or one line line down, respectively. |
| • | Page Up/Page Down - Moves the report to the previous or next page, respectively. |
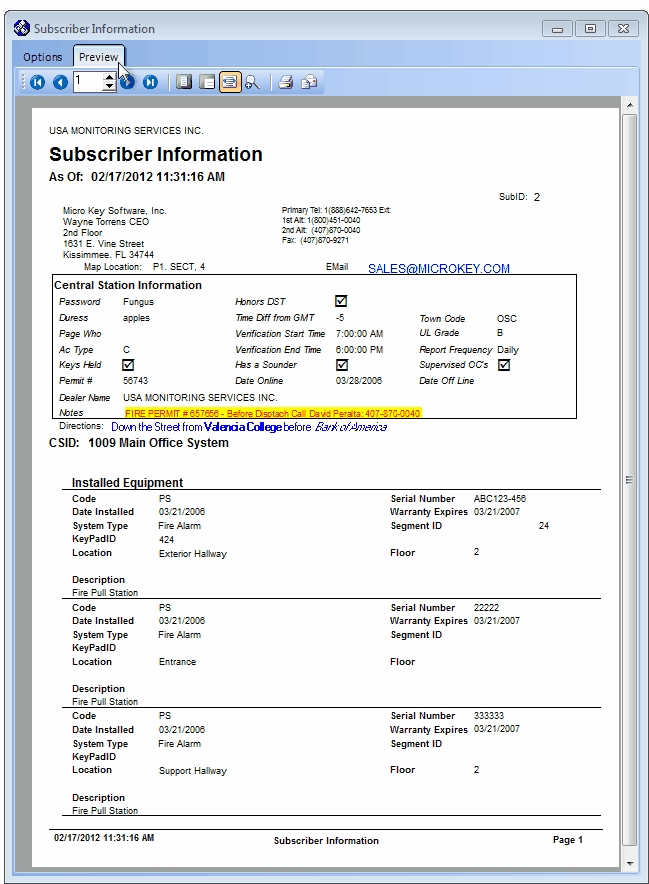
Subscriber Information - Preview
| • | Home -  - Using either the screen or your Keyboard's Home key, moves the report to the top of the first page. - Using either the screen or your Keyboard's Home key, moves the report to the top of the first page. |
| • | End -  - Using either the screen or your Keyboard's End key, moves the report to the bottom of the last page. - Using either the screen or your Keyboard's End key, moves the report to the bottom of the last page. |
| • | Arrows - The arrows allow you to move back and forth, from page to page. |
| • | Number - Indicates the page number you are viewing. |
| ▪ | You may also type in a specific page number, Press 8 Enter and that page will be displayed immediately. |
| ▪ | If you enter an invalid page number, it will be ignored. |
| • | Fit To Page - Click the first button after the arrows to size a full page of the report to fit the screen. |
| • | Zoom To 100% - Click the second button after the arrows to display the page at 100% (of the printed view). |
| • | Fit To Page Width - Click the third button after the arrows to size the page of the report to fit the full width of the screen. |
| • | Zoom To Percentage - Click the fourth button after the arrows to re-size the page of the report by percentage. |

| ▪ | When you Click the Zoom To Percentage button, the Percentage selector will be displayed. |
| ▪ | You may then Click the Up or Down ‚ arrows to set the exact amount of Zoom you want. |
| • | Print - Click the Print button to Print (to a File or a Printer)  the displayed Subscriber Information Forms. the displayed Subscriber Information Forms. |
| • | Email - Click the Email  button to send this report to an Email address of your choosing. button to send this report to an Email address of your choosing. |
| • | Exit the form by Clicking the Close button x on the right at the top of the form. |

