| □ | Supervising the Opening and Closing schedule(s) at a Subscriber's Premises is one of the primary functions of a Central Station. |
| • | Supervision of almost any schedule variation may be accommodated with this Opening / Closing Events Form. |
| • | An Opening/Closing Events record: |
| ▪ | Defines a time "window" in which the Signal for a specified Event should be received by the Central Station. |
| ▪ | Specifies which Event Type (i.e., Open, Close, Multiple, Holiday, Other) is being defined, and therefore Supervised. |
| ▪ | May require that the Opening Signal must be Verified. |
| ▪ | May specify which specific User(s) are permitted to Open and/or Close. |
| ▪ | May identify which Partition is being supervised (see both the "Understanding Partitions" section in the Subscriber Panel(s) chapter, and the Areas chapter for more information about Partitions). |
| ▪ | May specify the Day(s) in which the Event should, and should not, occur. |
| □ | Understanding the implementation of Partitions and how they affect Opening / Closing Events: |
| ◆ | If the Partitions feature will be needed, the SPA Setup Instructions contain detailed information on enabling Look-up Partitions, and the "Understanding Partitions" section in the Subscriber Panel(s), and the Areas chapters provide more information about Partitions. |
| • | Essentially, to start using the Partitions feature: |
| • | Each Partition will have the same CSID but will also have a Partition extension - added after a decimal place, or appended as an extra number added to the "root" CSID (CSID.PARTITION. or CSIDPARTITION) based on whether or not the Add period to partitions option is Checked. |

Partition defined using a decimal separated addition to the Primary CSID
| iii. | If any Subscriber Panel CSIDs are to be Supervised, whether or not Partitioned, the O & C Supervised? field on the Central Station Data Form must indicate the type of Event Supervision that will be required. |
| □ | The Opening / Closing Events Form |
| • | Select the General Quick Access Menu and Choose the Monitoring to open the Central Station Data Form. |
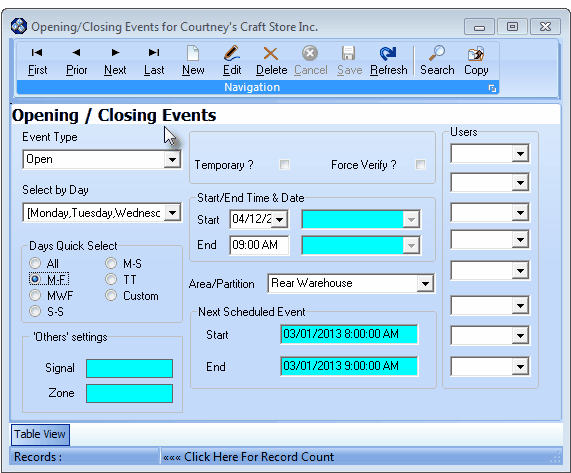
Opening/Closing Events Form
| • | This Opening / Closing Events Form may be Re-sized by Dragging the Top and/or Bottom up or down, and/or the Right side in or out. |
| • | Navigation Menu - The Navigation Menu is located at the top of the Opening / Closing Events Form. |

| • | This Navigation Menu provides the normal Record Movement, New, Edit, Delete, Cancel, Save, and Refresh options; as well as special Search and Copy functions. |
| • | Record Editing section - The details of the currently selected record are displayed below the Navigation Menu at the center (Main Body) of the Opening / Closing Events Form. |
| • | Table View tab - A tabular (spreadsheet style) Table View of the currently defined Opening / Closing Events is accessible by Clicking the Table View tab at the bottom of the Opening / Closing Events Form. |

| • | To display a specific Opening / Closing Event record in the Record Editing section, Click on that record within the Table View section, or use the Search Icon (see the "Using the Special Functions" section later in this chapter). |
| • | This Table View information may be Pinned in Place by Clicking the Pin Icon on the right. |
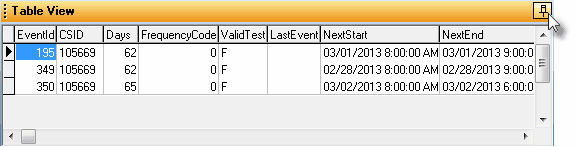
Opening / Closing Events Form - with Table View tab Pinned Open
| ▪ | You may Un-Pin this Table View by Clicking the Pin Icon again. |
| ▪ | Click on any listed record to display that information in the center (Main Body) of the Form. |
| • | There are many Columns of data in this Opening / Closing Events listing and each Column's Header Name describes the data contained in that Column. |
| • | The default Order in which this information will be listed is by EventID. |
| ▪ | Clicking on a Header Name will re-set the Order in which the Events will be listed. |
| ▪ | Clicking on the same Header Name will set the Order in the opposite direction (ascending vs. descending). |
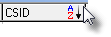
| ▪ | If the default Order has been changed, the Header Name that is determining the Order of the list will have an Icon indicating the Order displayed next to that Header Name. |
| □ | Entering Events information for the purpose of Supervising when the Opening and Closing Times should occur at a Subscriber's Premises: |
| • | Click the  Icon to start the Opening/Closing Event entry in the Record Editing section. Icon to start the Opening/Closing Event entry in the Record Editing section. |
| • | Event Type - Use the Drop-Down Selection List provided to Choose the Type of Event (is this for an Opening, Closing, Multiple, Holiday, or Other?) which this Opening/Closing Event schedule entry will represent. |
| • | Opening - The default selection - This is an Event record that will supervise an Opening at the Premises. |
| ▪ | One (1) minute after the End Time, if this Opening Event Signal has not been received, the system will generate a FO* Signal with a Failed To Open Condition Code. |
| • | Closing - This is an Event record that will supervise a Closing at the Premises. |
| ▪ | One (1) minute after the End Time , if this Closing Event Signal has not been received, the system will generate a FC* Signal with a Failed To Close Condition Code. |
| • | Multiple - This is an Event record that will supervise a Premises that may have multiple Openings and Closings occur within the specified time frame. |
| ▪ | An Opening Signal and/or a Closing Signal is not required, but is permitted at any time within the Start and End Times for this type of Event. |
| ▪ | Any number of Opening and Closing Signals may be received within the Start and End Times, and all will be considered Valid Openings and/or Closings Signals. |
| ▪ | To have the Closing time specifically Supervised, define that Closing Event separately (see the Closing instructions above). |
| • | Holiday - This is an Event record that will supervise a Holiday during which the Premises should remain Closed. |
| • | Other - This is an Event record - that requires a corresponding CSID Zone which has a User Defined Signal ID, and optionally a Physical Zone Code, that is designed to alert the Operator when it's the time specified to perform a specific task (see 'Others' Settings below). |
| • | Select by Day - Use the Drop-Down Selection List which lists all the days of the week to Choose the appropriate Days. |
| • | Check the Day(s) of the Week in which this Events schedule will be enforced (also see Days Quick Select below). |

Checking Day boxes
| • | Days Quick Select - To speed data entry, Day(s) of the Week may be selected from a list of preset Day Combinations: |
| • | Click the button that represents the set of Day(s) of the Week during which this Event is to be supervised. |
| ▪ | All - Every Day box will be selected. |
| ▪ | M-F - Monday through Friday will be selected. |
| ▪ | MWF - Monday, Wednesday and Friday will be selected. |
| ▪ | S-S - Saturday and Sunday will be selected. |
| ▪ | M-S - Monday through Saturday will be selected. |
| ▪ | TT - Tuesday and Thursday will be selected. |
| ▪ | Custom - The default selection - Manually Check the desired Day(s) in the Select by Day area. |
| • | The appropriate boxes will be Checked automatically in the Select by Day area. |
| • | Temporary? - If this is a Temporary Event - one that is meant to override another Event record previously entered for the same Day and Event Type, Check this field. |
| • | When Checked, the Temporary? field names turns Red. |
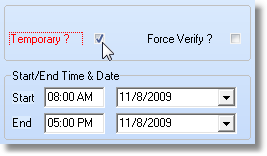
Temporary? Start/End Time & Date information
| • | Start - Enter the Starting Time, and because this is a Temporary Event, enter the (first) Date for which this Scheduled Event should be enforced. |
| • | End - Enter the Ending Time, and because this is a Temporary Event, enter the (last) Date in which this Scheduled Event should be enforced. |
| • | Force Verify? - Whenever this Event's signal is received, whether or not it is within the Event's Time Window, if the Operator is required to Verify the signal at the Premises, Check this box. |
| • | Start/End Time & Date - Enter the Starting Time and optionally the (first and/or last) Date to enforce this Schedule. |
| • | Start - Enter the Starting Time for this Event Type. |
| • | End - Enter the Ending Time for this Event Type. |
| • | Area/Partition - For systems with multiple Partitions, when this Supervised Event is to be enforced only on a specifically designated Partition (see Areas), use the Drop-Down Selection List provided to Choose the appropriate Area. |
| • | Only those Areas defined for the selected Subscriber Panel CSID will be listed in the Area/Partition field. |
| • | Next Scheduled Event - This Start and End information will be calculated by the system and entered in the fields listed below. |
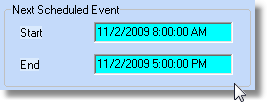
| • | Start - A Starting Date and Time representing when this Supervised Event's Window is expected to begin. |
| • | End - An Ending Date and Time representing when this Supervised Event's Window is expected to end. |
| • | Each time the appropriate Event signal is received, SPA will automatically update the Next Scheduled Event information with the "new" next time information. |
| • | Users - Sometimes, to be considered valid, Event signals must be received from specifically identified Users. |
| • | Use the Drop-Down Selection Lists provided to identify up to eight (8) Users who are permitted to transmit this Event Type. |
| • | The User ID #s transmitted by the control panel, that identifies the individual who disarmed or armed the Alarm System, is entered on the Central Station tab of the People To Call Form. |
| • | Entering a User limits which individuals may transmit this Event to only those User IDs identified here. |
| • | If all Users are permitted to initiate this Event, do not enter any User IDs. |
| • | Click the Save (<) Icon to record this entry. |
| • | Repeat this process as often as needed. |
| □ | Other Events - 'Others' Settings - When Other is selected as the Event Type: |
| • | An "internal" Signal - a User Defined Signal ID, and optionally a Physical Zone Code previously defined as a CSID Zone record - must be entered. |
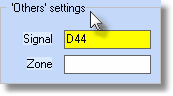
| • | This Signal (ID) and optional (Physical) Zone combination must already be defined in the CSID Zones Form. |
| • | The result is an Event record with a CSID Zone having a User Defined Signal ID, and optionally a Physical Zone Code, which, when required, alerts the Operator that it is time to perform a specific task (see the Other Events chapter for complete information about this feature). |
| □ | Using the Special Functions on the Navigation Menu at the top of the Opening/Closing Events Form: |
| • | Search - To modify or delete an existing Opening/Closing Event entry: |
| • | The Search Events dialog is displayed. |

Search Events dialog
| • | Search By - Using the Drop-Down Selection List provided, Choose the preferred Search By method. |
| • | Search Value - Enter characters until the desired Event record is located. |
| • | OK - Click OK to accept the selected record and Close the Search Events dialog. |
| • | Click the Edit Icon on the Navigation Menu and modify the field(s) as needed. |
| • | Click the  Icon to record any changes made to this Opening/Closing Event entry. Icon to record any changes made to this Opening/Closing Event entry. |
| • | See the "Using the Generic Search dialog" section in the Advanced Search Dialog chapter for more information about this Search dialog. |
| • | Copy - To copy an existing set of Opening/Closing Event records to another Subscriber's Subscriber Panel (CSID) Opening/Closing Events Form: |
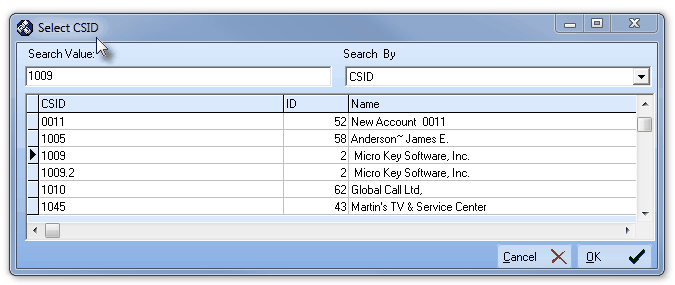
| • | Using the displayed Select CSID dialog |
| ▪ | Select the required CSID (the CSID to which these Opening/Closing Events are to be copied) |
| • | The Opening/Closing Events defined for this CSID will be instantly copied to the Selected CSID. |

