| □ | System tab - Establish universal parameters for the operation of SPA.failed |
| • | If SPA is running, Click the Stop button to stop SPA from processing signals, |
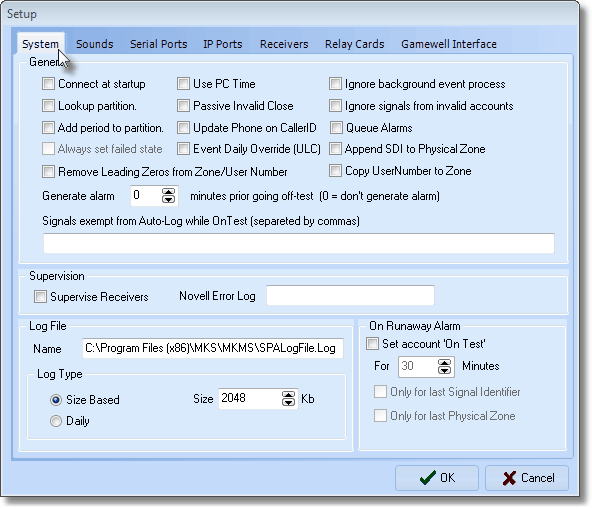
SPA Setup Form - System tab
| • | General - Check each feature to want or need to activate: |
Column 1:
| • | Connect at Startup - Check this box if you want SPA to connect to the Receivers and start processing alarms immediately at Startup (recommended). |
| ► | Important Note: SPA does not actually start (itself) automatically. |
After you have manually started the SPA application, this Connect at Startup option will allow SPA to connect to your Receivers without first Selecting the Start button on the SPA menu.
| • | Lookup partition - Check this box to activate the Partition Lookup option by which SPA will look for and incorporate the Partition Number into the CSID (See Add period to partitions below and Understanding Partitions later below). |
| • | Add period to partitions. - Check this box if you want SPA to add a period to the end of the CSID and before the Partition Number (See Understanding Partitions below). |
| ▪ | For those Central Stations using Partitions, and also receiving various lengths of CSIDs, implementing the Formatting of the CSID+Partition data with a Period inserted between the CSID and Partition ensures that SPA can properly interpret the Areas when they are transmitted - regardless of the length of the CSID. |
| • | Always set failed state - The use of the field is not currently active. |
| • | Remove Zeros from Physical Zone/User Number - Check this box if you want SPA to remove any leading Zeros from all Physical Zones and User Numbers. |
| ▪ | Check this box if you want SPA to notify the Technician via Email through the Communication Module, that an Account which was placed On Test is about to come Off Test. |
| ► | Important Note: If the Ignore background processes box is Checked, this feature is disabled (see the "Column 3" section below). |
| • | Signals exempt from Auto-Log while On Test (separate with commas) - Enter the Alarm Condition Codes representing the type of signals that qualify in this field. |
Column 2:
| • | Use PC Time - Check this box if you want SPA to use the Time on the Clock in the Workstation, instead of those in your Receivers. |
| ▪ | This is a useful feature if using multiple Receivers because it is difficult to keep each Receiver's Clock synchronized with all of the other Receivers. |
| ▪ | By using the Workstation's Clock, all signals received will be recorded with the correct - and most consistent - time stamp. |
| • | Passive Invalid Close - Check this box if you want SPA to insert Invalid Close signals directly into the Alarm History file without processing this signal as an Alarm. |
| • | Update Phone on Caller ID - To have SPA automatically insert Caller ID Telephone Numbers from which Alarm Signals were transmitted for this Account into the Phone List field's table within the Subscriber Panels Form, Check the Update Phone on CallerID box. |
| • | Event Daily Override (ULC) - Check this box if your are operating under ULC® (Underwriters Laboratories of Canada) rules, and therefore need to implement the special handling of Overrides for supervised Closings that they require. |
Column 3:
| • | Ignore background event processes - Check this box if you want SPA to ignore events created by SPA - such as Failed To Open or Failed To Test. |
| ▪ | Additionally, when Checked, the alarm events On Hold will not reset or come back to the Signal Processing screen. |
| • | Ignore signals from invalid alarms - Check this box if you want SPA to ignore Alarm Signals from Invalid Accounts - which would be any CSIDs that have not been previously entered in the Subscriber Panels table. |
| • | Queue Alarms - Check this box if you want SPA to acknowledge (ACK) Receiver Data before it receives Confirmation from the database that the Alarm Signal has been saved in the Alarm Stack table. |
| ▪ | If not Checked - the default behavior - SPA will not acknowledge receipt of a signal from the receiver until it has received notification from the database that the event was committed to the Alarm Stack table. |
| ▪ | During extremely busy times in your Central Station, if you get Automation Failure alarms from your Receivers, you may want to Check to box. |
| ▪ | However, as a warning, this should only be used in extreme cases because a loss of a signal is possible. |
| • | Append SDI to Physical Zone - For the SIA Communicator Format Only - Check this box if you want SPA to have the additional modifiers PT (point), ID (user id), or RT (rf point) that are received, (the number that follows these modifiers) placed in the Physical Zone field after the Physical Zone code itself (also see CSID Zones and Panel Zones). |
| • | Copy User Number to Zone - When Checked, the Physical Zone Code will be substituted with the User Number on Open and Close packets (e.g, E401, R401, OP, CL). |
| • | Supervision - Activates Receiver Supervision which is a UL® Central Station requirement. |
| • | Supervise Receivers - Check this box if you want SPA to Supervise your Receivers. |
| ▪ | SPA will create an Alarm Event (A101) if the connection is lost with a receiver, and a Restore Event (A102) when the connection is reestablished. |
| • | Novell Error Log - On Novell SFT III Networks Only - Sets the location of the Novell Netware Error Log (leave this field blank unless using a Novell SFT III Network). |
| ▪ | If you are running Novell SFT III Netware® as your Network Operating System, enter the Name and location of your Novell Error Log. |
| • | Log File - Enter the location and name of SPA's Log File. |
| • | Name - This is the file used to dump information passed over the ports. |
| ▪ | The location and name are inserted initially on installation. |
| ▪ | The information in the log file is used for debugging purposes only. |
| ▪ | We recommend that you do not change the location or file name. |
| • | Log Type - Enter the rules for the SPA Log File named above. |
| ▪ | Size Based - Click this button to control the maximum size of this file. |
| ▪ | Size - Enter the file size. The log file will remove the oldest information when the file exceeds this setting. |
| ▪ | Daily - Click this button to start a new log file each day. |
| o | This will save up to seven days of Log information (SPALogFile_Mon.log, then SPALogFile_Tue.log, etc.). |
| o | After the seventh day, the first file, and each file thereafter, will be overwritten as needed. |
| • | On Runaway Alarm - To control the volume of alarm signal traffic as related to runaway alarm signals, UL® 1981 has established a standard for identifying a Runaway Signal which is 30 signals in 60 minutes from an Account (this is a fixed configuration and may not be modified). |
| • | Set Account "On Test" - Check this box to have Runaway Signals automatically placed on Test. |
| • | For nn Minutes - Enter the number of minutes that a runaway alarm will remain on Test. The default is 30 minutes and this value may be set as high as 240 minutes. |
| • | Only for last Signal Identifier - Check this box to have only the last Signal Identifier placed On Test. |
| • | Only for Last Physical Zone - Check this box to have only the last Physical Zone placed On Test. |
| • | Save - Click the OK button when to save your entries. |
| □ | Understanding Partitions (a.k.a. Areas): |
| • | In some cases, a Subscriber's premises may have an Alarm System installed in such a way as to be able to sub-divide sections of that premises into separate Areas (often referred to as Partitions) for the purpose of having each section identified as a separate, unique, supervised area, with each of these individual Areas being monitored as separate "systems" within that Alarm System. |
| • | Areas do not represent the Subscriber's premises as a whole, but instead represent a specifically sub-divided section of that Subscriber's premises. |
| • | Each Area may therefore be monitored individually, Armed and Disarmed individually, and have Opening, Closing, and other types of Test Events Supervised individually. |
| • | Areas defined, using either the CSID.Partition or the CSIDPartition Lookup Format (as selected in the Setup Form within SPA), must also be defined in the Areas Form (using the Partition number attached to the "root" CSID). |
| • | Subscribers may have a partitioned system. If you use Partitions: |
| • | Check Lookup partition in the SPA Setup System tab (see above). |
| • | Check Add period to partitions in the SPA Setup System tab (see above). |
| • | Each Partition may have Open and Close Events scheduled at different Times/Days/Holidays (and have their own set of People To Call, CSID Zones, etc.). |
| • | Each Partition will have the same CSID but will also have an extension - defined in a decimal place - inserted after the basic CSID entry with this format: CSID.PARTITION. |

Partition entered as a decimal addition to Primary CSID
| • | Events - When defining the Open and Close rules for a Partition (and any other monitoring related data) you must First select the CSID with the correct CSID.PARTITION combination in the Subscriber Panels area, before entering the related Monitoring Information. |
| ► | Note: A word of caution is required here if your Central Station has Subscribers that are reporting ( Areas ) Partitions within their Signals. |
| b. | This assures that the correct Description of that Area (Partition), when received, can be displayed for the Operator. |
| c. | Partitions not defined within the Areas Form, can not display this needed information for the Operator. |

