|
Condition Codes This Help File Page was last Modified on 01/10/2014 |

|

|
|
|
Condition Codes This Help File Page was last Modified on 01/10/2014 |
|
|
Condition Codes
This Help File Page was last Modified on 01/10/2014
|
Condition Codes This Help File Page was last Modified on 01/10/2014 |
|
|
|
|
Condition Codes This Help File Page was last Modified on 01/10/2014 |
|
|
| □ | Event and Alarm Signal Condition Codes are assigned to all Panel Zones and, if CSID Zones are required, to all CSID Zone entries to define the reason why those Signals were transmitted from a Subscriber's Control Panel to the Receiver. |
| • | An Alarm Condition Code record describes an Event and/or Alarm Condition, identifies the required Operator Skill needed to process the Alarm Condition, set the Priority level for the monitoring response, and define the Report Printing Options for the Event or Alarm Signal. |
| • | Several Alarm Condition Codes come predefined and should not be deleted (see the "Mandatory Condition Codes and Panel Zones" chapter). |
| • | Some of these are mandatory for the proper operation of SPA - The Signal Processing Application. |
| • | To enter an Alarm Condition Code, on the Main Menu Select Maintenance and Choose Central Station, then Click Condition Code. |
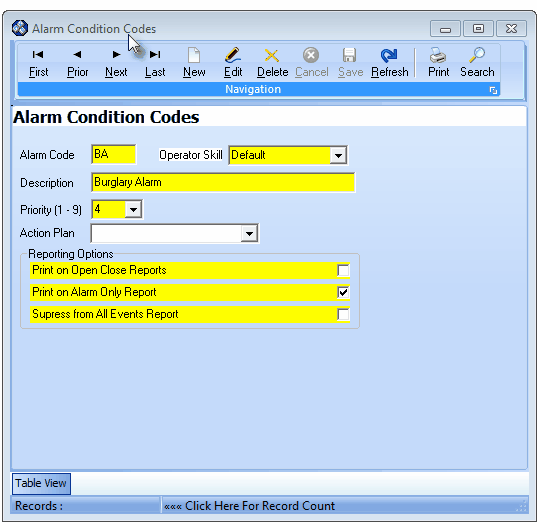
Alarm Condition Codes Form
| • | This Alarm Condition Codes Form may be Re-sized by Dragging the Top and/or Bottom up or down, and/or the Right side in or out. |
| • | Navigation Menu - The Navigation Menu is located at the top of the Alarm Condition Codes Form. |

| • | This Navigation Menu provides the normal Record Movement, New, Edit, Delete, Cancel, Save, and Refresh options; as well as special Print and Search functions. |
| • | Record Editing section - The details of the currently selected record are displayed below the Navigation Menu at the center (Main Body) of the Alarm Condition Codes Form. |
| • | Table View tab - A tabular (spreadsheet style) Table View of the currently defined Alarm Condition Codes is accessible by Clicking the Table View tab at the bottom of the Alarm Condition Codes Form. |
![]()
| • | To display a specific Alarm Condition Code record in the Record Editing section, Click on that record within the Table View section, or use the Search Icon (see the "Using the Special Functions" section later in this chapter). |
| • | This Table View information may be Pinned in Place by Clicking the Pin Icon on the right. |
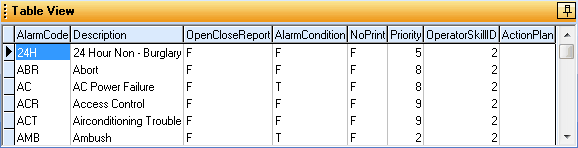
Alarm Condition Codes Form - the Table View tab Pinned Open
| ▪ | You may Un-Pin this Table View by Clicking the Pin Icon again. |
| ▪ | Click on any listed record to display that information in the center (Main Body) of the Form. |
| • | There are eight columns of data in this Alarm Condition Codes Record Listing: |
| 1) | Alarm Code - The Code which identifies this Alarm Condition. |
| 2) | Description - The description for this Alarm Condition. |
| 3) | Open Close Report - Listed as True ("T") if Events or Signals with this Alarm Condition will be printed on the Open & Close Report, and False ("F") if that is not required. |
| 4) | Alarm Condition - Listed as True ("T") if Signals with this Alarm Condition will be printed if the Alarm Only field is Checked on the Alarm Activity Report dialog, and False ("F") if that is not required. |
| 5) | No Print - Listed as True ("T") if the Signals with this Alarm Condition will not be printed on the All Events Report, and False ("F") if it will. |
| 6) | Priority - The Priority Level assigned to this Alarm Condition. |
| 7) | Operator Skill ID - The Operator Skills Skill ID record number that is assigned to this Alarm Condition. |
| 8) | Action Plan - The optional Action Plan record ID assigned to this Alarm Condition. |
| • | Each column's Header Name describes the data contained in that column. |
| ▪ | Clicking on a Header Name will set the order in which the Alarm Condition Codes will be listed. |
| ▪ | Clicking on the same Header Name will set the order in the opposite direction (ascending vs. descending). |
![]()
| ▪ | The Header Name that is determining the Order of the list will have an Icon indicating the Order displayed next to that Header Name. |
| • | To define the Alarm Condition Codes which define the reason why those Signals were transmitted from a Subscriber's Control Panel to the Receiver. |
| • | Click the |
| • | Alarm Code - You may enter up to three characters - Capital letters, spaces, numbers and basic punctuation marks are accepted - to identify a "code" for this Alarm Signal or Event. |
| • | Operator Skill - Use the Drop-Down Selection List provided to Choose any specialized Operator Skill that would be required to properly process this type of Alarm Signal or Event, otherwise Choose the "Default" Operator Skill. |
| • | Description - Enter a concise description - up to 30 characters in length - consisting of letters, numbers, spaces and punctuation marks - of this Alarm Signal or Event. |
| • | Priority - Enter the appropriate Prioritization Level (the higher the Priority Number - the lower its importance in relation to life safety) for this Alarm Signal or Event. |
| ▪ | Typically, priority 1 is reserved for Fire Alarms, 2 for Ambush or Hold Up Alarms, 3 for CO detected and other Medical and Life Safety related issues, 4 for Burglary, 5 for other general alarm events, 6 for System Trouble reports, 7 for Low battery, tamper, and other system status reports, 8 for Opening & Closing related signals, and 9 for Tests and other general system reporting. |
| ◆ | UL® Module users do not have the ability to change the Priority level of certain Condition Codes (this field will be displayed in gray when this restriction is in effect) which are entered and set by the system during installation (see the "For UL® 1981 Listed Users" section above). |
| • | Action Plan - If there is a Response Needed for this Alarm Signal and the normal Operator Guided Response is incapable of providing the appropriate instructions for the Operator, you may use a predefined Action Plan to dictate the exact Signal Processing steps that are required. |
| ▪ | Use the Drop-Down Selection List to Choose the appropriate Action Plan for this Alarm Signal. |
| ▪ | Also see the "If the MKSASP - Automated System Action Plans Service is in use" section below |
| • | Reporting Options - Because you may not want every Alarm Signal or Event included on every type of Central Station Report, you may define which Alarm Condition Codes (and therefore the associated Alarm Signal or Event sent for them) will, or will not be, included in the following reports: |
| ▪ | Print on Open Close Reports - To include any Alarm Signal or Event assigned this Alarm Condition Code on Open Close Reports, Check this box. |
| ▪ | Print on Alarm Only Report - To include any Alarm Signal or Event assigned this Alarm Condition Code on Alarm Activity Reports when the Alarms Only option is selected, Check this box. |
| ▪ | Suppress from All Events Reports - To Not include any Alarm Signal or Event assigned this Alarm Condition Code on the All Events Report, Check this box. |
| • | Click the |
| • | Repeat this process, as needed, to define each of the Alarm Condition Codes which provide contract monitoring and other recurring services for your Company. |
| ◆ | If the MKSASP - Automated System Action Plans Service is in use: |
| • | Enter any Alarm Condition Code which should always be processed by the MKSASP Automated System Action Plans Service by assigning the appropriate Automated System Action Plan. |
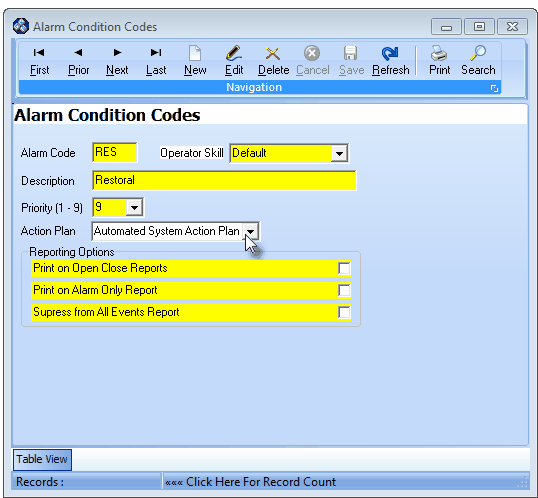
Alarm Condition Code Form - Automated System Action Plan entry
| ▪ | Action Plan - Using the Drop-Down Selection List provided, Choose the appropriate Automated System Action Plan. |
| □ | Using the Special Functions on the Navigation Menu at the top of the Alarm Condition Codes Form: |
| • | Print - Click the Print Icon to View and/or Print a list of the Alarm Condition Codes List. |
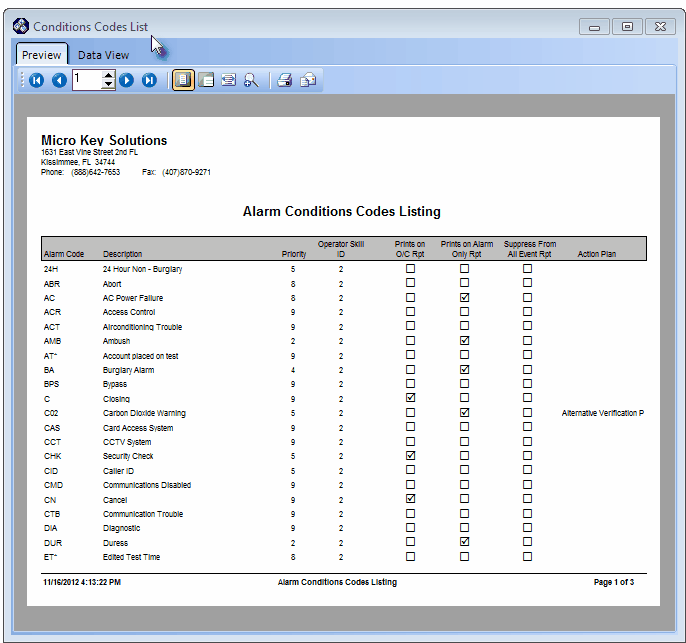
Alarm Conditions Codes Listing - Preview Tab
| • | Search - Click the Search Icon to open the Search (Alarm Condition Codes) dialog. |
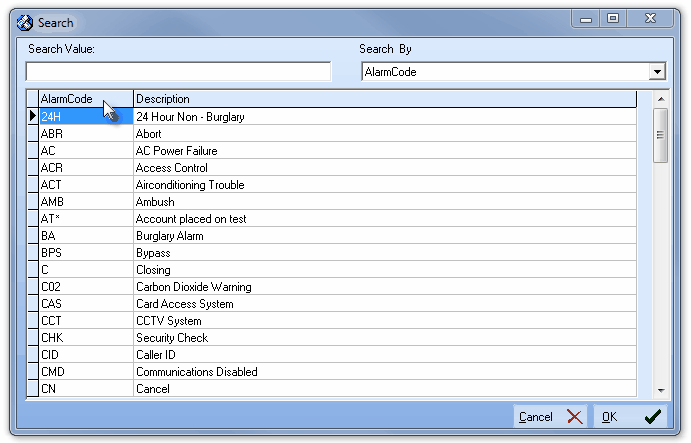
Search dialog
| • | See the "Using the Generic Search dialog" section in the Advanced Search Dialog chapter for more information about this Search dialog. |
| □ | To Modify an existing Alarm Condition Code |
| • | Click the Search Icon on the Navigation Menu. |
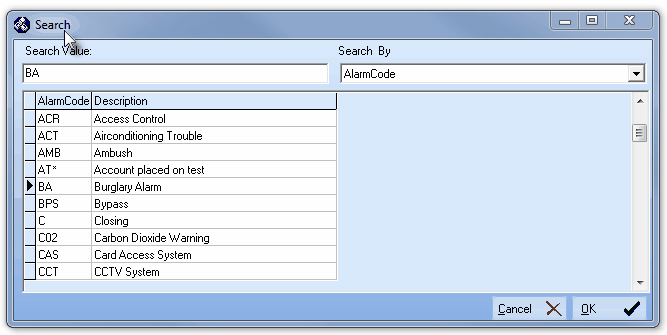
Alarm Condition Code Search dialog
| • | Select the desired Condition Code and Click OK. |
| • | Modify the record as needed. |
| • | Click the |
| □ | For UL® 1981 Listed Users: |
| • | Certain Condition Codes are predefined and Locked when the MKMSCS application is registered as a UL® Module. |
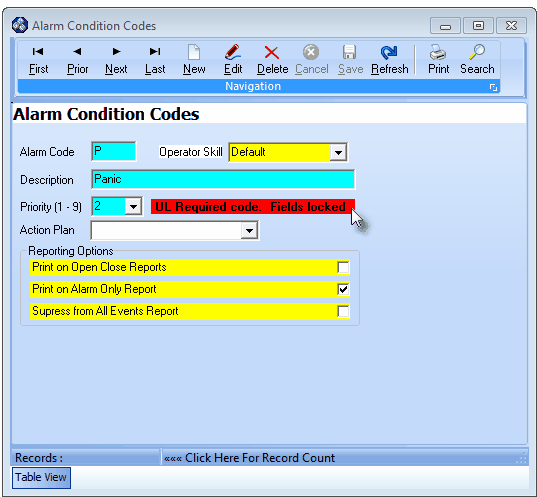
UL Required code. Fields Locked
| ◆ | This is a mandatory Second Edition UL® 1981 Standard requirement. |
| • | Optionally, a specific Action Plan may be identified for these Condition Codes, if appropriate. |
| • | Otherwise, the Signal Processing of these Condition Codes will follow the default Operator Guided Response procedure. |
| • | The chart below lists the mandatory Alarm Condition Codes and the required UL® 1981 Priority Levels: |
Code |
Description |
UL® Priority |
|---|---|---|
B |
Burglary |
4 |
D |
Duress |
2 |
FS |
Fire Supervision |
1 |
HD |
Hold Up |
2 |
P |
Panic |
2 |
MED |
Medical |
3 |
IND |
Industrial Supervision |
4 |
Required UL® Alarm Condition Code Information