| □ | It is important for your peace of mind, and the Subscriber's well being, that their monitored Alarm System is communicating properly with your Central Station. |
| • | When was the last time any signal was received from their system's communicator? |
| • | No special programming or data entry is required for this report. |
| • | When was the last time your Subscribers actually tested - based on specifically defined criteria - their system's communicator? |
| • | The Failed to Test Report will provide the answer for those whose systems are not specifically Supervised in some manner. |
| • | To access this Account Testing information Form: |
| • | Select the General Quick Access Menu. |
| • | The Account Testing Form will be displayed |
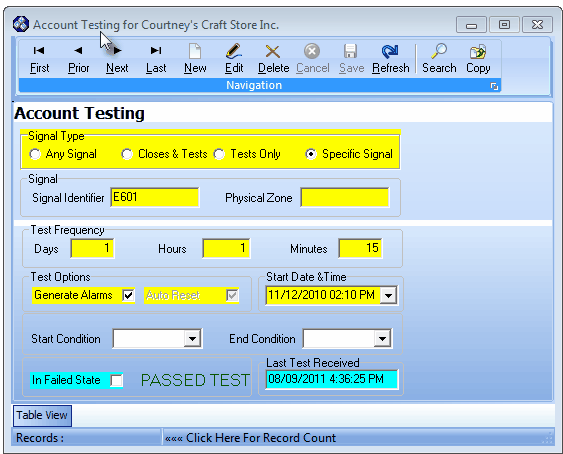
Account Testing Form
| • | This Account Testing Form may be Re-sized by Dragging the Top and/or Bottom up or down, and/or the Right side in or out. |
| • | Navigation Menu - The Navigation Menu is located at the top of the Account Testing Form. |

| • | This Navigation Menu provides the normal Record Movement, New, Edit, Delete, Cancel, Save, and Refresh options; as well as special Search and Copy functions. |
| • | Record Editing section - The details of the currently selected record are displayed below the Navigation Menu at the center (Main Body) of the Account Testing Form. |
| • | Table View tab - A tabular (spreadsheet style) Table View of the currently defined Account Testing is accessible by Clicking the Table View tab at the bottom of the Account Testing Form. |

| • | To display a specific Account Testing record in the Record Editing section, Click on that record within the Table View section, or use the Search Icon (see the "Using the Special Functions" section later in this chapter). |
| • | This Table View information may be Pinned in Place by Clicking the Pin Icon on the right. |
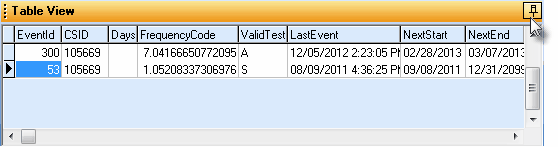
Account Testing Form - with Table View tab Pinned Open
| ▪ | You may Un-Pin this Table View by Clicking the Pin Icon again. |
| ▪ | Click on any listed record to display that information in the center (Main Body) of the Form. |
| • | There are many Columns of data in this Account Testing listing and each Column's Header Name describes the data contained in that Column. |
| • | The default Order in which this information will be listed is by Event ID. |
| ▪ | Clicking on a Header Name will re-set the Order in which the Account Testing will be listed. |
| ▪ | Clicking on the same Header Name will set the Order in the opposite direction (ascending vs. descending). |
| ▪ | If the default Order has been changed, the Header Name that is determining the Order of the list will have an Icon indicating the Order displayed next to that Header Name. |
| □ | Entering the Account Testing information: |
| • | Click the  Icon to start the Account Testing entry in the Record Editing section. Icon to start the Account Testing entry in the Record Editing section. |
| • | Signal Type - Select the Radio Button that best describes what will be considered a valid Test Signal for the selected Subscriber Panel. |

Signal Type options on the Account Testing Form
| ▪ | Any Signal - If any signal received at the Central Station constitutes a valid Test Signal for basic Account Testing supervision purposes, Click the Any Signal button. |
| ▪ | Closes & Tests - If any Close, and/or any defined Test signal received at the Central Station constitutes a valid test for Account Testing supervision purposes, Click the Closes & Tests button. |
| ▪ | Tests Only - If any defined Test signal received at the Central Station constitutes a valid test for Account Testing supervision purposes, Click the Test Only button. This is the default choice. |
| ▪ | Specific Signal - If only one specifically defined Test signal received at the Central Station constitutes a valid test for Account Testing supervision purposes, Click the Specific Signal button. |
| • | Signal - If a Specific Signal is required to validate a Test, these fields will also be displayed: |

Specific Signal selected as Signal Type on Account Testing Form
| ▪ | Signal Identifier - Enter the specific Signal Identifier for this Test Signal. |
| ▪ | Physical Zone - Enter the specific Physical Zone, if one is required. |
| • | Test Frequency - Enter how frequently - the maximum time since the last Test Signal - that the next valid Test Signal should be received. |

Test Frequency section of the Account Testing Form
| ► | Note: The following comments should be considered when defining the Test Frequency of the Account Testing entry for a Subscriber Panel CSID: |
| a) | The Hours and Minutes that are entered, will be added to the Days entered, to establish the total time allowed before the next Test Signal should be received. |
| b) | This Days plus Hours and/or Minutes method may be used to compensate for the normal "drift" of a Control Panel's timer. |
| c) | Any other slightly inconsistent, but required Test Signal which also needs to have a follow-up Test Signal sent, may also use this method. |
| d) | Multiple Test Signal requirements may be supervised for each Subscriber Panel CSID, by simply adding additional Account Testing records. |
| e) | Any number of Account Testing records may be defined for each Subscriber Panel CSID. |
| • | Days - Enter the maximum number of days allowed between Test Signals. |
| ▪ | 1 is the default, 0 is the minimum, 999 is the maximum. |
| • | Hours - Enter the number of hours (if required) allowed between Test Signals. |
| ▪ | 0 is the default, 23 is the maximum. |
| • | Minutes - Enter the number of minutes (if required) allowed between Test Signals. |
| ▪ | 0 is the default, 59 is the maximum. |
| • | Test Options - Define the rules for notifying Operators about a specific Account that has Failed To Test. |

Test Options section of the Account Testing Form
| • | Generate Alarms - Check this box to create an actual Alarm Event (Active Signal) that must be processed by an Operator. |
| ▪ | At a minimum, to implement this feature, a record with a Condition Code of Failed To Test, and with a Signal Identifier of FT*, must be defined in Panel Zones. |
| • | Auto Reset - If you want the Test Frequency timer to reset the Start Date & Time entry if a Failed To Test Alarm Event is generated, Check this box. |
| ▪ | If you do not Check this box, once a Failed To Test alarm event is generated, it will not do so again until a Valid Test - based on the definition of a valid test that was entered above - is received, at which time the Test Frequency timer is reset and supervision for a Valid Test - based on the definition of a valid test that was entered above - is re-started. |
| o | If an Account Testing entry for a Subscriber does not Auto Reset, once that premises has a Failed To Test occurrence, the Failed To Test Report is the only place where that information is provided. |
| ▪ | If you do Check this box, if a Failed To Test Alarm Event is generated, the Test Frequency timer is reset. |
| o | Once the normal interval between tests expires, unless a Valid Test is received, the system will generate another Failed To Test Alarm Event. |
| o | This sequence will continue until a Valid Test - based on the definition of a valid test that was entered above - is received. |
| o | The purpose of this choice is to prevent a Failed To Test Alarm Event from being "missed" (not properly followed up) by the Central Station or the Subscriber. |
| ▪ | With these two Account Testing options and the ability to create multiple Account Testing records for each Subscribers' CSIDs, the appropriate Account Testing method for tracking the Follow-Up of a Failed To Test situation (based on whether being listed in the Failed To Test Report versus being continuously reminded with a repetitive Alarm Event) may be selected on a CSID by CSID, and/or required Test Signal by Test Signal basis. |
| • | Start Date & Time - Using the Drop-Down Date Selection Box provided, enter the Date and Time to "Start the Clock" running in anticipation of the next valid Test Signal, based on the rules established above. |
| • | Supervising Other Conditions and Events - You may also supervise a situation that entails receiving a Starting Event Condition Code (that must be defined using the CSID Zone Form) which then initiates a Test Frequency timer that anticipates receiving a specific Ending Event Condition Code (also defined in the CSID Zone Form), within a specified time frame, which then satisfies the Account Testing requirement. |
| • | To do so, enter the Test Frequency information as explained above, and then enter the required Condition Codes below. |
| ▪ | Start Condition - Use the Drop-Down Selection List to Choose the proper Starting Condition Code which must be in a record in the CSID Zone table. |
| ▪ | End Condition - Use the Drop-Down Selection List to Choose the proper Ending Condition Code which must be in a record in the CSID Zone table. |
| • | Click the  Icon to record this Account Testing entry. Icon to record this Account Testing entry. |
| □ | System Maintained Information |
| • | In Failed State - A Check will appear in this box if the system failed its most recently required test. |
| • | The current Test Status is displayed in this area: PASSED TEST |
| • | Last Test Received - The date and time of the last valid Test Signal is displayed here. |
| □ | Using the Special Functions on the Navigation Menu at the top of the Account Testing Form: |
| • | Search - To locate a specific Account Testing record, Click the Search at the top of the Form. |

Search Events dialog
| • | The Search Events dialog will appear. |
| • | Enter the Search By method using the Drop-Down Selection List . |
| • | Enter the Search Value characters until the desired record is displayed. |
| • | Click on the record when it is displayed. |
| • | Click OK to select the record and Close the Search Events dialog. |
| • | Copy - You may copy all of the Account Testing records for one Subscriber's CSID, to another Subscriber (either to a different CSID installed at the Same Subscriber's premises, or to a Subscriber's CSID being monitored for a completely different Subscriber). |
| • | Click the Copy  |
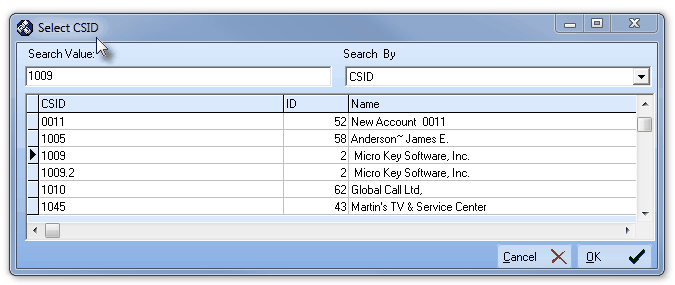
| • | It will display the Select CSID dialog. |
| • | Search By - Select the method you'll use for this search with the Drop-Down Selection List provided. |
| ▪ | CSID - Search by the CSID. |
| ▪ | ID - Search by the actual internal record number. |
| ▪ | Name - Search by the Subscribers Name. |
| • | Search Value - Enter the appropriate characters to locate the desired Subscriber to which you want to copy the currently selected People To Call. |
| • | Click on the desired Subscriber's CSID record. |
| • | Click OK to select the record to copy to, and then return to the Account Testing Form. |
| • | All Account Testing records will be copied to the selected Subscriber's CSID. |
| • | If any names are not required at the new location, go to that Subscriber, Select Monitoring and then Choose Account Testing where you will then be able to delete any unnecessary tests. |

