| □ | The normal Processing of an Alarm Signal generally starts with the Verification procedure. |
| • | When an Alarm Signal is received you must acknowledge it. |
| • | To do so, Press the <Space Bar>, or Press 8 Enter and the Alarm Signal will be displayed. |
| • | Alarm Verification - Most Alarm Signals are Verified prior to initiating a Dispatch. |
| • | If Verification is required, the Verification dialog will be displayed automatically. |
| ► | Note - Generally you Do Not Verify Silent Alarms, Panic Alarms, and any other signal that needs to be handled discretely prior to Dispatching. |
| ► | The Operator Guided Response will present to the Operator the appropriate next step. |
| ► | When an Alarm Signal is first acknowledged, the Comments sub tab may be shown with the Comment displayed if the first person that is to be Notified for that Subscriber - based on the default Call Order (or the specially defined Call Order for the CSID Zone being reported) - has a comment defined in their People To Call record. |
| □ | Verification - The CSID Zone (or Panel Zone) for this Signal contains instructions as to whether or not this Alarm Signal or Supervised Event should be Verified. |
| • | Verify - The process of having an Operator Telephone the Subscriber's Premises immediately after receiving an Alarm Signal or Supervised Event to determine if it was accidental, unintended, had already been resolved, or for some other reason, there is no further action required by the Operator. |
| • | To activate the Automatic Dialing feature, you must define the Modem(s) connected to your Workstation in the Personal Options tab on the User Options Form. |
| • | This feature is called Automatic Dialing. |
| • | The computer's Modem used by the Operator for Automatic Dialing must be connected to a telephone line. |
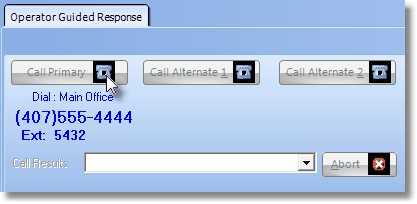
| • | If Verification is required, the Verification dialog is presented automatically (see below) with up to three (3) buttons (the number is based on the how many contact telephone numbers were defined for this Subscriber in their Subscriber Information Form). |
| • | If Dialing is automatic, the Operator doesn't have to Click Call Primary (or Alternate 1 or 2 options, if available and as needed, to contact the Subscriber), they just Press the <Space Bar>. |
Verification dialog
| • | Up to three contact numbers may be entered for each Subscriber (see below) in the Contact Information section of the Subscribers Form. |
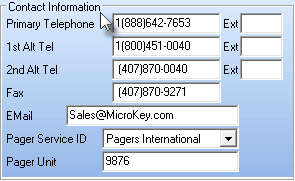
Contact Information on Subscribers Form
| • | Verifying an Alarm Signal or Supervised Event: |
| • | When the Verification dialog is presented, Press the <Space Bar>, or Press 8 Enter and the telephone number will be dialed automatically |
| ▪ | If the Operator does not have a modem attached and so is performing the Verification manually, Click the Call Primary button or the Verify button (if it is shown) to display the appropriate contact telephone number that is to be dialed. |
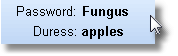
| • | The Password that allows the Subscriber to validate themselves (and the Duress signal as well) is displayed on the Signal Processing screen. |
| • | Call Primary - The Primary Telephone number for this Subscriber will be dialed first (, automatically). |
| ▪ | If there was No Answer or the person answering the call could not be validated, or they requested help, Press the <Space Bar> to display the Call Result Drop-Down Selection List . |
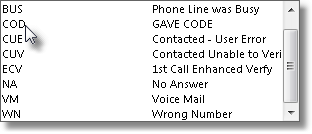
Call Result is chosen from predefined Verification Responses
| • | Once Verified, or if the Operator was unable to Verify, enter the Call Results in the box provided by selecting it from the list of predefined Verification Responses. |
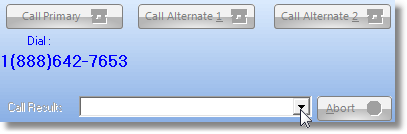
Dial: information is displayed when Verification Call is initiated
| ▪ | In some cases, based on the instructions entered for this Verification Response Code, an explanatory Note may be required (see Entering a Note below). |
| • | Entering a Note about this Verification: |
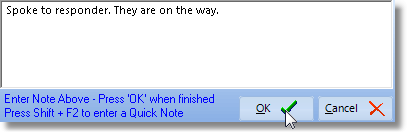
| ▪ | Pressing Shift+F2 when inside the Note field in the MKMSCS Signal Processing mode, enables the Selection of an appropriate predefined Quick Note from the Drop-Down Selection List that is presented. |
| o | More than one Quick Note may be used in the same Notes field. |
| o | Manually entered Notes may also be added at that time, or used instead of any predefined Quick Notes. |
| ▪ | After the , is entered, Click the OK button to indicate that the Note has been completed. |
| ▪ | These Quick Notes, and any manual additions, are inserted into the Subscriber's Alarm History for the Alarm Signal or Event currently being processed. |
| • | Call Alternate 1 - If a Call Alternate 1 number is available, Click the Call Alternate 1 button or just Press the <Space Bar>. |
| ▪ | If there was No Answer or the person answering the call could not be validated, then Press the <Space Bar> (which Selects the Complete button automatically) to automatically view the Call Result Drop-Down Selection List . |
| ▪ | In some cases, based on the instructions entered for this Verification Response Code, an explanatory Note may be required (see Entering a Note about this Verification above). |
| • | Call Alternate 2 - If a Call Alternate 2 number is available, Click the Call Alternate 2 button or just Press the <Space Bar>. |
| ▪ | If there was No Answer or the person answering the call could not be validated, then Press the <Space Bar> (which Selects the Complete button automatically) to automatically view the Call Result Drop-Down Selection List . |
| ▪ | In some cases, based on the instructions entered for this Verification Response Code, an explanatory Note may be required (see Entering a Note about this Verification above). |
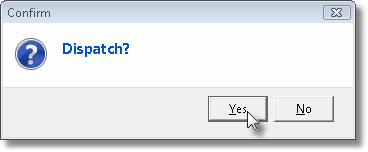
Confirm that a Dispatch may now be executed by the Operator
| • | Typically, unless Verified OK, the next step is to Dispatch. |
| □ | Converting to Manual Mode - Manual Mode allows the Operator to switch to the Operator Guided Response user interface. |
| • | If the Operator needs to exit from an Action Plan, Press Ctrl+Shift+M. |
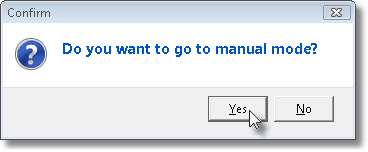
| • | Click the Yes button to Confirm the switch to Manual Mode. |
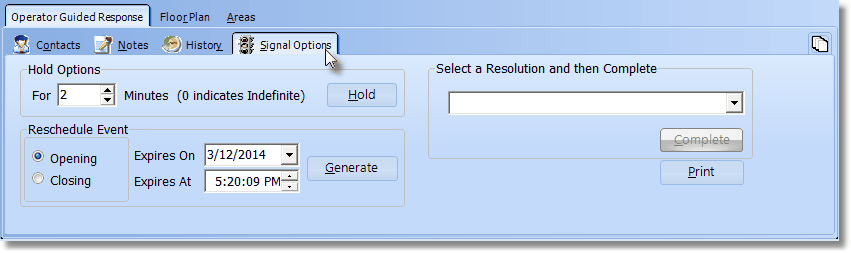
Operator Guided Response view with Signal Options tab activate
| • | The Contacts, Notes, History, Temp Notes and Signal Options tabs may now be accessed, as needed. |

