| • | The User Options Form is accessed by Clicking the Maintenance Menu and Choosing User Options. |
| • | Click the Personal Options Icon. |
| • | Certain program behaviors may be individualized. These include certain Software Options, your personal computer's Modem and Scanner device settings. |
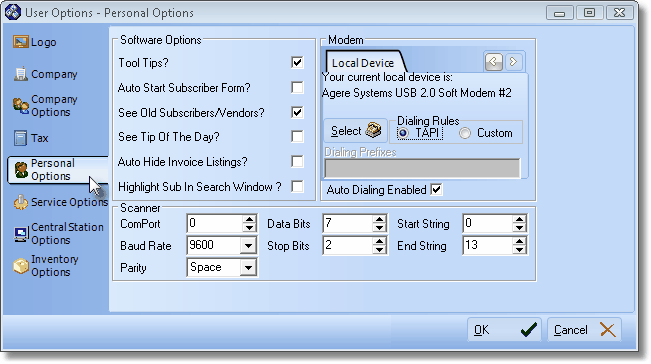
Personal Options tab on the User Options Form
| • | To enter your Personal Options settings: |
| 1. | Select Maintenance and choose User Options. |
| 2. | Click on the Personal Options tab. |
| 3. | Check the boxes and complete the other information as requested and appropriate for Software Options, Modem and Scanner as needed.. |
| a. | Tool Tips? When you place your mouse pointer over certain of the buttons, you may have a brief tool tip appear. |
| i. | These help identify what function the particular button performs. |
| ii. | If you wish to have these reminders appear, Check the Tool Tips option. |
| b. | Auto Start Subscriber Form? When the software starts you can have it automatically show the Subscriber Form. If you do not Check this item, the desktop appears, but is empty except for its Main Menu and Shortcut Bar. |
| c. | See Old Subscribers/Vendors? Normally Deleted Subscribers or Vendors are hidden from view to speed browsing through your Subscriber database. If you check this box, you will be able to view Deleted records as well as your current Subscribers and Vendors. |
| d. | See Tip of the Day? The Millennium Series will provide you a daily "tip" when you start the program. |
| i. | These are helpful ideas that are displayed to provide you ideas on how to make better use of the software. |
| ii. | They also provide reminders of important operating techniques and procedures. |
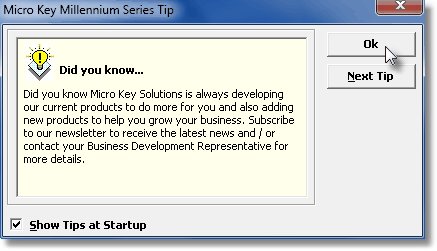
Micro Key Millennium Series Tip
| e. | Auto Hide Invoice Listings? In the Sales Form, the Bills Form and the Purchase Orders Form you may retrieve a previous Invoice or Purchase Order by sliding your mouse to the left of the form to display a Prior Invoices selection area. |
| i. | You may request to have this Prior Invoices box always displayed. |
| ii. | Or you may Check Auto Hide Invoice Listing to have it hidden automatically unless it's needed. |
| f. | Highlight Sub in Search Window? When using the Subscriber Search function (F2), if you want to start your search from the current Subscriber as the default selected record, Check this box. Please note that users with a large volume of accounts (5000+) may experience a performance degradation if this option is selected. |
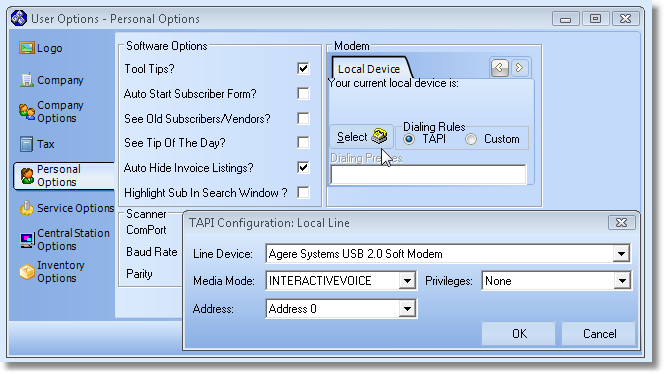
Personal Options tab on the User Options Form with Modem configuration for Local Device
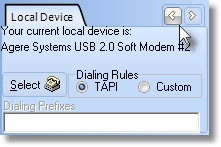
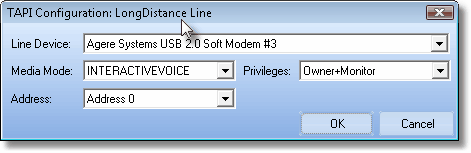
| ▪ | Information on may be defined for a Local Device and for a Long Distance Device. |
| o | Use the left and right arrow (at the right of the Local Device tab) to switch between these choices. |
| o | Click Select then Click its down arrow and Choose from your Computer's available Line Device(s) from the Drop-Down Selection List provided. |
| o | The remainder of the fields will be self populated. |
| ▪ | Click OK to make this selection active or Click Cancel to exit without any changes taking effect. |
| ▪ | Repeat this process for the Long Distance Device if needed. |
| • | Dialing Rules allow you to specify TAPI, or a Custom setup for a Dialing Prefix (such as dialing "9" to access an outside line or transmitting a long distance code for toll calls). |
| o | TAPI - Click the TAPI button to activate standard Automatic Dialing function. |
| o | Custom - Click the Custom button to identify a required Dialing Prefix - particularly for Long Distance calling. |
| ► | Note: See the "Phone and Modem Options" chapter for more detailed information about using TAPI and implementing a special Dialing Prefix. |
| ► | Scanner - If a Bar Code/Scanner is to be integrated into the system, identify the required information, as needed. |
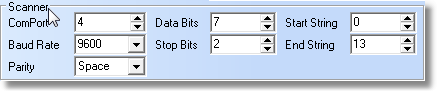
| a. | Bar Code/Scanners may be used to help expedite the payment posting, accounts receivable and service order processes. |
| b. | You must specify the Serial Communication Parameters required by the Bar Code/Scanner device that you will be using. |
| c. | Configure each field to match your Bar Code/Scanner's requirements. |

