| □ | The Metrologic Voyager USB Barcode Scanner model 9520 is easily connected to MKMS for the purpose of recognizing and taking appropriate action when an Invoice or a Service Request Form's barcode is scanned, as well as the Call List Verification Form.. |
| • | This is the process to configure the Metrologic Voyager USB Barcode Scanner to work with MKMS. |
| • | This procedure has been tested with the model Voyager 9520 - right out of the box. |
| • | The scanner requires an initialization process, then MKMS must be updated (within the Personal Options tab of the User Options Form) to recognize the device. |
| ► | Important Note: Because the model 9520 has now been discontinued by Metrologic. |
If you cannot find that device, new model information will be required.
This information will be provided when a replacement device is chosen.
| □ | Initializing the Metrologic Voyager USB Barcode Scanner model 9520: |
| • | Copy the Metrologic USB.Zip file into the MKS sub-directory of the Program Files folder on your computer's hard drive. |
| • | Extract the USB-to-Serial Drivers from the Metrologic USB.Zip file into the MKS sub-directory. |
| • | Connect the USB Barcode Scanner model 9520 to one of the computer's USB ports |
| • | Once connected wait until the Scanner's front light (red) is lit indicating that it is in scanning mode. |
| • | If you are running MKMS, close the program now. Then scan the following codes: |
| ► | Notes: 1.) Each scan should generate a 3 tone sound if scanned correctly; |
2.) The page number indicates where the required barcode to be scanned is located within the Metrologic Voyager USB Barcode Scanner model 9520's manual;
3.) To save time, try printing this page and scan from the printed Help Files page.
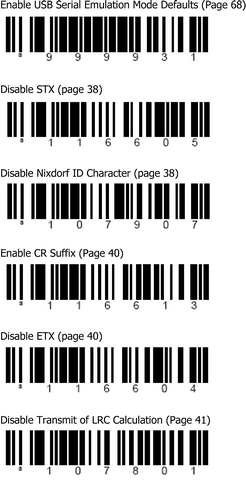
| • | Enable USB Serial Emulation Mode Defaults (Page 68) |
| • | Disable Nixdorf ID Character (page 38) |
| • | Enable CR Suffix (Page 40) |
| • | Disable Transmit of LRC Calculation (Page 41) |
| • | When you have completed these scans, your computer should display a "Found New Hardware" wizard; Click "Next". |
| • | Select "Install from a specific location" and Click "Next". |
| • | Select "Search for the best driver in these locations". |
| • | Check "Include this location in the search". |
| • | Click "Browse" and specify a location where you unzipped the driver files (C:\Program Files\MKS\ ) |
| • | Uncheck all other options, then Click "Next". |
| • | Click "Next" after Windows finds the driver to install. |
| • | Important - Click "Continue anyway" if you get a warning that the driver has not been digitally signed. |
| • | When driver installation is complete, Click "Finish". |
| □ | Initializing MKMS to recognize the Metrologic Voyager USB Barcode Scanner: |
| • | Open the MKMS application and login as as the Administrator. |
| • | On the Main Menu Select Maintenance and Choose the User Options sub-menu. Click the Personal Options tab. |
| □ | Identifying the Scanner's Port Number |
| • | You must enter the information MKMS needs to properly use your new Scanner. |
| • | This requires that you know the "Port Number" to which the scanner is connected. |
| • | Open the Windows® Control Panel dialog (if using Windows 7, Click the Start button, Choose Settings and then Select the Classic View). |
| • | Select System and Choose the Device Manager tab. |
| • | A "Metrologic USB Scanner" will be displayed with the proper port number |
| • | Maximize MKMS and complete the required information in the Personal Options tab. |
a. ComPort: Enter the Metrologic USB Scanner port number derived from the procedure above.
b. Baud Rate: 9600
c. Parity: Space
d. Data: 7
e. Stop: 2
f. Start: 0
g. Stop: 13
| • | Exit MKMS completely (do NOT simply Log Out then Login). |
| • | Open the MKMS application and login - the scanner should now be available. |
| □ | Using the Barcode Scanner to speed your work - |
| ► | On any MKMS document that has a printed barcode, the first character in the barcode tells MKMS its origin and purpose. |
| • | Invoice - When no forms are open, scan the barcode on the return stub of an Invoice and that Subscriber and the specific Invoice form will be opened automatically. |
| • | Post Receipts - With the Receipts Posting Form open, scan the barcode on the return stub of an Invoice and a Receipts Posting entry for that Invoice Amount will be created. |
| • | This has the same functionality as if you opened the Receipts Posting Form, Selected Search By Invoice, entered the Invoice's Number, and entered the Amount Received. |
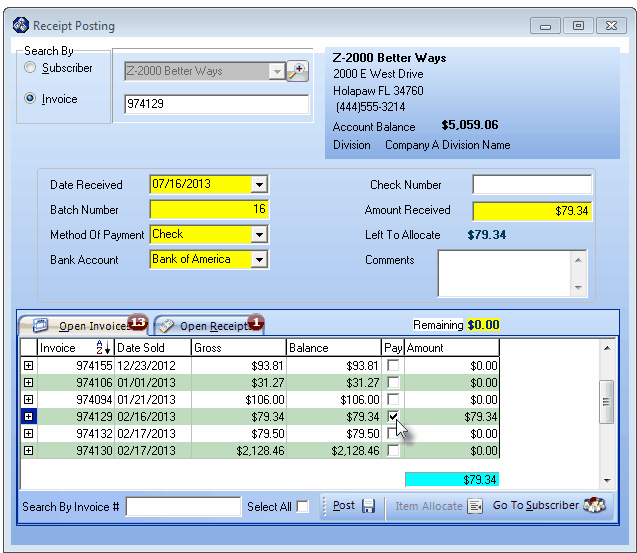
Receipt Posting form by Invoice Number
| • | If the payment received was greater or less than the Invoice amount, you must manually adjust the amount received accordingly. |
| • | Then tab to the next field so the Left To Allocate value, and the Pay Amount at the bottom of the form, is updated. |
| • | Click Post when the information is displayed. |

Service Request Completion information

