| □ | Receipts may be recorded using the Receipts Form accessed from the Subscribers Form's Receivable Quick Access Menu. |
| • | The Receipts Form is designed for a "one-Receipt-from-one-Subscriber-at-a-time" posting process. |
| • | However, the Receipt Posting dialog, explained in detail below, offers two ways to identify the Source of the Revenue: |
| 1. | By the Invoice being Paid |
| 2. | By the Subscriber who is paying it. |
| • | In either case, it will Post the Receipt to the Subscriber's account, and Allocate that Revenue to the appropriate Invoice(s) - all in one step! |
| • | Therefore, when posting several Subscriber Payments at the same time, it is recommended that you use this Receipt Posting dialog. |
| □ | Receipts should be Posted (and preferably, Deposited) Daily! |
| • | There is no real reason "hold checks until we have enough to record". |
| • | From a security standpoint, all Subscriber Payments should be recorded on the day they are received. |
| • | Use either the "one at a time" posting method with the Subscribers Form Menu's Receipts selection, or, for rapidly entering multiple Receipts, use this Receipt Posting dialog. |
| • | The advantage of using the Receipt Posting dialog is that the Invoices are automatically Allocated as the Receipts are posted. |
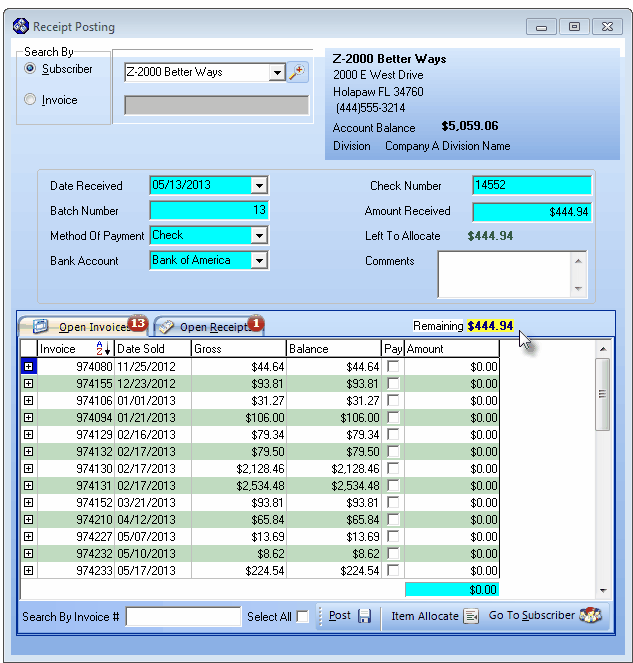
| □ | The Receipt Posting Form: |
| • | You may access this Receipt Posting Form from the Main Menu by Selecting Maintenance and Choosing Accounts Receivable then Clicking the Receipt Posting option. |
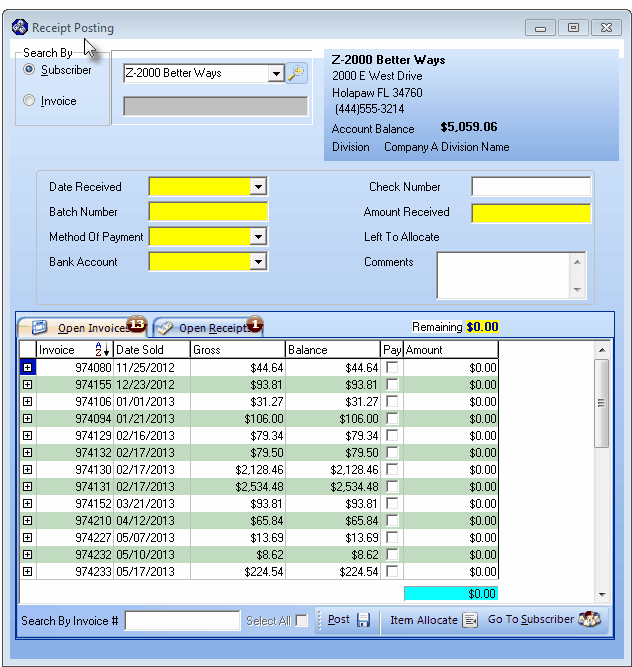
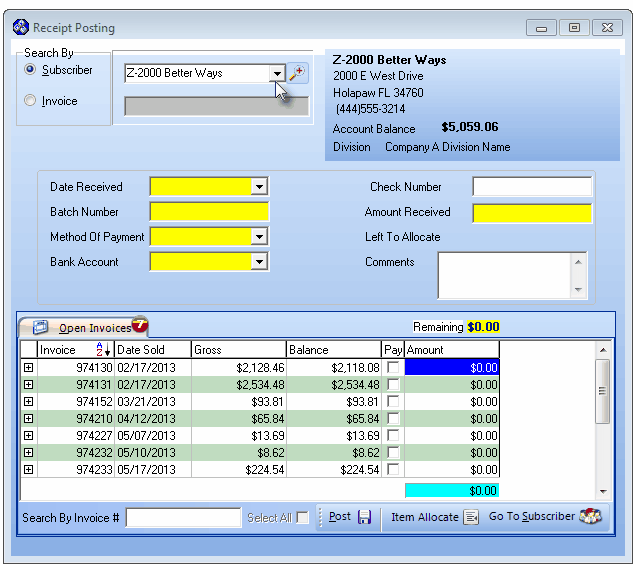
Receipt Posting Form - Search By Subscriber option selected
| □ | Receipt Posting - In either case, the Receipt Posting dialog is displayed. |
| • | This Receipt Posting Form is divided into several sections, some with various tabs - and most of those tabs are only displayed when needed. |
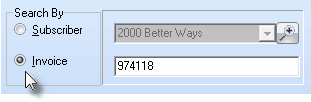
| • | Search By - This section provides two search options: |
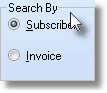
Search By options
| 1. | Subscriber - Post a Receipt based on the selection of a specific Subscriber |
| ▪ | This method is usually used when a single Payment (Amount of the Receipt) from a Subscriber is actually intended to pay for multiple Invoices. |
| 2. | Invoice - Post a Receipt based on a specific Invoice Number that is being paid. |
| ▪ | This method is usually used when a Payment (Amount of the Receipt) is intended to pay one specifically identified Invoice, and that Invoice Number is on the Invoice's Payment Stub which accompanied the Payment. |
| ► | Note: The selected Search By method may be switched from Payment to Payment, as appropriate. |
| • | Subscriber Information - Located to the right of the Search By box, this area provides general Account information on the Selected Subscriber (or the Subscriber whose Invoice Number was entered). |
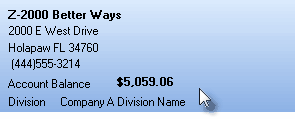
Subscriber Information area on Receipt Posting Form
| • | Receipt Information - This area contains the fields that must be completed to properly record the Revenue that was received. |
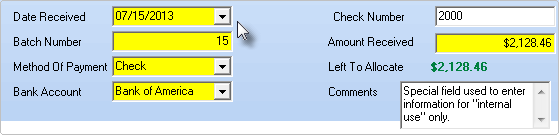
Receipt Information section on Receipt Posting Form
| • | Open Invoices & Receipts - The remainder of the Receipt Posting Form includes: |
| 1. | The Open Invoices tab which lists any Invoices that are not Paid in Full, and/or |
| 2. | The Open Receipts tab which lists any Receipts that are not fully Allocated. |
Open Invoices tab & Open Receipts tab on Receipts Posting Form
| • | The actual Receipt Posting Procedures are performed as follows (details of these steps are provided later in this chapter): |
Locate the Subscriber who has sent the Payment (Receipt) using the Search Icon that is provided.
| ▪ | Use the Drop-Down Date Selection Box to identify the Date this Payment (Receipt) was received (or is to be deposited). |
| ▪ | The Batch Number (set to the Day Number of Today), Method Of Payment (defaulted to Check), and the Bank Account (set to the Bank identified in the Company Options tab of the User Options Form as the Default Bank Account) are filled in automatically - but each of these fields may be changed, if appropriate. |
| ▪ | Enter the Check Number used to make this Payment (or some other data - to be used for future reference - which will identify this Payment). |
| ▪ | Enter the Amount Received. |
| ▪ | Check the Pay box(s) of those the Invoice(s) to which the Amount Received is to be Allocated |
| • | If the chosen Search By method is by Invoice: |
| ▪ | Enter the Invoice Number for which the Payment (Receipt) was sent, and Press the Tab F key. |
| ▪ | The Subscriber Information section, the Date Received (Today), the Batch Number (set to the Day Number of Today), the Method Of Payment (defaulted to Check), and the Bank Account (set to the Bank identified in the Company Options tab of the User Options Form as the Default Bank Account) are filled in automatically (but the information in each of these fields may be modified, if appropriate). |
| ▪ | The Amount Received will be filled in automatically based on the Balance Due of the Selected Invoice. |
| ▪ | Enter the Check Number used to make this Payment (or for future reference if a Check was not used to make the Payment, some other data which will identify this specific Payment such as the last four digits of their Credit Card). |
| ▪ | Enter any Comments, if appropriate (this entry is for Internal Use Only) |
| ▪ | In the Open Invoices tab: the Pay box of the selected Invoice will be Checked automatically. |
| ► | Note: For Keyboard priority (versus Mouse priority) Users, once the Invoice(s) is/are Selected, instead of repeatedly having to Press the Tab F key until the Post < Icon is highlighted, just Press Alt+P and the Post < Icon will be immediately highlighted. |
| □ | Posting a Payment (Receipt) by Invoice: |
| • | Identify the Invoice Number for which the Payment was sent |
| • | Click the Invoice button. |
| • | Enter the Invoice Number to which the Payment (Amount of the Receipt) is to be applied. |
| • | Press the Enter 8 key (or the Tab F key). |
| • | The Subscriber Information area will be populated with the associated Subscriber information. |
Subscriber Information area on Receipt Posting Form
| • | The Revenue Information area of the Receipt Posting Form will be populated with the Balance Due of the Invoice Number to which the Payment is to be applied. |
Receipt Information section on Receipt Posting Form
| • | The Date Received will be entered as Today. |
| ▪ | You may edit the Date Received using the Drop-Down Date Selection Box provided, if appropriate. |
| • | Batch Number - The Day number of the selected Date Received will be inserted. |
| ▪ | Batch Numbers may be (re-)assigned within a range from 1 to 32637. |
| • | Method of Payment - The most common Method of Payment is Check - which will be inserted by default. |
| ▪ | The eight Method of Payment choices are: |
| 1. | American Express - charged to this Credit Card |
| 2. | Cash - received an actual Cash payment |
| 3. | Check - paid with a Business or Personal Check |
| 4. | Discover - charged to this Credit Card |
| 5. | Electronic Transfer - received Direct payment from Subscriber's Bank |
| 6. | MasterCard - charged to this Credit Card |
| 7. | Visa - charged to this Credit Card |
| 8. | Other - paid via "In-Kind" or with something else of value |
| ▪ | Use the Drop-Down Selection List to Choose a different Bank Account into which these funds will be deposited, if appropriate. |
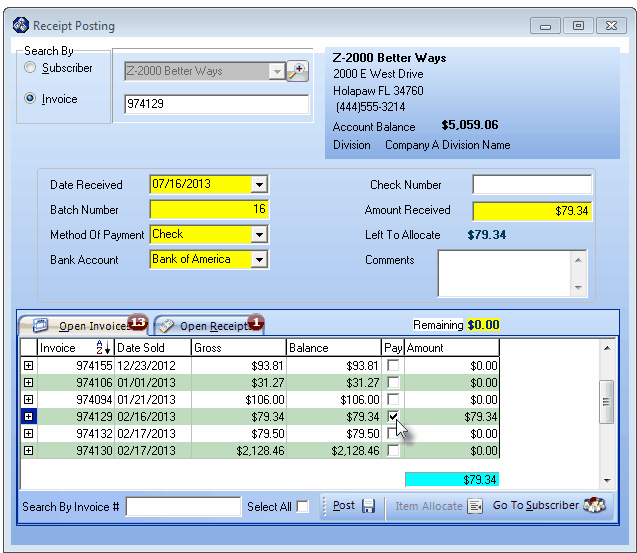
Receipt Posting Form by Invoice Number
| • | Check Number - Enter the Check Number of the Payment that was received, if appropriate. |
| ▪ | Up to 10 characters, as needed, may be entered to specifically identify this Receipt item for future reference. |
| • | Amount Received - The Payment (Amount of the Receipt) is entered automatically based on the Balance Due of the selected Invoice Number. |
| • | The Open Invoices tab will be displayed with the Invoice identified above. |
| • | Remaining - The Remaining (to be Allocated) field will be displayed immediately above, and to the far right of, the Open Invoices tab with an Amount of $0.00 shown. |
| ▪ | Also see the "Itemized Allocations using the Item Allocate button" section below. |
| • | The Pay box of the selected Invoice Number will be Checked and the Amount that was Received will be entered automatically. |
| • | An additional Comment may be entered, if necessary, which is for Internal Use Only. |
| • | Post - Click the Post < Icon to record this Receipt. |
| ▪ | The Receipt is automatically Applied to the identified Invoice and an Allocation record is created for future reference. |
| ▪ | A Receipt record is also created for future reference. |
| • | A new, blank Receipt Posting Form will be displayed. |
| • | If you are finished with the Receipt Posting Form, Click the Close ("T") button on the top right of the Form. |
| □ | Posting a Payment (Receipt) by Subscriber from whom the Payment was received. |
| • | Click the Subscriber button. |
| • | Click the Search next to the Subscriber field. |

| • | Using the Select Subscriber dialog, Select the Search By field and enter the Search Value to quickly retrieve the desired Account. |

Select Subscriber Form
| • | Initialize - Once the Subscriber is located, Click on the Drop-Down Date Selection Box Down Arrow (‚) within the Date Received field to initialize this Receipt Posting transaction. |

| • | The Receipt Information area of the Receipt Posting Form will be automatically populated as follows: |
| • | Date Received - The Date Received (Today) will be inserted into this field automatically. |
| ▪ | You may change the date using the Drop-Down Date Selection Box provided. |
| • | Batch Number - The Batch Number (the Day number of Today) will be inserted automatically. |
| ▪ | Batch Numbers may be assigned from 1 to 32637 (this limitation is a function of the field type into which you are entering this Batch Number). |
| ▪ | You may start a new numbering sequence each month (using the current Date's Day number), so the same Batch Number will be used in multiple Months but the date will be different. |
| ▪ | In some cases, you may use the same Batch Number for more than one day to group certain of these types of payments together. |
| ▪ | You may use multiple Batch Numbers within the same day to separate Credit Card transactions from Cash Receipts, and to separate those Receipts from EFT funds. |
| ▪ | You may start from 1 and increment the Batch Number perpetually (if you used 2 batch numbers for two deposits every day, 5 days a week, it would take over 60 years to use all of the numbers). |
| ▪ | The down side of the second method is that you must keep track of the next number to be used. |
| ▪ | To keep Batch Numbers differentiated, MKMS automatically records a Receipt in a group that is stored based on the posting date's Month & Year. |
| • | Method Of Payment - The most common Method of Payment - Check - will be inserted automatically. |
| ▪ | The Method of Payment choices are listed below and the default - Check - entry may be changed using the Drop-Down Selection List provided, if needed: |
| o | American Express - charged to this Credit Card |
| o | Cash - received an actual Cash payment |
| o | Check - paid with a Business or Personal Check |
| o | Discover - charged to this Credit Card |
| o | Electronic Transfer - received Direct payment from Subscriber's Bank |
| o | MasterCard - charged to this Credit Card |
| o | Visa - charged to this Credit Card |
| o | Other - paid via "In-Kind" or with something else of value, or provided as a gift |
| • | Bank Account - The default Bank Account (the preferred Bank that was identified in Company Options) will be inserted. |
| ▪ | If a Bank account other than the default Bank account will be receiving this Payment, use the Drop-Down Selection List to Choose the specific Bank Account into which these funds will be deposited. |
| • | Check Number - Enter the Check Number, or any other information, that would specifically identify this item. |
| • | Amount Received - Enter the Payment (the Amount of the Receipt) that was sent by the Subscriber. |
| • | Left To Allocate - Press Press the Tab F key after entering the Amount Received and the Left to Allocate field will be populated with that amount. |
| • | Remaining - The Amount Remaining to be Allocated will be displayed immediately above, and to the far right of, the Open Invoices tab. |
| □ | When Posting a Payment (Receipt) by Subscriber, you must Allocate the Receipt to Open Invoices: |
| • | The final two steps are: |
| 1. | Allocate the Amount Received to one or more Invoices, or to one or more specified Line Items of a selected Invoice, and then |
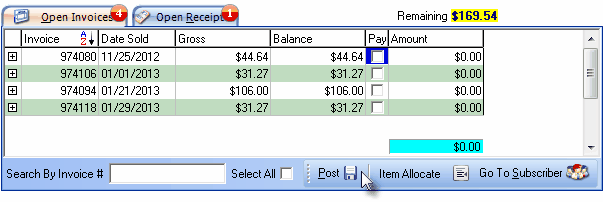
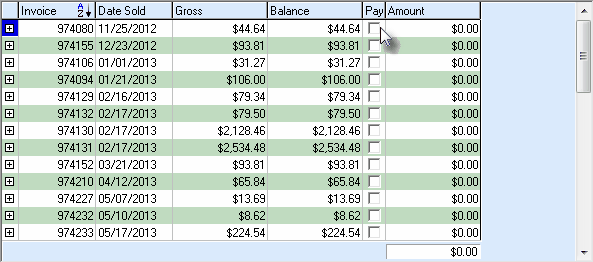
| • | Open Invoices tab - The Open Invoices tab displays a list of the Open Invoices - that have a Balance Due owed to you by the Selected Subscriber which may be Paid using all, or a portion of the Amount Received entered above. |
| • | Each column of data may be relocated based on User Preference (just Drag & Drop the Header Name to the preferred location). |
| • | The number of Open Invoices - those with a Balance Due - is shown in a red circle l on the Open Invoices tab. |
Open Invoices and Open Receipts tabs on the Receipt Posting Form
| • | Pay - Check the Pay box(es) of the Invoice(s) that - some or all of which - this Payment (Amount of the Receipt) is to be Allocated. |
| • | As you Check each Pay box, the Amount Due for that Invoice (assuming there is a sufficient Payment Amount available to do so) will be inserted in the Amount column. |
| • | Remaining - This field - indicating how much of the Amount Received is still available to be Allocated - is updated each time an Invoice Item's Pay box is Checked. |
| • | If the remaining portion of the Amount Received is insufficient to cover the amount owed on the Invoice, only the portion that is available will be applied to the Invoice. |
| • | You may continue to Check the Pay box(es) of the Invoice(s) to which this Subscriber's Payment should be Allocated, or Item Allocate (see "Itemized Allocations" below) another Open Invoice, until you have allocated the entire Payment (Amount of the Receipt). |
| • | Post - Click the Post < Icon to record this transaction. |
| • | A new, blank Receipt Posting Form (or the remaining Open Invoices for the currently selected Subscriber) will be displayed on which you may repeat this process with another Payment. |
| • | If you are finished, Click the Close ("X") button on the top right of the Form. |

| • | If you have not selected any Open Invoices to which the Revenue should be allocated, a No Invoices Selected message will be displayed. |
| • | You have the option to simply save the Payment as a Deposit for later use (by Clicking the Yes button), or Cancel the Posting request (by Clicking the No button) and return to select one or more Open Invoices to which the Payment (Amount of the Receipt) should be allocated. |
| □ | Itemized Allocations - Using the Item Allocate button |
| • | This feature allows you to selectively apply portions of the Amount Received to a specific Invoice's Detail Line Items. |

| • | If you Select an Open Invoice which has multiple Detail Line Items, the Item Allocate button will become active (as show below), otherwise it is Grayed Out (as shown above). |

| • | Item Allocate - To selectively apply portions of the Payment (Amount of the Receipt) to specific Detail Line Items, Click the Item Allocate button. |
| • | This allows the funds to be applied to an Open Invoice on a line item, by line item basis. |
| • | Often an allocation by line item process is required when Central Stations are paid for many different Subscriber's Monitoring Services from the same Gross Receipt Amount (such as Medicare reimbursements for Elderly Medical & Emergency Monitoring Services). |
| • | To allocate portions of the Payment to specifically selected Detail Line Items: |
| ▪ | Click on the specific Open Invoice to which you want to make Itemized Allocations |
| o | Do Not Check the Pay box for that Open Invoice record!. |
| ▪ | Instead, Click the Item Allocate button at the bottom of the Receipt Posting Form. |
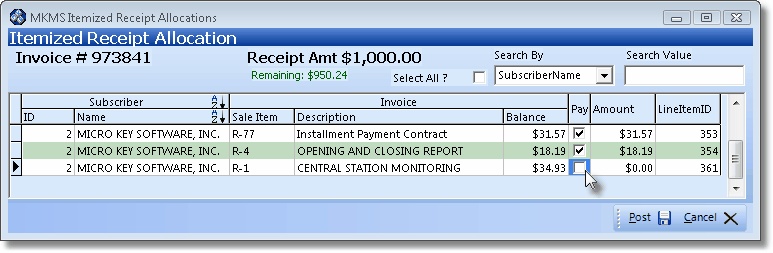
MKMS Itemized Receipt Allocation dialog
| ▪ | Pay - Check the Pay box of a Detail Line Item to indicate that the Balance of that Detail Line Item should be Paid using a portion of the Amount Received. |
| o | Press the down arrow key to move focus to the next Detail Line Item. |
| o | You may continue to Check the Pay box(es) of Detail Line Item(s) which should be Paid until you have allocated all the Detail Line Items required, or the entire Amount Received is used. |
| • | Locating a specific Detail Line Item: |
| ▪ | If the Open Invoice, to which you are applying some or all of the Receipt, has a large number of Detail Line Items, and so all Detail Line Items cannot be displayed within a single screen view: |
| o | Select All - You may Check the Select All box to have all items Chosen, then Uncheck items to which you do not want to Apply an amount. |
| o | Search By - Use the Search By Drop-Down Selection List to Choose the method you want to use to locate that Items. |
| ► | Title Bar - Alternately, you may Click the column's Title Bar to insert that field name into the Search By field. |
| ► | Sort Order - Click the column's Title Bar to set the Order in which the Detail Line Items are listed, and Click the column's Title Bar to reverse that selected Order. |
| o | Search Value - Enter the characters or numbers that will identify the Detail Line Item in the Search Value field. |
| • | Post - When you have finished making the Itemized Allocations for the selected Open Invoice, Click the Post button on the Itemized Receipt Allocations Form to record these Itemized Allocation transactions. |
| • | Post - Click the Post button on the main Receipt Posting Form to to record this, and all of the other transactions. |
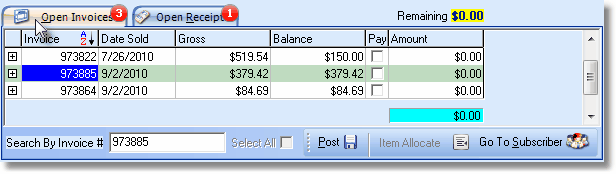
| □ | Open Receipts tab - Allocating an Existing Open Receipt |
| • | If the Open Receipts tab is visible, there are previously entered Receipts which have not been fully Allocated to an Invoice. |
| • | The number of Receipts with an Unallocated Balance is shown in a red circle l on the Open Receipts tab. |
| • | Click on the Open Receipts tab. |
| • | Select the Receipt record that is to be Allocated. |

Receipt Posting Form - Open Receipts tab
| • | Click the Use Receipt $ button and the information associated with the Selected Receipt is displayed on the Revenue Information area, and the Subscriber from whom is was received is shown in the Subscriber Information area of the Receipt Posting Form. |
| • | The Open Invoices tab - which lists all of the Unpaid Invoices for this Subscriber - is selected automatically. |
Open Receipt information with Open Invoices tab displayed for Allocating that Open Receipt
| • | The Receipt Information area information - which cannot be modified - includes the following information. |
| • | Date Received - The date that the Receipt was originally posted. |
| • | Batch Number - The Batch Number assigned to the Receipt when it was posted |
| • | Method of Payment - The Method of Payment entered for the Receipt. |
| • | Bank Account - The specific Bank Account into which the Receipt was deposited. |
| • | Check Number - The Check Number, or any other information, identifying the Receipt. |
| • | Amount Received - The Amount of the Receipt. |
| • | Left To Allocate - The Left to Allocate field showing how much of the Selected Receipt has not yet been allocated to an Invoice. |
| • | Remaining - The Amount Remaining to be Allocated will be displayed immediately above, and to the far right of, the Open Invoices tab. |
| • | Check the Pay box to indicate which Invoice(s) are to Paid, and the continuously updated Amount Remaining from the Selected Receipt will be displayed. |
Allocate the Open Receipt to selected Open Invoice(s) as appropriate
| • | Pay - Check the Pay box(es) of the Invoice(s) that - some or all of which - this Payment (Amount of the Receipt) is to be Allocated. |
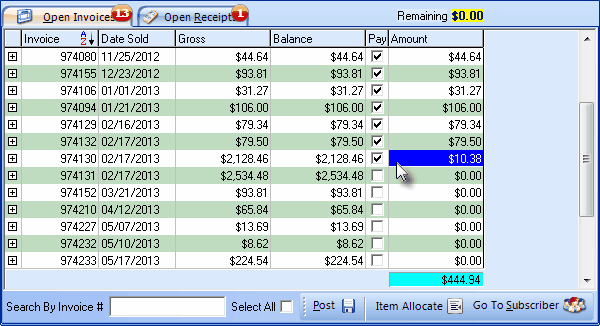
Fully Allocated Open Receipt
| • | As you Check each Pay box, the Amount Due for that Invoice (assuming there is a sufficient Payment Amount available to do so) will be inserted in the Amount column. |
| • | Remaining - This field - indicating how much of the Amount Received is still available to be Allocated - is updated each time an Invoice Item's Pay box is Checked. |
| • | If the remaining portion of the Amount Received is insufficient to cover the amount owed on the Invoice, only the portion that is available will be applied to the Invoice. |
| • | You may continue to Check the Pay box(es) of the Invoice(s) to which this Subscriber's Payment should be Allocated, or Item Allocate (see "Itemized Allocations" above this section) another Open Invoice, until you have allocated the entire Open Receipt. |
| • | Post - Click the Post < Icon to record this transaction. |
| • | A new, blank Receipt Posting Form (or the remaining Open Invoices for the currently selected Subscriber) will be displayed, in which case you may repeat this process with another Payment, if available. |
| • | If you are finished, Click the Close ("X") button on the top right of the Form. |
| • | If you Click the Post < Icon but have not selected any Open Invoices to which the Revenue should be allocated, a No Invoices Selected message will be displayed. |
| • | You have the option to simply resave the Payment as a Deposit for later use (by Clicking the Yes button), or Cancel the Posting request (by Clicking the No button) and return to select one or more Open Invoices to which the Payment should be allocated. |

