| • | The Verification Response Form provides the means to predefine the Verification and/or Notification Responses which the Operator is likely to encounter, and in so doing, specify the appropriate follow up Action(s) that should be taken when that particular Verification and/or Notification Response is encountered. |
| • | Verification and Notification Responses are also used while constructing an Action Plan. |
| • | A Central Station should use predefined Verification and Notification Responses because: |
| • | Central Stations can be very busy, hectic paced, and noisy places in which to work, with lots of distractions. |
| ▪ | Predefine a description of a Verification/Notification Response |
| ▪ | Identify which Response Types (i.e., Verification, People To Call, and Invalid Phone #) will be able to use a particular predefined Verification/Notification Response |
| ▪ | Define the appropriate next step or procedure |
| • | Predefining this information rresults in a more precise control of what an Operator should do after initiating a Verification or Notification contact. |
| • | Plus, eliminating these repetitive Response and Notification Decisions (by simply letting an Operator Select the appropriate Response item from the Verification Responses list), greatly reduces an Operator's stress level, and as a result, helps to eliminate the chance for error. |
| • | The advantages of having predefined Verification Responses are: |
| b. | Records - in a consistent manner - what occurred during the Verification process. |
| d. | Records - in a consistent manner - what occurred during the Notification process. |
| e. | Automates the process of determining the appropriate next step or procedure that should performed be the Operator. |
| g. | Assists the Operator in performing the Completion process. |
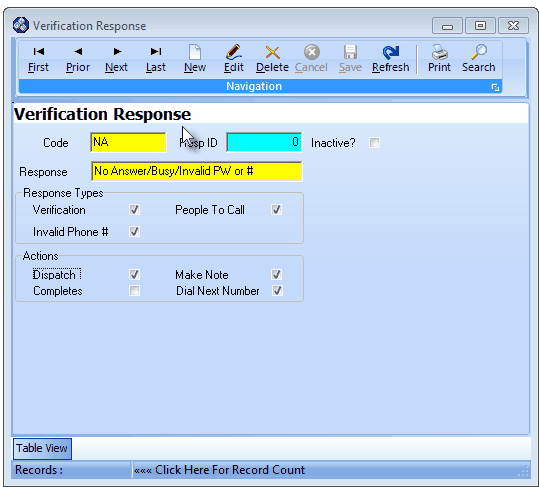
| □ | The Verification Response Form: |
| • | To define a Verification Response, on the Main Menu Select Maintenance, Choose Central Station, then Click Verification Response. |
Verification Response Form
| • | This Verification Response Form may be Re-sized by Dragging the Top and/or Bottom up or down, and/or the Right side in or out. |
| • | Navigation Menu - The Navigation Menu is located at the top of the Verification Response Form. |

| • | This Navigation Menu provides the normal Record Movement, New, Edit, Delete, Cancel, Save, and Refresh options; as well as special Print and Search functions. |
| • | Record Editing section - The details of the currently selected record are displayed below the Navigation Menu at the center (Main Body) of the Verification Response Form. |
| • | Table View tab - A tabular (spreadsheet style) Table View of the currently defined Verification Response Codes is accessible by Clicking the Table View tab at the bottom of the Verification Response Form. |

| • | To display a specific Verification Response Code record in the Record Editing section, Click on that record within the Table View section, or use the Search Icon (see the "Using the Special Functions" section later in this chapter). |
| • | This Table View information may be Pinned in Place by Clicking the Pin Icon on the right. |

Verification Response Form - with Table View tab Pinned Open
| ▪ | You may Un-Pin this Table View by Clicking the Pin Icon again. |
| ▪ | Click on any listed record to display that information in the center (Main Body) of the Form. |
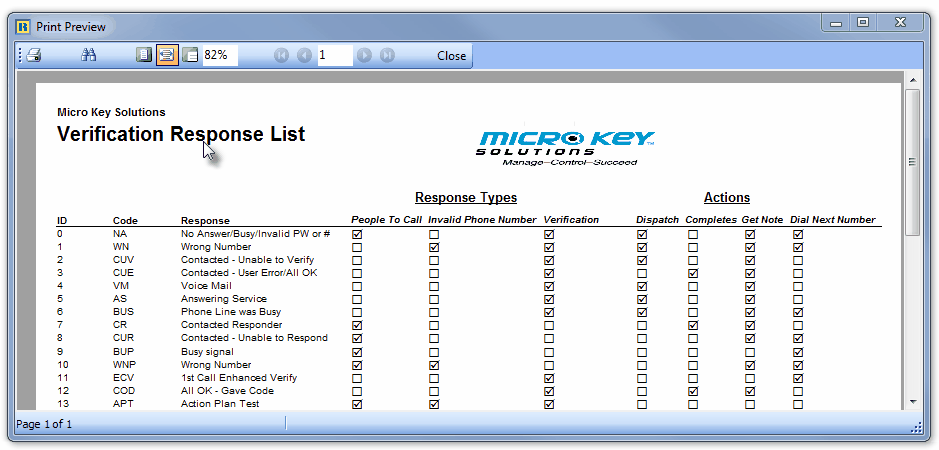
| • | There are eleven columns of data in this Verification Response Record Listing (all of which may not be visible unless the Verification Response Form is Re-sized to the right): |
| • | Each column's Header Name describes the data contained in that column. |
| ▪ | Clicking on a Header Name will set the order in which the Verification Responses will be listed. |
| ▪ | Clicking on the same Header Name will set the order in the opposite direction (ascending vs. descending). |
| ▪ | The Header Name that is determining the Order of the list will have an Icon indicating the Order displayed next to that Header Name. |
| • | To define the required Verification Responses: |
| • | Click the  Icon to start the Verification Response entry in the Record Editing section. Icon to start the Verification Response entry in the Record Editing section. |
| • | Code - Enter a code representing this Verification Response. |
| ▪ | This can be up to three (3) upper or lower case letters, punctuation marks, or numbers. |
| • | Resp ID - A record number that will be assigned by the system after the Verification Response entry is saved. |
| ▪ | This description may contain a combination of up to thirty (30) upper or lower case letters, punctuation marks, and/or numbers. |
| • | Response Types - Indicate the situation(s) in which this Verification Response Code may be used. |
| ▪ | This selection determines whether or not this Verification Response Code will be a choice available to the Operator to record their results when a Verification or Notification process is executed. |

Verification Response - Response Types
| i. | Verification - A Verification procedure is required, and a contact to the Premises was attempted and/or completed to verify the validity of the Alarm Signal. |
| ii. | People To Call - A Notification procedure is required, and a contact was attempted and/or completed to notify a third party of the occurrence of the Alarm Signal. |
| iii. | Invalid Phone # - During a Verification or Notification process, a contact was attempted but the Operator was unable to complete the process because the telephone number provided was invalid. |
| o | This Response Type must be used in combination with either the Verification and/or People To Call Response Type and typically - at a minimum - a Verification Response Code is created with the Verification + Invalid Phone #, and another Verification Response Code with the People To Call + Invalid Phone # boxes Checked - each with a slightly different set of Action(s) selected (see "Actions"below). |
| ▪ | Based on which Response Types were Checked, the designated Action(s) provided to the Operator will only be listed when appropriate (see "Actions"below). |
| • | Actions - As a result of performing the designated Response Type assigned to this Verification Response Code (i.e., a Verification or Notification call, or a call to an invalid telephone number), the following Action steps should be undertaken. |
| ▪ | Keep in mind that more than one Action may be required in some cases and should be defined that way by Checking multiple boxes. |

Verification Response - Action options
| o | This action would normally be required if Verification failed, was not required, or the person who answered had requested help. |
| ▪ | Make Note - Enter a Note relating to the Type of Response that actually occurred (also see Quick Notes). |
| o | This action would normally be required when the Verification process resulted in the cancellation of the Alarm Signal, or the person who answered requested service or some other type of help not requiring a normal Dispatch. |
| ▪ | Completes - The Response Type that was just executed (represented by this Verification Response code) finishes the Operator's processing requirement for this Alarm Signal. |
| ▪ | Dial Next Number - Dial the next telephone number available to call. |
| o | Continue making the next call to the Subscriber's Contact Information number, or continue with the People To Call Notification process. |
| ► | Note: These Actions are not necessarily the same as those defined in an Action Plan, but may require that the same type of step be undertaken. |
| • | Inactive? - Check this box when the selected Verification Response (for what ever reason) will no longer be used. |
| ▪ | To preserve the integrity of the Alarm History information, once a Verification Response Code has been used by an Operator during the Verification of an Alarm Signal, it can not be deleted. |
| ▪ | The Inactive? field allows this code to be "retired" and not be displayed on any Drop-Down Selection List of choices, but still remain in the system for Central Station Reports. |
| • | Click the  Icon to record this Verification Response entry. Icon to record this Verification Response entry. |
| • | Repeat this process, as needed, to define each Verification Response. |
| □ | Using the Special Functions on the Navigation Menu at the top of the Verification Response Form: |
| • | Print - Click the Print Icon to View and/or Print a list of the Verification Responses. |
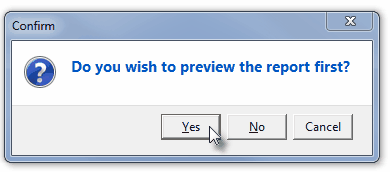
| • | Yes - Click the Yes button to View a copy of the report. |
| • | No - Click the No button to open the Windows® Print dialog where a copy of the report may be sent to a selected Printer, or Printed to a File. |
| • | Cancel - Click the Cancel button to close this Print question and return to the Form. |
| • | Search - Click the Search Icon to open the Search (Verification Response) dialog. |

Search dialog
| • | See the "Using the Generic Search dialog" section in the Advanced Search Dialog chapter for more information about this Search dialog. |

