|
Signal Options This Help File Page was last Modified on 06/30/2012 |

|

|
|
|
Signal Options This Help File Page was last Modified on 06/30/2012 |
|
|
Signal Options
This Help File Page was last Modified on 06/30/2012
|
Signal Options This Help File Page was last Modified on 06/30/2012 |
|
|
|
|
Signal Options This Help File Page was last Modified on 06/30/2012 |
|
|
| □ | The Signals Options Process & Data Options tab will be activated when the Operator: |
| 1. | Has finished all of the Operator Guided Response steps required - based on the actual results of those action steps. |
| 2. | Has been directed to the Signal Options tab by an Action Plan step. |
| 3. | Has switched to the Manual Mode from an Action Plan step. |
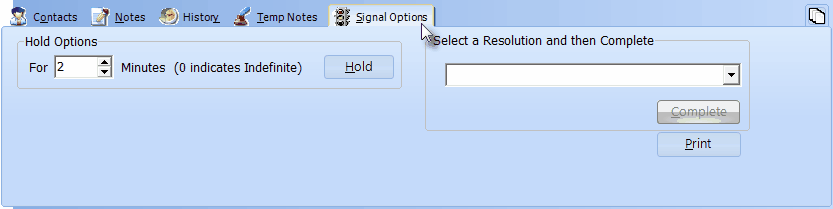
| □ | There are three options available on the Signal Options tab: |
| 1. | The Operator may temporarily place the Alarm Signal on Hold |
| ► | Note: If an Action Plan was directing the Operator, once this Signal is retrieved following being Placed on Hold, the system will default to the Operator Guided Response method. |
Signal Options tab on the Signal Processing screen
| 2. | The Operator wants to indicate that all required and necessary processing steps have been Completed, by selecting the appropriate Resolution Code. |
| 3. | The Operator wants to Reschedule an Event. When the Alarm Signal being processed is reporting an Event related issue, the Signal Options tab also offers the Reschedule Event option. |
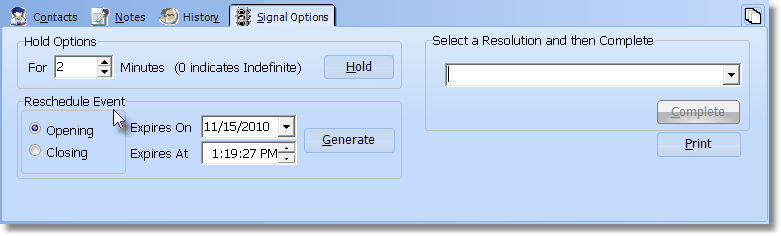
Signal Options tab with Reschedule Event options
| • | See Completion - Finalizing an Alarm for more information. |
| □ | Using the features on the Signal Options tab: |
| • | Hold Options - To place an Alarm Signal on Hold to await further information, perform the steps below: |
| • | For - Enter the number of minutes that you want to place the Alarm Signal on Hold. Entering a zero (0) places the Alarm Signal on Hold indefinitely. |
| • | Hold - Click the Hold button to execute the Hold request. |
| ► | Note: If an Action Plan was directing the Operator, once this Signal is retrieved following being Placed on Hold, the system will default to the Operator Guided Response method. |
| • | Select Resolution and then Complete - To define the reason this event is resolved, (optionally) print an Alarm Ticket, and indicate that all required and necessary processing steps have been Completed. |
| • | Resolution Code - Use the Drop-Down Selection List to Choose the appropriate Resolution Code. |
| • | Print - To print an Alarm Ticket for this Alarm Signal, Click the Print button. |
| • | Complete - Click the Complete button to finalize the processing of the current Alarm Signal. |
| □ | Rescheduling an Event - When the Alarm Signal being processed is reporting an Event related issue, the Signal Options tab automatically offers the Reschedule Event option |
| • | Often, while verifying an FC* - Failed to Close or an FO* - Failed To Open - Event, the Operator is asked to set a new Opening or Closing time for the premises. |
Signal Options tab with Reschedule Event options
| • | The Reschedule Event box: |
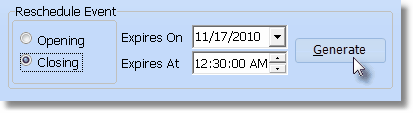
Reschedule Event box
| • | Open or Close - Click either the Opening or Closing button that represents the type of Event which needs to be rescheduled. |
| • | Expires On - By default, it will be Today. |
| ▪ | Use the Drop-Down Date Selection Box the Choose the Date when this Event should occur. |
| ▪ | Keep in mind that if setting the time beyond midnight, you must Choose the Date of the following day. |
| • | Expires At - By default it will be one hour later than the current time. |
| ▪ | Reset the Time when this Event should occur using the up & down arrow buttons. |
| ▪ | As needed, Click the Hours, Minutes, Seconds or AM/PM column, then Click the appropriate arrow to change the contents. |
| • | Generate - Click the Generate button to create the new Event in this Subscriber's current list of Scheduled Events. |
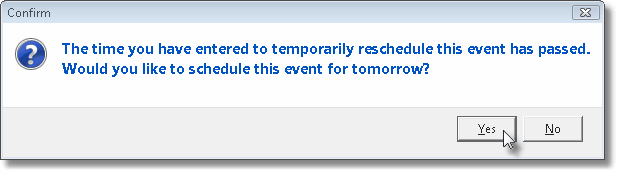
| ▪ | If you have entered a time that would require that it be inserted into the "next day" Scheduled Events list, you must Confirm this action. |
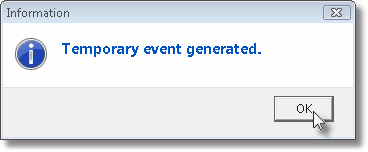
| ▪ | The system will indicate (whether or not the next day's date was required), that this Temporary Event has posted correctly. |
| • | Complete - Complete the processing as explained in Completion - Finalizing an Alarm Signal chapter. |