|
Quick Account Setup This Help File Page was last Modified on 09/20/2012 |

|

|
|
|
Quick Account Setup This Help File Page was last Modified on 09/20/2012 |
|
|
Quick Account Setup
This Help File Page was last Modified on 09/20/2012
|
Quick Account Setup This Help File Page was last Modified on 09/20/2012 |
|
|
|
|
Quick Account Setup This Help File Page was last Modified on 09/20/2012 |
|
|
| □ | Quick Account Setup - When a Technician or Alarm Dealer calls in to test the installation of a New Account: |

| • | Click the New Account button on the Panel Test Information Form to open the Quick Account Setup dialog. |
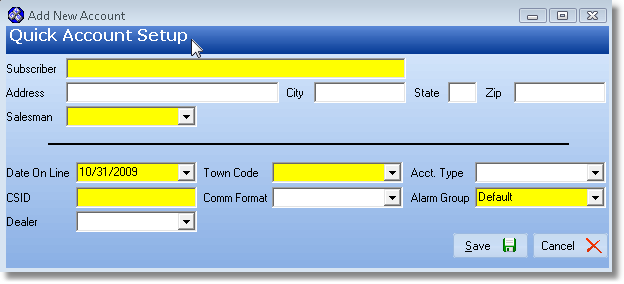
Quick Account Setup form
| • | Subscriber Information: |
| • | Subscriber - Enter the Subscriber's name. |
| ▪ | Entering a Business Name |
| o | Enter the Name as it would be listed in the Telephone Directory |
| o | If a prefix is part of the name but that name is not normally alphabetized by that prefix (such as the word "the"), enter the name followed by a tilde ("~") and the prefix. |
| o | Example: "ABC Company~The" |
| ▪ | Entering an individual Person's Name |
| o | Last Name is entered first |
| o | Type a tilde ("~") |
| o | (The tilde tells the system that everything after it is the Employee's first name and middle initial.) |
| o | Enter the First Name and Middle Initial |
| o | For Prefixes (Mr., Mrs., Ms., etc.), enter them after the Tilde and before the first name |
| o | For Suffixes (MD., Jr., III, etc.), enter them after the last name and before the tilde. |
| o | Example: "Smith, MD~Dr. James T." |
| • | Address - Enter their Street Address. |
| • | City - Enter the City. |
| • | State - Enter their 2 character State (or Province) code. |
| • | Zip - Enter their Zip Code. |
| • | Salesman - Use the Drop-Down Selection List to Choose the Salesman for this Account. |
| ▪ | This list will display all of the Employees defined for your Company. |
| ▪ | This is because a Subscriber record must have an Employee ID assigned. |
| ▪ | So you must Select one, even if you are not currently sure who the appropriate person is. |
| ▪ | Later, if appropriate, this information may be easily changed by the Accounts Receivable department. |
| • | Monitoring Information: |
| • | Date On Line - By default, Today will be inserted. |
| • | Town Code - Use the Drop-Down Selection List to Choose the Town Code for this Subscriber's responding authority. |
| • | Acct. Type - Use the Drop-Down Selection List to Choose the appropriate Account Type. |
| • | CSID - Enter the CSID for this new Account. |
| • | Comm Format - Use the Drop-Down Selection List to Choose the Communicator Format they will be installing. |
| • | Alarm Group - Use the Drop-Down Selection List to Choose the Alarm Processing Group to which this Subscriber will be assigned. |
| • | Dealer - If the Subscriber is being added by an Alarm Dealer for whom your Company provides Central Station Monitoring Services, use the Drop-Down Selection List to Choose that Dealer. |
| • | Save - Click Save to enter the new Subscriber information. |