| □ | To enter an Employee record, select Maintenance from the Main Menu and choose Employee. |
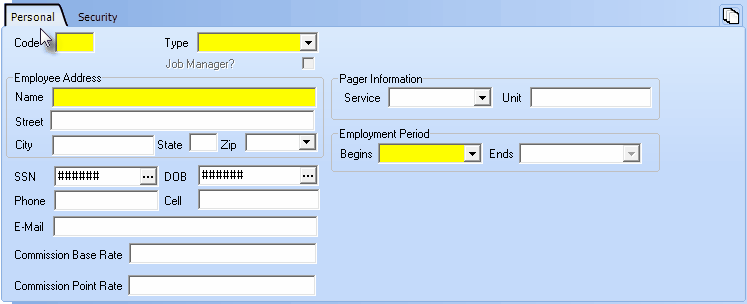
Blank Employee Form - Personal Tab
| • | Click the New (/) Icon on the Navigation Menu to indicate that you want to add a new record to the Employee table. |
| • | Fields highlighted in yellow are mandatory. |
| • | The record can not be saved unless the mandatory information is entered. |
| • | Although the yellow highlighted fields constitute a valid record, it is recommended that you complete the Personal information Tab at a minimum. |
| • | Code - Enter a Code - think of it as their Employee Identification Code - to represent this Employee. |
| • | Up to four alpha characters plus dashes, underlines and spaces are allowed. |
| • | Typically, you should use their initials. Do Not Use Numbers in the Employee Code. |
| • | If a duplicate would result, add another character at the end (ABC, ABCZ, ABCY, ABCX, ETC.). |
| • | Type - Using the Drop-Down Selection List provided, select a Type classification. |
| • | Administration - for key staff such as those Employees responsible for accounting operations, are a job manager, and/or perform other management level functions |
| • | All - for Employees who may be involved in any/all phases of the business |
| • | Operator - for Employees who primarily perform Central Station Monitoring functions |
| • | Sales - for Employees who are classified as Salespersons. |
| • | Technician - for Employees who are Service Technicians. |
| • | Job Manager? - Check this box if the Employee has been assigned the Type classification of All or Administration, and is an individual who may be assigned the duties of a Job Manager within the Inventory Tracking & Job Costing System, |
| ▪ | However, the Lead Technician is not a Job Manager, |
| • | A Job Manager must be assigned a Type of either All or Administration. |
| • | Employee Address - Enter the Name and Address of this Employee. |

Employee Form - Employee Address
| • | Name - Enter the Name of the Employee |
| • | Street - Enter the home address of the Employee |
| • | City, State, Zip - Enter as appropriate. |
| • | Begins - Using the Drop-Down Date Selection Box provided, Choose the Date of Hire. |
| ► | Note: This is the absolute minimum amount of information that may be entered to establish an Employee record. |
| • | Ends - Caution - The Ends field is not to be completed until the Employee is terminated or quits. |
| • | Entering an Ends date automatically removes the Login access for that terminated Employee. |
| • | To reinstate an Employee who previously had an Ends date entered, you must reenter the Employee's User Name and Password in Add/Delete Users. |
| • | Click the  Icon on the Navigation Menu to save the record, or Click Cancel ("X") to cancel the entry. Icon on the Navigation Menu to save the record, or Click Cancel ("X") to cancel the entry. |
| □ | Complete the remaining fields on the Personal tab. |
| • | Once you've saved an Employee record with the minimal information outlined above, you'll notice a lot of empty white space - all of which is labeled for additional information. |
| • | SSN - Click the Ellipse  button and enter the Social Security Number for this Employee. button and enter the Social Security Number for this Employee. |
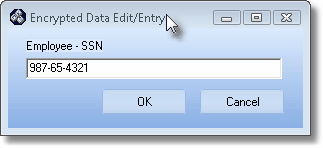
Employee - SSN information
| • | DOB - Click the Ellipse  button and enter the Date of Birth of this Employee. button and enter the Date of Birth of this Employee. |
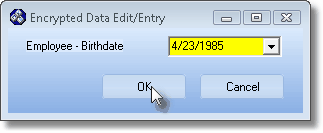
Employee - Birthdate
| • | Complete as much, or as little, of this information as may be necessary, based on the duties and responsibilities of this Employee. |
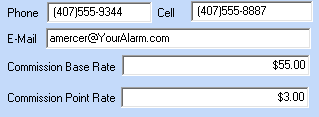
| • | Phone - Enter the Home Telephone Number of this Employee. |
| • | Cell - Enter the Cell Phone Number of this Employee. |
| • | E-Mail - Enter the E-Mail Address for this Employee. |
| ► | Note: Only those Employees whose Employee Type (see Type above) is either Sales, Technician, or All is Commission Eligible and only of they are assigned a "Dollar" Value to each of these fields. |
| ▪ | Commission Base Rate - Enter the minimum "Dollar" Value of the Commission that this Employee will earned for each Commission Eligible Sale. |
| ▪ | Commission Point Rate - Enter the "Dollar" Value of each Commission Point they may "Bank". |
| • | Pager Information fields (explained below). |
| • | Pager Information - These fields are used with the Paging capabilities provided in the Communications Module |

Page Information for Communication Module users
| ▪ | Service - Click the Drop-Down Selection List provided, choose the appropriate paging Service Provider. |
| ▪ | Unit - Enter the Pager Unit number assigned to their Pager. |
| • | Click the  Icon to record the edit. Icon to record the edit. |
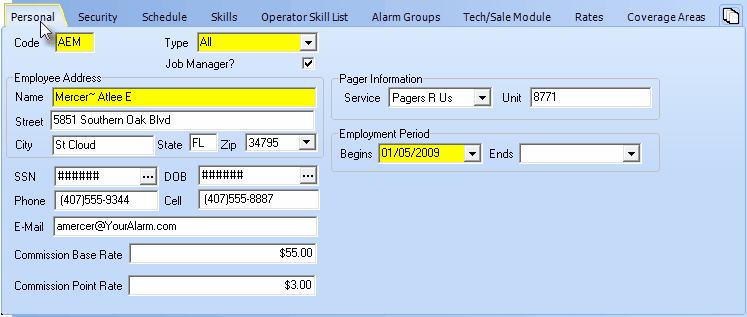
Employee Form - Personal tab - Sample entry
| □ | Return to this Form at any time and Add to or Edit the information whenever necessary. |
| • | Use the Search Icon (or Press F2) to retrieve the Employee record that needs to be updated. |
| • | Then, simply enter the required changes. |
| • | Click the  Icon to to record the revisions or Click Cancel ("X") to cancel the edit Icon to to record the revisions or Click Cancel ("X") to cancel the edit |
| • | Create a fictitious Employee (as shown below) to be used to Login to the MKSASP application, and for identifying the Operator of record when posting the executed Action Steps in the Subscriber's Alarm History file (an example of which is shown below). |
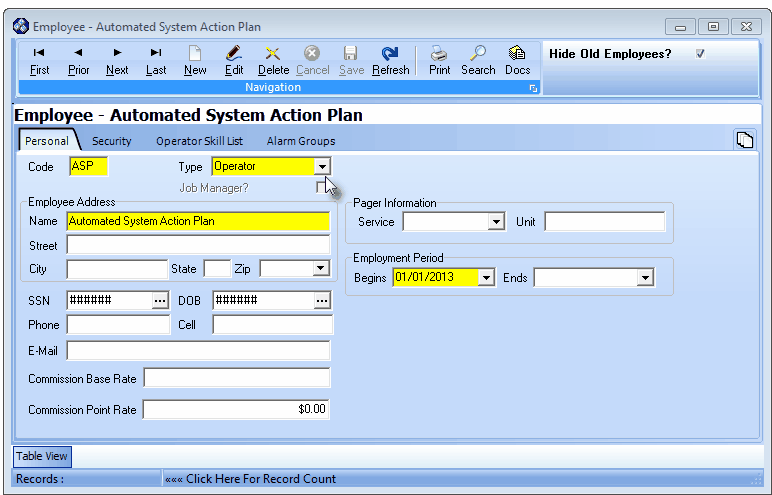
Employee Form - Automated System Action Plan Employee
| ▪ | Only the Mandatory fields need to be completed. |
| ▪ | The Employee's Code is used to identify the "Operator" who performed the Automated System Action Plan Action Steps as the information is stored in the Subscriber's Alarm History file. |

Alarm History detail - showing Automated System assigned Employee Code


