|
Emergency Management Mode This Help File Page was last Modified on 11/12/2012 |

|

|
|
|
Emergency Management Mode This Help File Page was last Modified on 11/12/2012 |
|
|
Emergency Management Mode
This Help File Page was last Modified on 11/12/2012
|
Emergency Management Mode This Help File Page was last Modified on 11/12/2012 |
|
|
|
|
Emergency Management Mode This Help File Page was last Modified on 11/12/2012 |
|
|
| □ | Emergency Management Mode may be implemented when your Central Station needs to better allocate and manage your Operator's Processing Time due to an external emergency that is affecting the entire Central Station. |
| • | Severe Weather and broadly based Power Outages are the two most common reasons to implement the Emergency Management Mode. |
| • | During these types of emergency situations, Central Stations are often flooded with Active Signals reporting various Supervisory Events of low importance, but that still require Response from an Operator. |
| • | Non Life Threatening Supervised Events such as Low Battery, AC Loss, Failed to Open or Close, Hi Temp, Low Temp, etc., are usually assigned a less important Priority Level within the Alarm Condition Code Form (as illustrated below). |
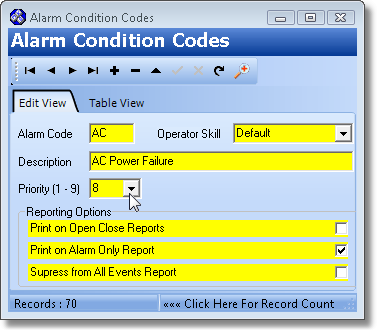
Alarm Condition Code Form with Priority set to 8
| • | Priority - The higher the Priority Number (see the mouse pointer in the illustration above), the lower its importance in relation to life safety. |
| ▪ | Typically, assigning a Priority Level of 4 or higher indicates that the Alarm Condition Code is not directly related to a Life Safety event. |
| • | By implementing the Emergency Management Mode, all Alarm Signals (and other Supervisory Events), which have a Priority Level set at or above, a specified Priority Level number, will be placed on Hold immediately. |
| • | While in Emergency Management Mode, those selected Active Signals are automatically placed on Hold but will still remain in the Alarm Stack . |
| • | As time permits, these signals may easily be retrieved and properly Processed as the Emergency abates. |
| • | In summary, by implementing the Emergency Management Mode, your Operators will be able to concentrate and process the most important signals - those relating to life safety - and as the emergency situation subsides, retrieve the remaining signals (automatically placed on Hold by this Emergency Management Mode process) from the Alarm Stack, as time allows. |
| □ | To access the Emergency Management Mode dialog, Press Ctrl+F2, or Select Emergency Management Mode on the MKMSCS Main Menu's Actions option. |
| • | There are two tabs on the Emergency Management Mode Form: |
| 1. | Enhanced EMM - This tab provides the Enhanced Emergency Management Mode with several options to fine-tune which Accounts are affected by the Emergency Management Mode. |
| 2. | Traditional - This tab - the original Emergency Management Mode tab - allows an Authorized Operator to Activate and Deactivate this function, as needed. |
| □ | Enhanced EMM - This tab provides the upgraded Enhanced Emergency Management Mode with several options to fine-tune which Accounts are affected by this function. |
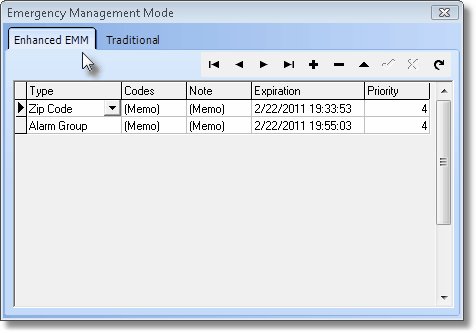
Enhanced EMM tab on Emergency Management Mode Form
| • | Understanding Enhanced EMM: |
| • | To start the Enhanced Emergency Management Mode Process: |
| ▪ | Click the Add ("+") Icon. |
| ▪ | Enter the appropriate data in each of the five columns (see below). |
| ▪ | Click the Save ("ü") Icon to record your entry. |
| • | Any number of Enhanced EMM entries may be activated at the same time. |
| • | Each Enhanced EMM entry may have its own Expiration Date and/or Time. |
| • | Each Enhanced EMM entry may identify a different set of Accounts, and the Priority Level subject to the Emergency Management Mode Process. |
| • | There are five data columns on the Enhanced EMM tab which, when completed, provide the means to custom define which set of Accounts will be placed in Emergency Management Mode. |
| 1. | Type - Using the Drop-Down Selection List provided, Choose the Type of Accounts, based on the options in the list shown below, that are to be placed in Emergency Management Mode. |
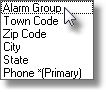
Type options
| a. | Alarm Group - All Subscribers that are members of the Selected Alarm Group(s) will be subject to the Emergency Management Mode procedures. |
| b. | Town Code - All Subscribers that are located within the Governmental Jurisdictions represented by the Selected Town Codes will be subject to the Emergency Management Mode procedures. |
| c. | Zip Code - All Subscribers that are located within the listed Zip Code(s) will be subject to the Emergency Management Mode procedures. |
| d. | City - All Subscribers that are located within the listed Cities will be subject to the Emergency Management Mode procedures. |
| e. | State - All Subscribers that are located within the listed States will be subject to the Emergency Management Mode procedures. |
| f. | Phone *(Primary) - All Subscribers whose Telephone Exchange matches one of these listed Telephone Exchanges will be subject to the Emergency Management Mode procedures. |
| 2. | Codes - Based on the Type selected above, Click inside the Codes field and select the Ellipse. Using either the Multiple-Selections dialog, or the Enhanced EMM Pop-up Data Entry dialog, identify those Accounts that are to be placed in Emergency Management Mode. |
| ▪ | Alarm Group - One or more Alarm Groups may be identified: |
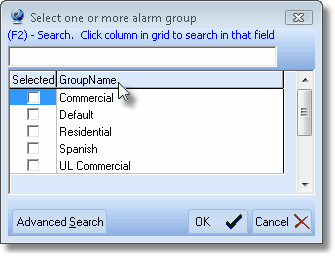
Check one or more Alarm Groups
| a. | Check any number of Alarm Processing Group(s) whose Subscriber members (residents and businesses) are assigned to one of these Alarm Groups, are to be subject to the Emergency Management Mode procedures. |
| b. | Click the OK button when finished. |
| c. | The selected Alarm Group(s) will be inserted into the Codes field. |
| d. | Click the Save ("ü") Icon to record your entry. |
| e. | You may update any Pending Signals in the Alarm Stack (placing those that qualify on Hold) based on their Alarm Processing Group(s) and Priority Level, if needed. |
| ▪ | Town Code - One or more Town Code(s) may be identified: |
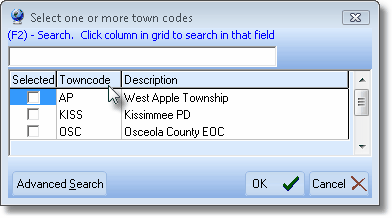
Check one or more Town Codes
| a. | Check all of the Town Codes, whose Subscribers (residents and businesses) assigned one of these Town Codes, are to be subject to the Emergency Management Mode procedures. |
| b. | Click the OK button when finished. |
| c. | The selected Town Code(s) will be inserted into the Codes field. |
| d. | Click the Save ("ü") Icon to record your entry. |
| e. | You may update any Pending Signals in the Alarm Stack (placing those that qualify on Hold) based on their Town Codes and Priority Level, if needed. |
| ▪ | Zip Code - One or more Zip Codes may be identified: |
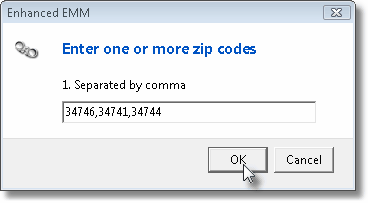
Enter one or more zip codes
| a. | Type in any number of Zip Codes, each separated with a comma, whose Subscribers (residents and businesses) within those Zip Codes, are to be subject to the Emergency Management Mode procedures. |
| b. | Click the OK button when finished. |
| c. | Those Zip Codes will be inserted into the Codes field. |
| d. | Click the Save ("ü") Icon to record your entry. |
| e. | You may update any Pending Signals in the Alarm Stack (placing those that qualify on Hold) based on their Zip Code and Priority Level, if needed. |
| ▪ | City - One or more Cities may be identified: |
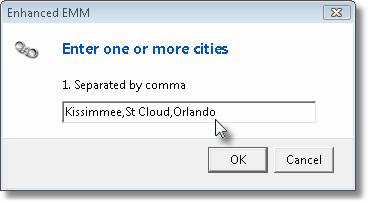
Enter one or more cities
| a. | Type in any number of City Names, each separated with a comma, whose Subscribers (residents and businesses) within those Cities are to be subject to the Emergency Management Mode procedures. |
| b. | Click the OK button when finished. |
| c. | Those City Names will be inserted into the Codes field. |
| d. | Click the Save ("ü") Icon to record your entry. |
| e. | You may update any Pending Signals in the Alarm Stack (placing those that qualify on Hold) based on their City and Priority Level, if needed. |
| ▪ | State - One or more States may be identified: |
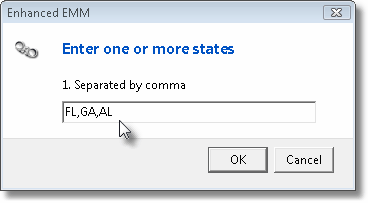
Enter one or more states
| a. | Type in any number of State Codes, each separated with a comma, whose Subscribers (residents and businesses) within those States are to be subject to the Emergency Management Mode procedures. |
| b. | Click the OK button when finished. |
| c. | Those State Codes will be inserted into the Codes field. |
| d. | Click the Save ("ü") Icon to record your entry. |
| e. | You may update any Pending Signals in the Alarm Stack (placing those that qualify on Hold) based on their State and Priority Level, if needed. |
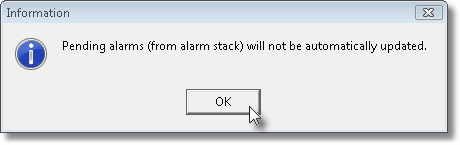
| ▪ | Phone *(Primary) - One or more Telephone Exchanges may be identified: |

Enter one or more phone exchanges
| a. | Type in any number of Telephone Exchanges, each separated with a comma, whose Subscribers using that Telephone Exchange as part of their Primary Telephone Number, are to be subject to the Emergency Management Mode procedures. |
| b. | Click the OK button when finished. |
| c. | Those Telephone Exchanges will be inserted into the Codes field. |
| d. | Click the Save ("ü") Icon to record your entry. |
| e. | Pending alarms (from the alarm stack) will not be automatically adjusted (placed on Hold). |
| 3. | Note - Double-Click (Memo) in the Note column and provide a brief explanation as to why Emergency Management Mode was implemented for these Subscribers. |
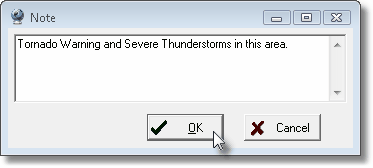
Note identifying reason Emergency Management Mode started
| ▪ | Type in the reason for starting Emergency Management Mode for these selected Accounts. |
| ▪ | Click the OK button when finished. |
| 4. | Expiration - By default the Date and Time that the Emergency Management Mode will end is set 24 hours from Now. |
| ▪ | Using the Drop-Down Date & Time Selection Box provided, you may Modify this Date and/or Time information, as appropriate. |
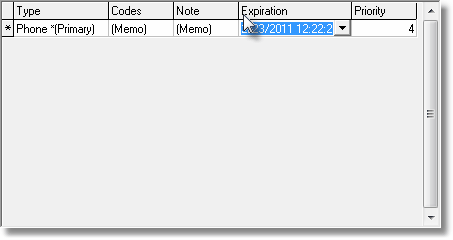
Destination column on Enhanced EMM tab
| 5. | Priority - By default, the Priority Level is set to 4. |
| ▪ | Active Signals with a Priority Level above this number will automatically be placed on Hold. |
| ▪ | You may Modify this Priority Level number, as appropriate. |
| • | If you have not done so yet, Click the Save ("ü") Icon to record your entry. |
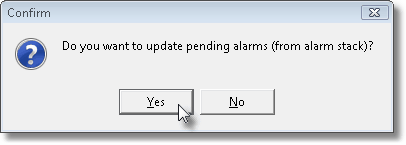
| • | As noted above, usually when you Click the Save ("ü") Icon to record your entry, you may be allowed to Update All of the Pending Alarms in the Alarm Stack at that time, based on the Type(s) and Code(s) that were chosen. |
| • | Update any Pending Signals in the Alarm Stack (placing those that qualify on Hold)? |
Do you want to update pending alarms (from alarm stack)?
| • | When the Emergency Management Mode ("EMM") is Activated, an A115 Signal is inserted into the SPA Account's Alarm History. |
| • | The Alarm Signal History Detail will indicate the following: |
ID: 20 (System assigned number)
Type: Alarm Group
Code: '1' (Code number is based on the Type selected above)
Expiration: 3/24/2011
Priority: 4
Note:
| • | A special message will be displayed at the bottom of the Alarm Signal Processing screen indicating the Emergency Management Mode ("EMM Active") is Active. |
![]()
| • | When the Emergency Management Mode ("EMM") is Deactivated, an A116 Signal is inserted into the SPA Account's Alarm History. |
| • | The data lines below refer to the SPA Special Subscriber Account which has a Subscriber Panel record with a CSID of "SPA" and - among others - must have these EMM Activation and Deactivation Signal Identifiers defined in CSID Zones. |
| ▪ | Signal ID = A115 Alarm Code = System Messages OCTAR = Alarm Description = Emergency Mode Activation |
| ▪ | Signal ID = A116 Alarm Code = System Messages OCTAR = Alarm Description = Emergency Mode Deactivation |
| □ | Traditional tab |
| • | Activate - Select the Traditional tab, and Click the Activate button - filling in the information shown below, as required. |
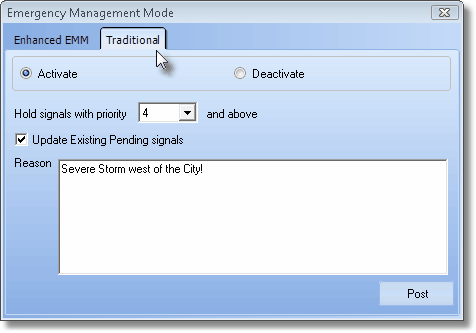
Activating Emergency Management Mode
| • | Hold signals with priority nn and above - By default, the Priority Level is set to 4. |
| ▪ | You may Modify this number, as appropriate. |
| • | Update Existing Pending signals - By default, signals already in the Alarm Stack are left unchanged. |
| ▪ | Check this box to place signals in the Alarm Stack on Hold if they have a Priority at or above what you've specified above. |
| • | Reason - Enter a brief explanation as to why Emergency Management Mode was turned on. |
| ▪ | This is a mandatory field, and if not filled in, a message will be displayed to remind the Operator to do so. |

| ▪ | Click the Post button to activate the Emergency Management Mode. |
| ▪ | When the Emergency Management Mode is Activated, a warning message is continuously displayed on the Information Bar at the bottom of the MKMSCS desktop. |
![]()
Emergency Management Mode Message on the MKMSCS Desktop's Information Bar
| • | Deactivate - To turn Off the Emergency Management Mode, Press Ctrl+F2 and then Click the Deactivate button and Click the OK button. |
| ▪ | So, if the Emergency Management Mode has been Activated (set to On), and you want to turn it off, Click Deactivate and Click the OK button. |
![]()
The Default setting is Deactivate