| □ | Some businesses have a very large number of Sale-Purchase Items defined - often the majority of which are Inventory items.. |
| • | When entering Sales, Proposals or Purchases, locating the correct code may mean searching through a very long list. |
| • | To speed this process, create Sale Item Groups to identify a specific group or type of Sale-Purchase Item. |
| □ | Advanced Sale Item Lookup |
| • | To access the Sale Item Groups list while entering a Sale, a Proposal or recording a Purchase. |
| • | Click the Sale-Purchase Items Drop-Down Selection List. |
| • | Press Alternate and F2 at the same time (Alt+F2) to activate the Advanced Sale Item Lookup. |
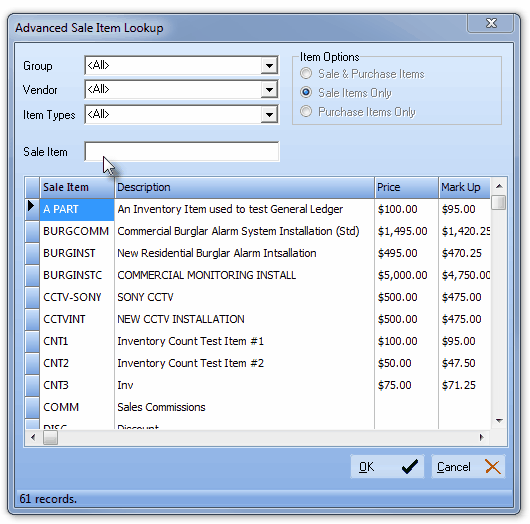
| • | Item Options - The Item Options box will automatically select the correct choice which limits the choices in the selection list. |
| ▪ | Sale Items Only - the default when creating a Sales Invoice or Proposal. |
| ▪ | Purchase Items Only - the default when entering a Purchase Invoice. |
Advanced Sale Item Lookup dialog
| • | There are four (4) selection criteria on the Advanced Sale Item Lookup that you may use individually, or together with the others, to quickly refine what will be presented in the Look Up List. |
| ▪ | The Group selection may be used by itself or combined with any of the other selection criteria to further refine your selection |
| ▪ | By making this selection, only Sale-Purchase Items with this Sale Item Group code will be displayed. |
| ▪ | Click on the desired Sale Item |
| ▪ | Click OK to make the selection. |
| 2. | Vendor - use the Drop-Down Selection List to Choose a Vendor. |
| ▪ | The Vendor selection may be used by itself or combined with any of the other selection criteria to further refine your selection |
| ▪ | By making this selection, only Sale-Purchase Items with this Vendor Item Id code assigned will be displayed. |
| ▪ | Click on the desired Sale Item |
| ▪ | Click OK to make the selection. |
| 3. | Item Types - There are, in addition to <All> four predefined Item Types: |
| a. | Inactive - limits the list to those Sale-Purchase Items Checked as Inactive. |
| b. | Inventory - limits the list to those Sale-Purchase Items Checked as Inventory. |
| c. | Kits - limits the list to those Sale-Purchase Items that are Checked Kit Designation. |
| d. | Recurring - limits the list to those Sale-Purchase Items that are Recurring Revenue Items. |
| ▪ | Click on the desired Sale Item |
| ▪ | Click OK to make the selection. |
| 4. | Sale Item - Type one or more letters of the desired Sale Item or Description to further limit the selection to only those items that start with the letter(s). |
| ▪ | Click on the desired Sale Item |
| ▪ | Click OK to make the selection. |
| • | There are four (4) columns in the Look Up List on the Advanced Sale Item Lookup dialog: |
| 2. | Description - The description of each listed Sale Item. |
| 3. | Price - The regular Retail Price of each listed Sale Item. |
| 4. | Mark Up - The Adjusted Retail Price for this Sale Item after factoring in a Mark Up/Down Percentage assigned to the Subscriber or as a Price Override on the Sale-Purchase Item itself. |
| • | Click on the desired Sale Item and then Click the OK button. |
| • | The Advanced Sale Item Lookup dialog will Close. |
| • | The selected Sale Item will be inserted into the Item column on the Sales Form. |
| □ | Many times this feature is not needed initially, but as your business and Inventory grows, it may become necessary in the future. |

