| • | This Advanced Sale Item Lookup process requires that most - if not all - of your Sale Purchase Items have been assigned a Sale Item Group. |
| • | Once this has been done, when selecting a Sale-Purchase Item, you can specify that the list only contain items in a specified Sale Item Group. |
| □ | Sale Item Group Assignments |
| • | Later, as the list grows (and it will), you may want to do so. |
| • | From the Main Menu Select Maintenance menu and then the Accounts Receivable sub-menu, and Click Sale Item Group Assignment. |
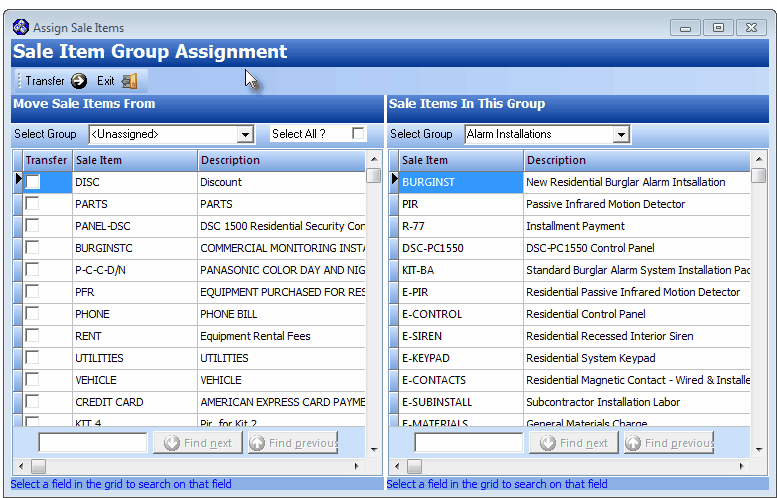
Sale Item Group Assignment Form
| • | There are two main sections on this Form: |
| 1. | Move Sale Items From - This is where you Choose the Select Group that you want to Transfer to the right side - the list that has been assigned a Sale Item Group code. |
| o | Use the left side Select Group Drop-Down Selection List to Choose the Sale Item Group (or more likely, the items with no Sale Item Group assigned - the <Unassigned> items) you want to transfer to a predefined Sale Item Group (which you will Choose using the Select Group Drop-Down Selection List on the right side). |
| o | The concept is to find the <Unassigned> (the initial default selection) Sale-Purchase Items on the left side and move (Transfer) them to a Sale Item Group of similar Sale-Purchase Items on the right side. |
| o | Check the boxes of as many items as needed in the Transfer column on the left side that you want to Transfer to the right side. |
| o | Click the Transfer button to move them to the right side of the Form. |

| 2. | Sale Items In This Group - This is where you Choose, using the right side Select Group Drop-Down Selection List, the Sale Item Group that you want assigned to Sale-Purchase Items.transferred from the left side. |
| • | You may want to transfer all members of a group to a different group. |
| • | To do so, select the group to be re-assigned in the left side Select Group box. |
| ▪ | All items in the group will be listed. |
| ▪ | Check the Select All? box. |
| ▪ | In the right side Select Group box, Select the group you want all of the items listed on the left side transferred to. |
| ▪ | Click the Transfer Ü button. |
| • | Other features on the Sale Item Group Assignment Form: |
| • | Search Function - When selecting the items on the left side to be transferred to a selected Sale Item Group on the right side, if your naming or code assignment method has been consistent, you may use the Search function at the bottom of the Form to quickly locate items of a similar type. |

| ▪ | As an example - If you named Inventory Items starting with the manufacturer's name: |
| ▪ | Enter a portion of that name in the search box - The entry is not case sensitive. |
| o | Click the column (either Sale Item or Description - in this case Description) where the comparison should be made. |
| o | Click Find next (or Find previous) to locate the next item that matches the search entry. |
| ▪ | If it is correct, Click the Transfer box to insert a Check mark. |
| ▪ | It is now selected for transfer. |
| o | Click the Description that matched the search and Click Find next (or previous) again to locate the next item. |
| o | Continue this process until you have found all the members of the group you want to transfer to the right side. |
| ▪ | Click the Transfer to move them to the right side. |
| • | Exit - once you have completed the desired transfers, Click the Exit (next to the Transfer ) to close the Form. |

