| □ | Each entity who qualifies as a Vendor must have specific Information entered for several reasons: |
| • | Each supplier of parts, services, and commodities must be identified so you can pay them (you can't write a check to no one). |
| • | In addition, any other entity to whom you write checks (such as Employees and Sub-Contractors) should also be entered. |
| □ | To open the Vendor Information Form |
| • | Press the F4 function key. |
| • | Or, on the Main Menu Choose the Outlook Bar menu, Select the Accounts Payable sub-menu and Click F4 Vendor. |
| • | To locate a specific Vendor record, Press F2 to open the Search Vendor dialog. |
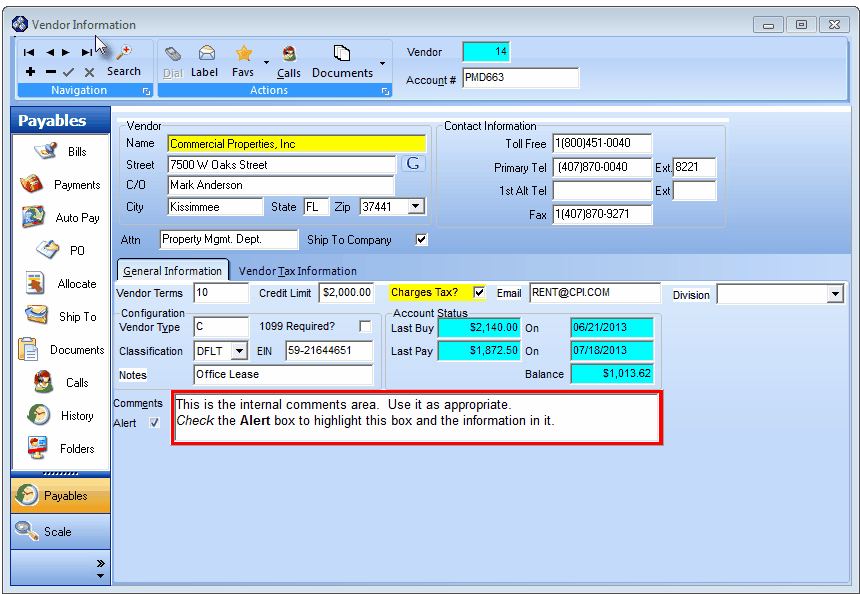
Vendor Information Form showing General Information sub-tab & Payables Quick Access Menu
| □ | Completing the Vendor Information Form: |
| • | Vendor - This is the internal Record Number assigned by MKMS when a Vendor Information entry is initially saved. |
| • | Acct # - This is the Account Number assigned by this Vendor that represents your Company in their accounting system. |
| • | Up to 20 characters are allowed including upper & lower case letters, numbers, spaces and normal punctuation. |
| • | If the Account # assigned by the Vendor is greater than 20 characters in length, enter the last 20 characters. |
| • | This Account # will be printed on Check Payments printed for this Vendor. |
| • | Vendor - Enter the full mailing address information for the Vendor. |
| • | Name - Enter the name of the Company as it would appear in the Telephone book. |
| ▪ | The first letter will be capitalized automatically, |
| ▪ | A total of 30 characters are allowed including upper & lower case letters, numbers, spaces and normal punctuation. |
| ▪ | Entering a Business Name |
| o | Enter the Company's Name as it would be listed in the Telephone Directory |
| o | If a prefix is part of the name but that name is not normally alphabetized by that prefix (such as the word "the"), enter the name followed by a tilde ("~") and the prefix. |
| o | Example: "ABC Company~The" |
| ▪ | Entering an individual Person's Name |
| o | Last Name is entered first |
| o | (The tilde tells the system that everything after it is the Person's first name and middle initial.) |
| o | Enter the First Name and Middle Initial |
| o | For Prefixes (Mr., Mrs., Ms., etc.), enter them after the Tilde and before the first name |
| o | For Suffixes (MD., Jr., III, etc.), enter them after the last name and before the tilde. |
| o | Example: "Smith, MD~Dr. James T." |
| • | Street - Enter the property's address number and full street name. |
| ▪ | If the first character is a letter, it will be capitalized automatically, |
| ▪ | A total of 30 characters are allowed including upper & lower case letters, spaces, numbers and normal punctuation. |
| ▪ | Google Maps® - Click the  to open a Digital Map Display showing the exact location of this Subscriber. to open a Digital Map Display showing the exact location of this Subscriber. |
| • | C/O (Care of) - Secondary address line. |
| ▪ | If the first character is a letter, it will be capitalized automatically, |
| ▪ | A total of 10 characters are allowed including upper & lower case letters, numbers, spaces and normal punctuation. |
| ▪ | If the first character is a letter, it will be capitalized automatically, |
| ▪ | A total of 25 characters are allowed including upper & lower case letters, numbers, spaces and normal punctuation. |
| • | State - This field will accept up to 20 characters. |
| ▪ | Character that are letters are NOT capitalized unless you type them that way. |
| ▪ | A total of 20 characters are allowed including upper & lower case letters, numbers, spaces and normal punctuation. |
| • | Zip - Enter a Zip Code, or Postal Code for this Vendor. |
| ▪ | If any character is a letter, it is NOT capitalized unless you type it that way. |
| ▪ | A total of 10 characters are allowed including upper & lower case letters, numbers, spaces and normal punctuation. |

| o | The Zip field in the Vendor Information Form will have a Drop-Down Selection List . |
| o | In this Zip field, when the Zip Code (Postal Code) is Selected (and/or entered) for that record's location, the associated City and State (Province) information will be automatically inserted into those related fields. |
| • | Attn (Attention) - For additional addressing information, if needed. |
| ▪ | If the first character is a letter, it will be capitalized automatically, |
| ▪ | A total of 30 characters are allowed including upper & lower case letters, numbers, spaces and normal punctuation. |
| • | Ship To Company - Check this box if a Ship To Address has been identified (see "Ship To Company" below) |
| • | Contact Information - Enter complete contact information as available. |
| • | Toll Free - Enter their Toll Free telephone number. |
| • | Primary Tel - Enter the Primary telephone number following the rules below. |
| ▪ | (Formatting -parentheses and dashes - is applied automatically by the system - do not type them) |
| ▪ | If no area code is needed, enter the telephone number (it cannot start with a 1) |
| ▪ | If you have 10 digit dialing where no "1"prefix is needed, but you do need to dial an area code as part of the telephone number: |
| ▪ | Press the <Space Bar> first. |
| ▪ | Then enter the three digit area code. |
| ▪ | Finally enter the seven digit telephone number. |
| ▪ | Correct formatting will occur automatically. |
| ▪ | Long distance numbers (with a "1" prefix) are entered as such with the formatting parentheses and dash applied automatically |
| • | Ext - Enter any Extension, if required. |
| • | 1st Alt - Enter their first alternate telephone number. |
| • | Ext - Enter its Extension, if required. |
| • | Fax - Enter a Fax number. |
| • | Save - Click the Save ("ü") to record the Vendor Information entry. |

Post changes to record?
| • | If the User attempts to Close this Form by Clicking the Close Icon (T) before saving the current entry (or modification), a Post changes to record? message will be displayed. |
| ▪ | Yes - Click the Yes button to record the entry (or modification) and Close the Form. |
| ▪ | No - Click the No button to abandon the entry (or modification) and Close the Form. |
| • | Ship To Company - Establish a specific Ship To Address for Purchase Orders issued to this Vendor. |
| • | Enter your appropriate Company Shipping Address for the items that will be purchased from this Vendor in the displayed Edit Rich Text dialog. |
| • | Press Ctrl+S to save the Company Shipping Address entry. |
| • | Check the Ship To Company box so the Purchase Orders from this Vendor show the correct shipping instructions. |
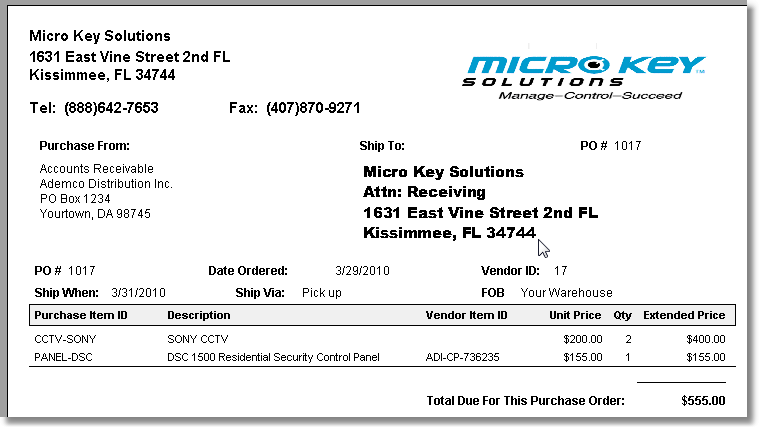
Sample Purchase Order showing Ship To address information
| ▪ | If you need to modify the Shipping Address information that was entered |
| o | Un-Check the Ship To Company box and Save ("ü") the Vendor Information record. |
| o | As needed, Modify or completely Remove the information displayed in the Edit Rich Text dialog. |
| o | Press Ctrl+S to save the revised shipping address information. |
| o | Check the Ship To Company box. |
| o | Then Save ("ü") the Vendor Information record. |
| □ | See the General Information tab - (see the example above) allows you to enter additional information related to Vendors. |
| □ | See the Vendor Tax Information tab for a detailed explanation of how to set the Sales Tax Rate(s) and Rule(s) charged by the Vendor, if required. |

