| □ | There are many times when you want the information you are entering to stand out more clearly on Forms, and on printed Documents - particularly for your Central Station Operators, Accounts Receivable Collectors, and for certain information sent to your Subscribers. |
| • | Comment fields usually support the Rich Text Editor function. |
| • | The Rich Text Editor allows you to enter bold, italicized and underlined text, and the individual selection of Font type, it's size, color, and to highlight areas of text. |
| • | You can Double-Click any comment type of field to see if the Edit Rich Text box appears. |
| • | If a Rich Text Editor is available, a special Edit Rich Text Form will be displayed. |
| • | Edit Rich Text Main Menu: |
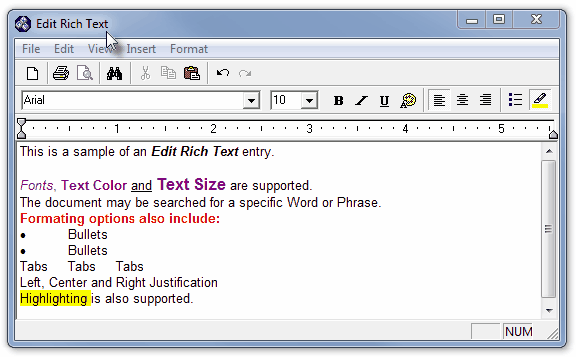
Edit Rich Text Form
| • | File - Offers Save & Exit, Page Setup and Printing Selections, in addition to Exit (without saving). |
| • | Edit - Standard Windows® functionality including Copy, Paste, Undo, Redo, Select, Find, Search, and Replace |
| • | View - Display or Hide the Tool Bar, Status Bar, Format Bar and Ruler by Checking and Unchecking these options. |
| • | Insert - Enables you to create a new or select an existing Object - based on the applications already installed on your computer - consisting of a graphic, word processing, spreadsheet and many other types of files. |
| • | Format - Access to the Font dialog, the Bullet Icon, and the standard Word® style Paragraph and Tab setting dialogs. |
| • | Other Icons - There are also buttons for Open (Ctrl+O - an existing file), Print (Ctrl+P - this entry), Find (Ctrl+F - text within the entry), and the standard Windows® Cut (Ctrl+X), Copy (Ctrl C) Paste (Ctrl+V - to insert what is in the Clipboard), plus Undo (Ctrl+Z)and Redo (Ctrl+Y) functions. |
| • | Edit Rich Text formatting options: |

Edit Rich Text - formatting options
| • | Font - Select the text you desire to be change, then use the Drop-Down Selection Box to select the desired Font type. All properly installed fonts on your computer will be available. |
| • | Size - Select the text you desire to be change, then use the Drop-Down Selection Box to select the desired font Size (the hight of the font). |
| • | Bold - Select the text you desire to be change to Bold and Click the "B" Icon (or hold down the Control Key and Click the letter "B"). |
| • | Italics - Select the text you desire to be change to Italics and Click the "I" Icon. |
| • | Underline - Select the text you desire to be change to underlined and Click the "U" Icon. |
| • | Text Color - Select the text you desire to be changed to a different Color, then Click the Text Color Wheel. |
| • | Left, Center, Right Justify Text - Select the text you desire to be Justify, then Click the appropriate Justification Icon. |
| • | Bullets - Bullets may be added to a list of phrases. |
| ▪ | As you pre-enter the text, Press Enter at the end of each line that is to be a bulleted item. |
| ▪ | Select the entire Text that is to be bulleted. |
| • | Highlight - Select the text you desire to be highlighted in yellow, then Click the Highlight Icon. |
| • | Click File on the top menu. |
| • | Select Save and Exit to record your entry and Close the Edit Rich Text Form. |

