| □ | 09The General Information Tab on the Vendor Information form allows you to further classify and define the purpose of a Vendor. |
| • | Press F4 to open a Vendor Information form and Select the General Information Tab. |
| • | The General Information Tab may also be accessed by Pressing the Alternate key together with the Underlined Letter in the tab's Title (Alt+G). |
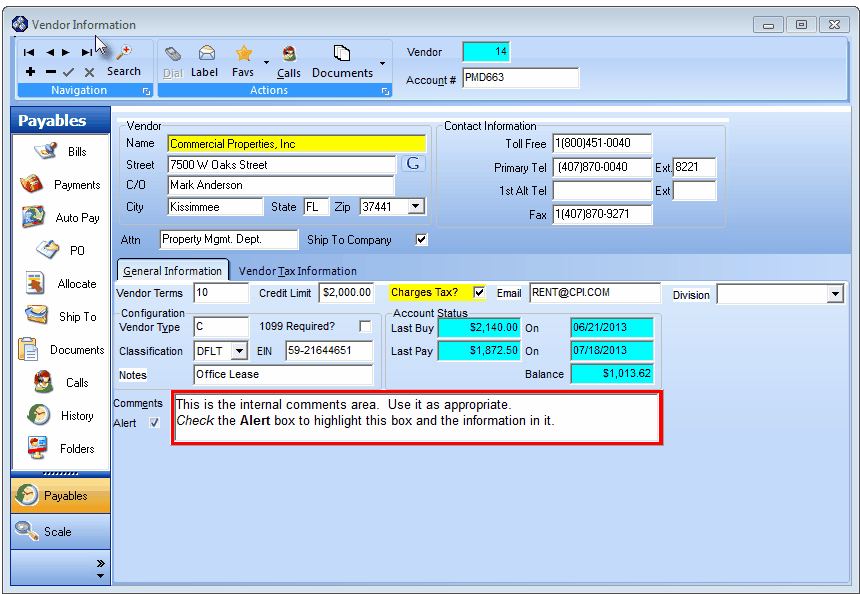
Vendor Information Form and its General Information tab activated with Payables menu shown
| • | Vendor Terms - Enter the number of Days after the Vendor's Invoice Date that your Payment is Due. |
| • | Credit Limit - If appropriate, enter your Credit Limit with this Vendor. |
| • | Charges Tax? - Check this box if the items purchased from this Vendor are Taxable. |
| • | If this Vendor charges Sales Tax on your Purchases, Check the Charges Tax? box on the General Information tab to open the Vendor Tax Information Tab. |
| • | Email - Enter the appropriate contact's Email address. |
| • | Division - A Vendor may be assigned to (only used by) a specific Division within your Company. |
| • | Use the Drop-Down Selection List to Choose that Division, if appropriate. |
| • | If a Division code is assigned in error (or no longer needed), open the Drop-Down Selection List and Press the Delete key. |
| • | Configuration - Complete this general information for each Vendor. |
| • | Vendor Type - This may be entered to help you classify this Vendor. |
| ▪ | Enter "C" for Corporation, "P" for Partnership, or "S" for Sole Proprietor. |
| ▪ | You may also define your own Vendor Types, as needed such as "D" for Distributor or "G" for Government. |
| ▪ | Vendor Types are not predefined nor validated. |
| • | 1099 Required? - Check this box if any IRS rule require that you to send this Vendor a 1099 Form at the end of the calendar year. |
| • | EIN - Enter the Employers Identification Number (or Social Security Number if a Sole Proprietor). |
| • | Notes - Enter a brief note about this Vendor. |
| • | Account Status - These items are maintained by the system: |
| • | Last Buy - The amount of the last purchase from this Vendor. |
| • | On - The date of the last purchase from this Vendor. |
| • | Last Pay - The amount of the last payment made to this Vendor. |
| • | On - The date of the last payment made to this Vendor. |
| • | Balance - The amount currently owed to this Vendor. |
| • | Comments - Enter any Comment, as needed. |
| • | You may simply type in your comments as needed. |
| • | If you have made your entry without opening the Edit Comments box (see below), Click Save ("ü") after finishing a Comment entry. |
| • | However, there is a built in text editor available - accessed by Double-Clicking within the field - called the Edit Comments box |
| ▪ | This Edit Comments box provides word processing level features - most of which - you will find familiar. |
| ▪ | These include bold, underline, italics, highlighting and font and font color selections. |
| • | If you have opened the Edit Comments box to make your entry by Double-Clicking within the field, you must save your entry separately. |
| ▪ | Select File and Choose Save & Exit (or Press Ctrl + S). |
| • | Alert - Check this box to have the Comments field boxed in Red to draw attention to a specific issue relating to this Vendor. |

| • | Click the Save ("ü") to record this additional General Information. |

