
Sale-Purchase items Form
| □ | Item section - Completing the Item box - If this is an actual Inventory Item, enter the information outlined above as required with the additions or exceptions noted below: |
| ► | Note 1: As with all Data Entry Forms in this program, Yellow indicates a mandatory field that must be completed for the record to be saved. |
| ► | Note 2: In addition to all of the Inventory Items you choose to define, you must also create one generic Sale-Purchase Item named Part assigning it the code Part. |
| • | Item ID - Click the New (/) Icon and enter a unique Item ID of up to 40 alpha-numeric characters (most punctuation marks are also permitted). |
| ▪ | All Letters will be capitalized. |
| • | Item Type - Use the Drop-Down Selection List to enter the Item Type as Both. (you must Purchase the part before you Sell the Part) |
| ▪ | Purchase GL # - If this Sale-Purchase Item is assigned an Item Type of Purchase, or represents Both a Sale and a Purchase item, both the Sale GL # and the Purchase GL # must be entered using the Drop-Down Selection List provided. |
| ▪ | Dept - If you are using the General Ledger System and have initiated the use of multiple Departments, enter the appropriate Department using the Drop-Down Selection List provided. |
| o | If you have implemented multi-departmental accounting, this field is also Mandatory. |
| • | Retail Price - Enter the usual Retail Price for this item (suggested, but not mandatory, unless this is a item that will be part of your Inventory and you're using the Inventory Tracking System). |
| • | Description - Enter a brief description (up to 70 characters) of this Inventory Item (see Proposal Description below). |
| • | Show on Proposal - Check Show on Proposal if this is a Both a Purchase and a Sales item that might need to be included on a Proposal. |
| • | Proposal Description - Click the Proposal Description at the top of the Form to create a longer and more detailed description of this Sale-Purchase Item. |
| ▪ | This expanded description will be shown in addition to the Description field information on all Proposals containing this Sale-Purchase Item. |
| • | Sale Item Group - You may also enter a Sale Item Group using the Drop-Down Selection List provided. |
| ▪ | If you have a large quantity of Sale-Purchase Items, Sale Item Grouping allows you to select the desired Sale-Purchase Item from a pre-limited list (based on the Sale Item Group assigned to it). |
| ▪ | The Advanced Sale Item Lookup function (accessed with Alt+F2 from within the Sale-Purchase Item Drop-Down Selection List on Sales, Proposal and Purchases Forms) lets you pick from items only in a specific group - thereby presenting a much shorted list. |
| ▪ | When entering a Sales Invoice: |
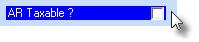
| a) | If AR Taxable? is Checked, whenever this Sale-Purchase Item is entered on a Sales Invoice, the appropriate Tax Code & Tax Percentage Rate will be inserted automatically, based on the Sales Tax information entered in the Accounting Info Tab for that Subscriber. |
| b) | If Not Checked, whenever this Sale-Purchase Item is entered on a Sales Invoice, the Tax Code will be entered as N (Non) and the Tax Percentage Rate set set at 0%, regardless of the Sales Tax information entered in the Accounting Info Tab for that Subscriber. |
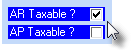
| • | AP Taxable? - Under Development - If present, Check this box if this Sale-Purchase Item is normally Taxable when making a Purchase. |
| ▪ | When entering a Bill (Purchase Invoice) Under Development: |
| a) | If AP Taxable? is Checked, whenever this Sale-Purchase Item is entered for a Bill (Purchase Invoice), the appropriate Tax Code will be inserted, and the Tax Percentage Rate will be used to calculate the Sales Tax Amount based on the Sales Tax information entered in the Vendor Tax Information tab for that Vendor. |
| b) | If Not Checked, whenever this Sale-Purchase Item is entered for a Bill (Purchase Invoice), the Tax Code will be entered as No and the Tax Amount set at 0%, regardless of the Sales Tax information entered in the Vendor Tax Information tab for that Vendor. |
| • | Commission Points - Enter a Point Value (representing its approximate cost) if this Sale-Purchase Item earns Commissions Points for the Salesperson when it is sold. |
| ▪ | The Commission Points assigned to a Sale-Purchase Item should represent an approximate Cost for the acquisition and installation of the Inventory Item. |
| ▪ | Commission Points are assigned a Point Value - on an Employee by Employee basis - in the Personal tab of the Employee Form. |
| • | Check the Inventory Item box. |

| ▪ | When you Check Inventory Item, the Form will require additional information needed to properly track Parts as actual Inventory. |
| ▪ | Never Check the Inactive box unless this part is no longer used. |
| ▪ | Do not Delete a Part item once it has been used in an Invoice (either for Sales or Purchases). |
| ▪ | If you will no longer order or sell the part, just mark it as Inactive. |
| • | Kit Designation - Check the Kit Designation box if this is a Part that actually consists of several individually ordered and sold parts that you have combined into an internally defined "Kit". |
| □ | Job Cost Categories section: |
| • | Completing the Job Cost Categories box: |

Job Cost Categories for Non-Inventory related Purchase Categories
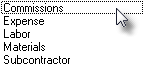
| • | Choose an Expense Category for any Purchase Categories - which are not actual Inventory Items (i.e., Commissions, Expenses, Labor, Materials or Sub Contractor costs) - that will be used for identifying Job Costs by using the Drop-Down Selection List to Choose the appropriate Job Costing Expense Category. |
Job Cost Categories List
| ▪ | Job Cost Category options and their purpose are: |
| o | This Commissions Job Cost Category will usually not have Labor component defined. |
| o | This Expenses Job Cost Category will usually not - but may - have a Labor component defined. |
| o | This Labor Job Cost Category will almost always have a Labor component defined |
| d) | Materials - Identifies this Purchase Category as charges for various Material used for a Job (such as wire, batteries, other electrical supplies, conduit, clamps, etc.). |
| o | This Materials Job Cost Category will usually not - but may - have a Labor component defined |
| e) | Subcontractor - Identifies charges of Subcontractor bills that will be charged against a Job (such as telephone line installations, pre-wiring, CCTV, independent alarm installer, etc.). |
| o | This Subcontractor Job Cost Category will usually not - but may - have a Labor component defined. |
| ► | Note: If using the Commission Tracking System and charging an Activation Fee (defined as part of a Proposal Package), the individual Inventory Items - which will be included in a Proposal Package - should have Commission Points assigned but should not have Labor related information defined (because Labor is included in the Activation Fee - see below). |

| • | Where appropriate, enter Labor information: |

Job Cost Categories section for Purchase Categories which are Inventory Items
| o | Labor Hours - ("Lbr. Hours") - This field is used to define - when this is an Inventory Item - the average number of Labor hours are required to install this Part. |
| o | Cost Labor Rate - ("Cost Lbr. Rate") - This field is used to define - when this is an Inventory Item - the average internal Cost for each hour required to install this Part. |
| o | Retail Labor Rate - ("Retail Lbr. Rate") - This field is used to define - when this is an Inventory Item - the average Retail Charge for each hour required to install this Part. |
| o | Labor Hours - ("Lbr. Hours") - This field is used to define the average number of Labor hours required for the designated Job Cost. |
| o | Cost Labor Rate - ("Cost Lbr. Rate") - This field is used to define the average internal Cost for each hour required for the designated Job Cost. |
| o | Retail Labor Rate - ("Retail Lbr. Rate") - This field is used to define the average Retail Charge for each hour required for the designated Job Cost. |
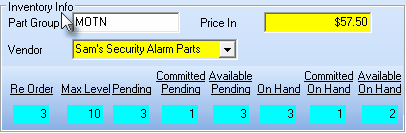
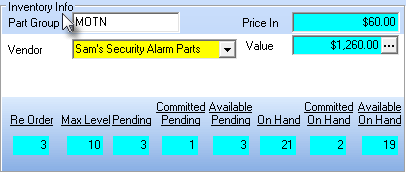
| • | Part Group - Enter a Part Group code. |
| ▪ | This is a user definable code which has no associated link to any predefined data set. |
| ▪ | It is for internal use only, as appropriate, to accommodate the Company's needs. |
| ▪ | This field may be used within a filter expression defined in the Report Builder module. |
| ▪ | Right-Click in this field to Choose the Search By method (Vendor Name or Vendor ID). |
| ▪ | This Search By selection will determine whether the chosen Vendor's Name or their Record ID number will be displayed in the Vendor field. |
| • | Enter the Price In for this item, regardless of whether it is Both a Purchase and a Sale, or just a Purchase which will be the default price used for the Inventory Item when entering a Bill. |
| ◆ | How and whether the Price In and/or Value fields will be displayed within the Inventory Info box is based on which Inventory Valuation Method has been elected. |
| o | If the Price In Inventory Valuation Method is in effect, the contents of this field will remain unchanged unless modified manually. |
Inventory Info box - LIFO or Price In Inventory Valuation Method selected
Inventory Info box - Average Cost Inventory Valuation Method selected
| • | Committed Available - The Inventory Quantities & Status information shown at the bottom of the Inventory Info box displays information that cannot be changed without accessing the Warehouse Inventory Icon (see below). |
| ▪ | If the actual On Hand level is less than the established Re-Order level for this Inventory Item, an 'On Hand' Low message will be displayed. |
| • | Click the  Icon to record this Inventory Item as a Purchase Category entry. Icon to record this Inventory Item as a Purchase Category entry. |
| □ | Other Special Fields and Functions: |
| • | Sale Item Group - Optionally, you may also enter a Sale Item Group using the Drop-Down Selection List provided. |
| • | The Advanced Sale-Purchase Item Lookup function (accessed with Alt+F2 from with the Purchase Item Drop-Down Selection List on the Bills Form) lets you pick from items only in a specific group - thereby presenting a much shorter list. |
| • | Click the Icon to record this Sale Item Group assignment for the Purchase Category entry. |
| • | Vendor Item ID - The Vendor Item ID button at the top of the Form allows you to enter the Part Numbers used by the Vendors from whom you generally order this Purchase Category. |
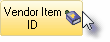
| • | If the Purchase Category Type is either Purchase or Both and are using the Accounts Payable System, Click the Vendor Item ID and Add the Part Number (Vendor Item ID) for all of the Vendors from whom you purchase this Inventory item. |
| • | Click the Warehouse Inventory to see the current status of this Inventory Item sorted and displayed by Warehouse. |
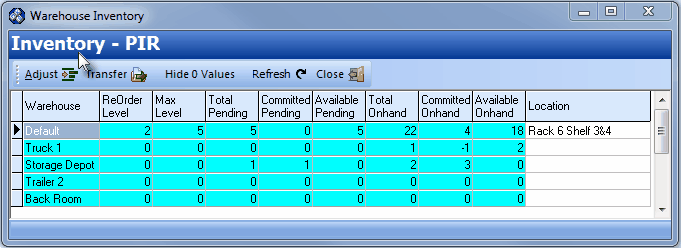
Warehouse Inventory
| • | Use these specialized Adjust, Transfer, Hide 0 Values, Refresh and Close (explained below) on the Warehouse Inventory Form to accomplish these tasks: |
| ▪ | Adjust - Click this Icon to adjust one or more of the Inventory Count(s) displayed in the Warehouse Inventory Form for this Sale-Purchase Inventory Item. |
| i. | Click on the Inventory Count(s) to be revised. |
| iii. | Enter a Reason for Change |
| iv. | Click OK to save the change or Cancel to abort the revisions. |
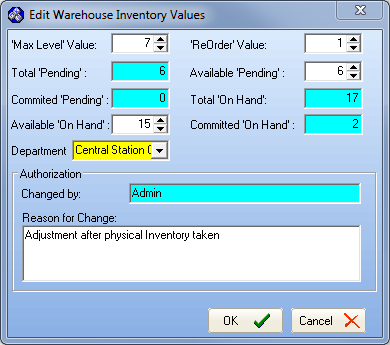
Edit Warehouse Inventory Values
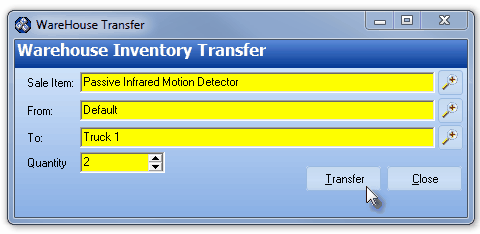
Warehouse Transfer
| i. | Using the Search Icon (see the Mouse arrow), select the Sale Item (this will - by default - be the current Sale-Purchase Item), select the From (the location where the transfer will come from), select the To (the location where the transfer will go) information to execute this Transfer. |
| ii. | Set the Quantity to Transfer |
| iii. | Click the Transfer button to commit the change |
| iv. | Click the Close button when finished. |
| ▪ | Refresh - Updates the Warehouse Inventory Form to the most current information in case another User has made a change since this Form was opened. |
| ▪ | Warehouse - The column showing the location(s) that were defined as Warehouses. |
| ▪ | Status Line - The row (next to the Warehouse column) that displays a series of columns with the current status (counts) of the currently selected Inventory Item. |
| □ | Inventory Valuation Methods (See the Inventory Valuation Options chapter for detailed information for all of these Inventory Valuation methods): |
| • | LIFO - Used to initiate the Last In - First Out Inventory Valuation Method. |
| • | Average Cost Inventory - Another approach to Inventory Valuation is to use the Average Inventory Cost for the Price (cost) that is used in the associated General Ledger System transactions. |
| • | This will establish and maintain the total Value of the Inventory and continuously Average the Cost of Inventory so that all Price (cost) changes are taken into consideration whenever the Value of the Inventory is reported. |
| • | If the Average Cost Inventory Valuation Method is selected, the total Value field is computed by multiplying the Price In Amount by the On Hand Quantity. |

