| • | Create the Sale-Purchase Items for the types of Recurring Revenue related services that you provide. |
| • | Identify the Pay Groups which will be used to establish the normal rates for the Recurring Revenue related services you provide. |
| • | If you plan on doing Recurring Revenue billing using the Recurring Billing Cycles feature (where different groups of Subscribers may be billed at different times throughout the month): |
| • | Create the Sale-Purchase Items for the types of Recurring Revenue related services that you provide. |
| • | Identify the Pay Groups which will be used to establish the normal rates for the Recurring Revenue related services you provide. |
| □ | Billing Recurring Revenue |
| 2. | From the Main Menu, Select the File menu and Choose Accounts Receivable then Click Run Automatic Billing. and complete the entries as outlined below. |
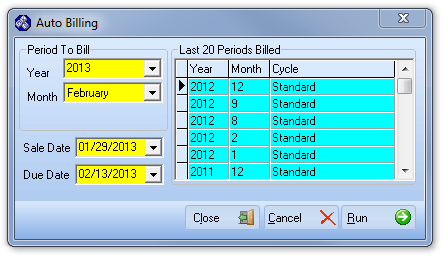
Auto Billing dialog - Recurring Billing Cycles are not implemented
| • | Completing the Auto Billing Form: |
| • | Period To Bill - Use the Drop-Down Selection List es provided to enter this information. |

| ▪ | Year - By default, it will be the current Year unless this is the last month of the Year, in which case the following Year will be offered. |
| o | If appropriate, use the Drop-Down Selection List provided to Choose a different Year for this billing. |
| ▪ | Month -By default, it will be the Month following the current Month. Enter the appropriate month for this billing. |
| o | If appropriate, use the Drop-Down Selection List provided to Choose a different Month for this billing. |
| ► | Note: Recurring Revenue is batched, tracked and stored within MKMS by the Year and Month entered here. |
| • | Last 20 Periods Billed - Initially, this will be blank (only zeros displayed). |
| ▪ | The first time you bill for your Recurring Revenue, and each time thereafter, the Month and Year that was billed will be stored. |
| ▪ | The Cycle column always reads "Standard". |
| ▪ | A maximum of the Last 20 Periods Billed will be displayed. |
| ▪ | Thereafter, the most recent 20 Periods Billed are saved and the oldest (the 21st) is discarded. |
| • | Sale Date - By default, Today will be entered as the Sale Date. |
| ▪ | If required, enter a different Sale Date using the Drop-Down Date Selection Box provided |
| ▪ | This Sale Date will appear on the Invoices that will be generated with this Auto Billing process. |
| • | Due Date - By default, this will be set based on the Sale Date entered above and your Company's Terms set in Company Options. |
| ▪ | If required, enter a different Due Date using the Drop-Down Date Selection Box provided |
| • | Run - Click the Run button to execute the Auto Billing process. |
| ► | Note: An AutoBill.log Notepad file is created in the \MKS\MKMS folder and records the setup entries, number of Recurring Revenue items that were pre-processed, the number that were completed, and notes an errors including Service Address information and the RRID if an Invoice could not be generated. |
| ▪ | Once the billing options have been chosen and the Run button Clicked, a Confirmation dialog will be presented. |
| o | No - Click the No button to return to the Auto Billing Form and reset/correct the Auto Billing options. |
| o | Yes - Click the Yes button to execute the auto billing process. |
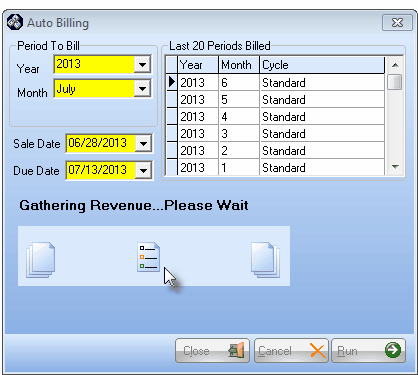
Auto Billing dialog - Gathering Revenue update
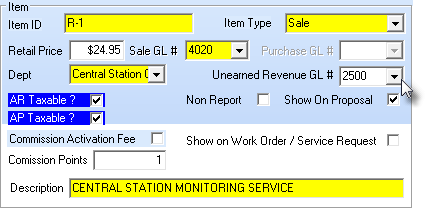
Sale-Purchase Item Form - Unearned Revenue GL #
| o | If one or more Auto Billing records are found to not have the recommended Deferred Revenue General Ledger Liability Account identified, the Unearned Revenue - Sale Items dialog will be displayed. |
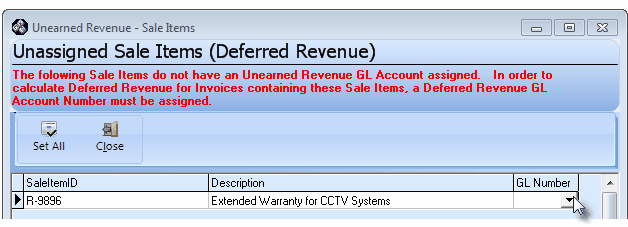
Unearned Revenue - Sale Items dialog
| o | GL Number - In the GL Number column of the selected Unassigned Sale Item record, using the Drop-Down Selection List provided, Choose the appropriate Deferred Revenue General Ledger Liability Account for that Sale Item ID. Repeat this process, as needed. |
| o | Set All - If all of the listed Unassigned Sale Item records should be assigned the same Deferred Revenue General Ledger Liability Account: |
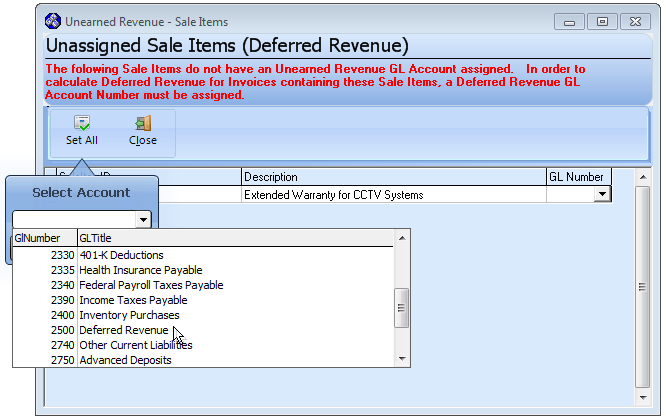
| i. | Click the Set All Icon to open the Select Account dialog. |
| ii. | Choose the appropriate General Ledger Liability Account using the Drop-Down Selection List provided. |
| iii. | The Sale-Purchase Item records for All listed Sale Item IDs (and all of these Recurring Revenue transactions) will be assigned the selected Deferred Revenue General Ledger Liability Account. |
| o | If Unearned Revenue (Deferred Revenue) is not being tracked, no action is required so Click the Close Icon. |
| ▪ | Close - Click the Close Icon. when finished (or no Unearned Revenue tracking is being implemented). |
| ▪ | The Auto Billing process will continue automatically. |
| • | When the process is completed, the Total Billed: amount will be displayed. |
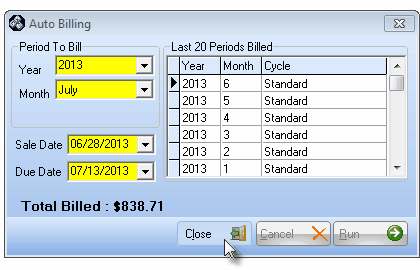
Auto Billing Form - Total Billed - only the Close option is now available
| ▪ | Close - Click the Close button - the only button that will be available - to exit the Auto Billing Form. |
Auto Billing dialog - Recurring Billing Cycles is implemented
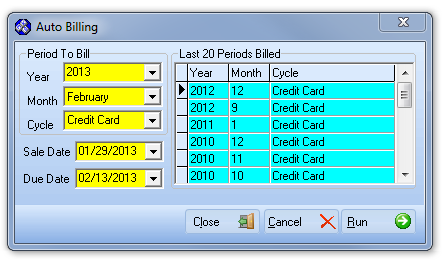
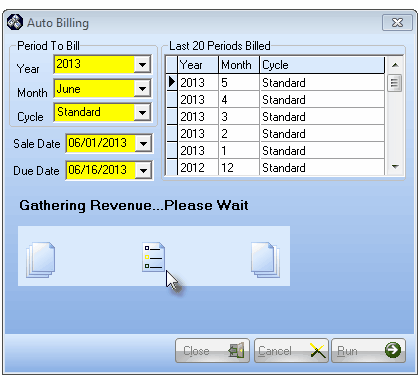
| • | Completing the Auto Billing Form: |
| • | Period To Bill - Use the Drop-Down Selection List es provided to enter this information. |
| ▪ | Year - By default, it will be the current Year unless this is the last month of the Year, in which case the following Year will be offered. |
| o | If appropriate, use the Drop-Down Selection List provided to Choose a different Year for this billing. |
| ▪ | Month -By default, it will be the Month following the current Month. Enter the appropriate month for this billing. |
| o | If appropriate, use the Drop-Down Selection List provided to Choose a different Month for this billing. |
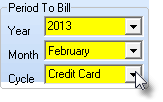
| ▪ | Cycle - If the Bill Recurring Revenue in Cycles optional feature has been implemented, use the Drop-Down Selection List provided to Choose the appropriate Recurring Billing Cycle for this Auto Billing process. |
| ► | Note 1: Recurring Revenue is batched, tracked and stored within MKMS by the Year, Month and Recurring Billing Cycle entered here. |
| • | Last 20 Periods Billed - Initially, this will be blank (only zeros displayed). |
| ▪ | The first time you bill for your Recurring Revenue, and each time thereafter, the Month & Year, and the selected Billing Cycle will be stored. |
| ▪ | A maximum of the Last 20 Periods Billed will be displayed. |
| ▪ | Thereafter, the most recent 20 Periods Billed are saved and the oldest (the 21st) is discarded. |
| • | Sale Date - By default, Today will be entered as the Sale Date. |
| ▪ | If required, enter a different Sale Date using the Drop-Down Date Selection Box provided |
| ▪ | This Sale Date will appear on the Invoices that will be generated with this Auto Billing process. |
| • | Due Date - By default, this will be set based on the Sale Date entered above and your Company's Terms set in Company Options. |
| ▪ | If required, enter a different Due Date using the Drop-Down Date Selection Box provided |
| • | Run - Click the Run button to execute the Auto Billing process. |
| ▪ | If the Period To Bill selection appears to skip one or more Recurring Billing Cycles, a warning message will be displayed. |
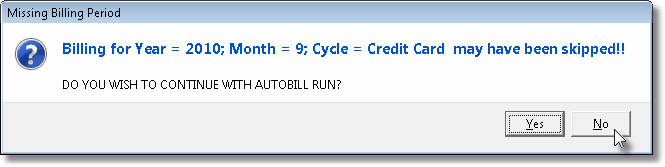
Auto Bill Missing Billing Period Warning Message
| • | Once the billing options have been chosen (and there are no Milling Billing Period issues) and the Run button is Clicked, a Confirmation dialog will be presented. |
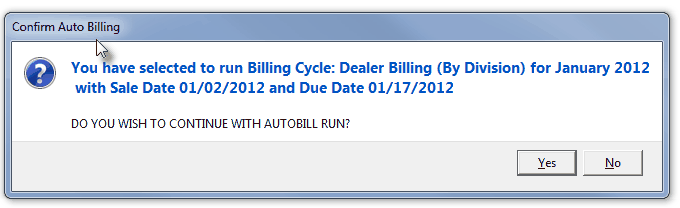
Confirm Auto Billing dialog
| • | In either case (Missing data or Confirmation request): |
| ▪ | No - Click the No button to return to the Auto Billing Form and reset/correct the auto billing options. |
| ▪ | Yes - Click the Yes button to execute the auto billing process. |
Auto Billing dialog - Gathering Revenue update
Sale-Purchase Item Form - Unearned Revenue GL #
| o | If one or more Auto Billing records are found to not have the required General Ledger Account identified, the Unearned Revenue - Sale Items dialog will be displayed. |
Unearned Revenue - Sale Items dialog
| o | Using the Drop-Down Selection List provided, Choose the appropriate (General Ledger) Unearned Revenue Liability Account Number for each Sale Item ID this is listed. |
| o | If Unearned Revenue (Deferred Revenue) is not being tracked, no action is required. |
| ▪ | Close - Click the Close button when finished (or no Unearned Revenue tacking is implemented). |
| o | The Auto Billing process will continue automatically. |
| ▪ | When the process is completed, the Total Billed: amount will be displayed. |
Auto Billing Form - Total Billed - only the Close option is now available
| o | Close - Click the Close button - the only one that will be available - to exit the Auto Billing Form. |

