| □ | Refunding a Previously entered Receipt: |
| • | Refunds happen, either because of an error in billing that the Subscriber paid anyway, or necessitated by an adjustment offered by your Company. |
| • | Refunds are different from Bounced Checks (see the Bounced Checks chapter for that information). |
| • | Refunds are initiated by you, the Company, Bounced Checks are caused by the Subscriber. |
| • | If a Receipt must be Refunded - regardless of the reason: |
| • | Press F3 to open the Subscribers Form and use F2 Search to Retrieve the appropriate Subscriber's record. |
| • | Click the Search Icon on the Navigation Menu to open the Search Receipts dialog and Select the appropriate Receipt record. |
| • | Once the appropriate record is found and selected, Click on the OK button to close the Search Receipts dialog and display the selected Receipt record. |
| • | There are two cases that may present themselves: |
| 1. | The Receipt that is to be Refunded has not yet been Allocated to any Invoice(s). |
| 2. | The Receipt that is to be Refunded has been Allocated to one or more Invoice(s). |
| • | The recommended processing of a Refund for each of these cases is explained below. |
1. Refunding a Receipt that has not been Allocated (the Left To Allocate value is equal to the Amount Paid value):
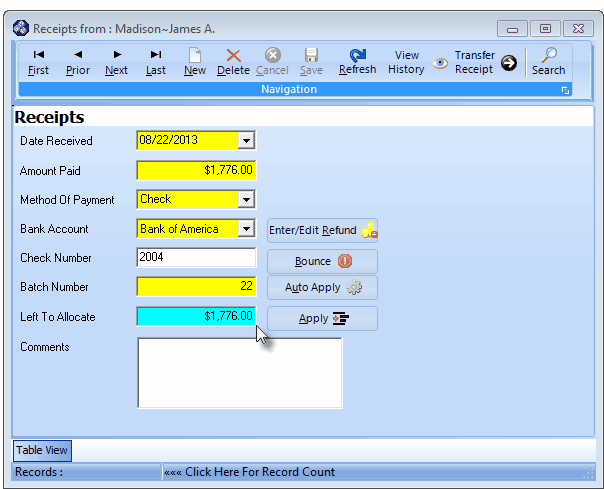
Receipts Form - Unallocated Amount to be Refunded
| • | Having located the correct Receipt, Click the Enter/Edit Refund button located in the center of the Receipts Form. |
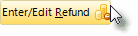
| • | The Refund dialog will be opened. |
Refunds dialog opened from the Receipts Form
| • | Click Add ("+") to enter the Refund information. |
| • | Date Issued - By default Today will be inserted. |
| ▪ | Use the Drop-Down Date Selection Box to change that Date, if required. |
| • | Batch # - By default, Today's Day Number will be inserted. |
| • | Amount - Enter the Amount of the Refund to be returned to the Subscriber. |
| ▪ | The Amount entered may not exceed the Amount of the original Receipt. |
| ▪ | A negative Amount [i.e., -1.00, or (1.00)] is not permitted. |
| • | Comments - Enter a explanation describing why this Refund was issued. |
| • | Click Save ("ü") to record this Refund. |
| • | Click the Close button x when finished. |
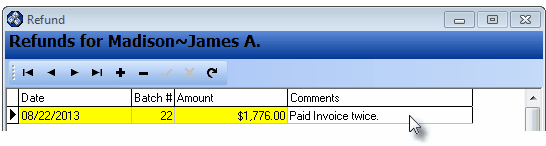
| • | The Receipts Form will be re-displayed noting that the Refund has been Issued. |
Receipts Form showing Refund Issued message
| ► | Note: Refunds appear on the Cash Receipts Report just below the original Receipt, with the refunded Amount, and the Date the Refund the Refund was issued. |
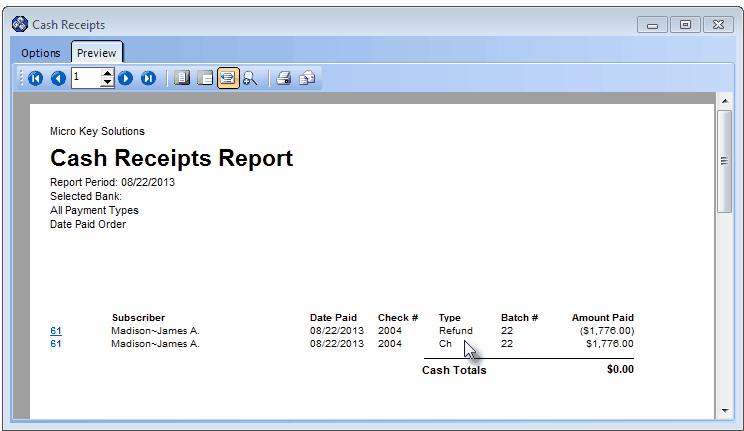
Cash Receipts Report with Refund and Bounced Check information
| • | Generally a Refunded Receipt was originally intended to pay an Invoice that had already been entered and which, because of the Refund, the Subscriber now will not be paying for it. |
| • | Therefore, unless this was a Duplicate payment, a Credit Memo needs to be created (see "Issuing a Credit Memo" below) and then applied to that unnecessary Invoice. |
| • | The only exceptions to the Credit Memo requirement is when the Refund was issued because the Subscriber accidentally paid an Invoice twice, or paid a Deposit and then canceled the order before an Invoice was ever entered. |
| • | In this case, no other step is required except for the issuing of that Refund. |
| ► | Note: For General Ledger System users, as shown in the illustration below, the Transaction File is automatically updated with this information by including a Credit (reduction) to the Cash Assets account, and a Debit (reduction) to the Deposits Liabilities account. |
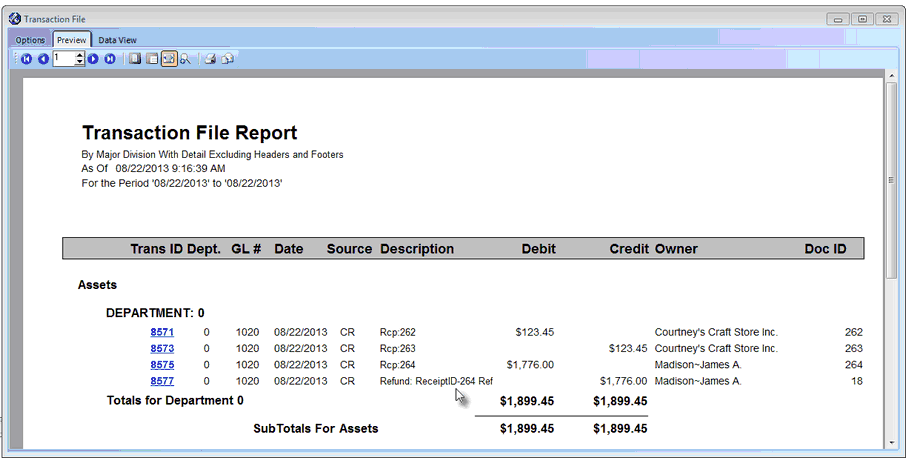
Transaction File Report showing a Refund to a Subscriber (and a Bounced Check) transaction
2. Refunding a Receipt which has been Allocated:
| • | Because the Receipt has already been allocated to one or more Invoices, that Allocation must be reversed before a Refund may be issued. |
| • | Locate the Receipt record which is due the Refund. |
| • | Confirm that the Left To Allocate value is 0.00. |
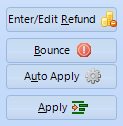
| • | Click the Apply button to open the Receipt Allocations Form (or open the Receipt Allocations Form directly - see Allocating Receipts). |
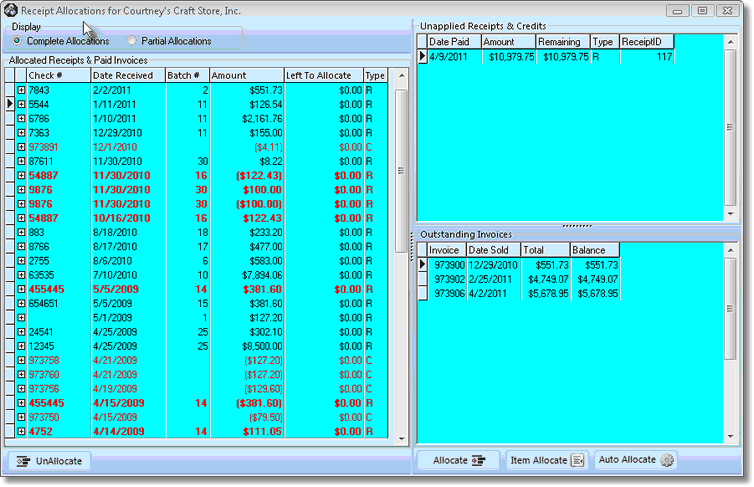
Receipts Allocation Form
| • | Unallocate - In the Display box of the Receipt Allocations Form, Click the Complete Allocations button. |

| • | Locate the Receipt in the Allocated Receipts & Paid Invoices section. |
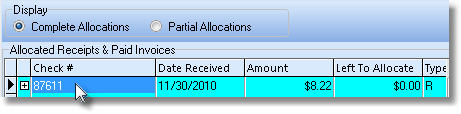
| • | Select (Click on) that Receipt record. |

| • | Click the UnAllocate button. |
| • | The Authorize Accounting Transaction Form may be displayed. |
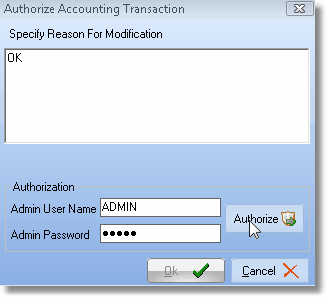
Authorize Accounting Transaction Form
| ▪ | If you do not have the Security Rights to modify or cancel an existing transaction, you will need to have the appropriate person do so. |
| o | They must enter their User Name and Password - the same one they use to login. |
| ▪ | Specify the Reason for the Modification. |
| • | Once you complete the Authorize Accounting Transaction process, the UnAllocate Confirmation dialog will be displayed. |
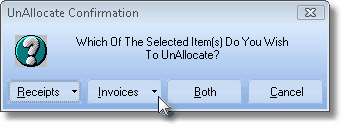
UnAllocate Confirmation dialog
| ▪ | Click Both to Unallocate the Receipt and the Invoice(s) satisfied by it. |
| o | The Receipt will be completely unallocated. |
| o | Any Invoices Paid by the Receipt will be marked unpaid. |
| ▪ | Thereafter, the Unallocate process is fully automatic. |
| • | Click the Close button x when it's finished to exit the Receipt Allocations Form. |
| • | The Receipt is now unallocated and available for Refund. |
| • | Then Issue the Refund following the steps in " 1. Refunding a Receipt that has not been Allocated" outlined above, and Issue a Credit Memo for the Invoice that was just Unallocated. |
3. Edit Refund - Adjusting a Refund for a Receipt:
| • | If a Refund was issued in error: |
| • | Click the Enter/Edit Refund button to open the Refund dialog. |
| • | Locate the Refund record and Click the Delete button (-) to remove the Refund record. |
| • | If the Refund Amount was entered incorrectly (but some portion of the Refund was owed): |
| • | Click the Enter/Edit Refund button to open the Refund dialog. |
| • | Locate the incorrect Refund record and Click the Delete button (-) to remove the Refund record. |
| • | Close the Refunds dialog. |
| • | Enter the correct Refund Amount following the instructions in 1. Refunding a Receipt that has not been Allocated above. |
| □ | Review the Receipt record for the Refund to a Subscriber: |
| • | If you want to Confirm that the Refund process was properly executed, |
| • | Press F3 to open the Subscribers Form and use F2 Search to Retrieve the appropriate Subscriber record. |
| • | Click on the Table View tab and Select the appropriate Receipt record. |
| • | Once the appropriate record is found and selected, it will be displayed. |
Receipts record with Refund Issued
| • | The Receipts record should have a Refund Issued message displayed. |
The Refund will be dated when it was Issued, not the Date of original Receipt, but will be listed immediately below the Receipt, itself on that report.
Cash Receipts Report containing Refund information

