| □ | Viewing the Transaction File Report is like looking under the hood of your favorite race car to see it's engine. |
| • | At first glance, it is mysterious, amazing and complicated. |
| • | But once you learn what all those parts are for, and how they work together, it's actually a pretty straightforward engine, just like all the others you may have seen, just more of it. |
| □ | The Transaction File Report provides a very detailed listing of every Debit and Credit - based on the chosen options - that were posted to the General Ledger. |
| • | Although there is a lot of detailed information in this report, this information allows you to track every step of the way how each Financial Transaction was actually posted. |
| • | Here too, once you get to know what each component of the report describes, the Transaction File Report becomes much easier to understand, and so will the whole set of General Ledger processes. |
| □ | Printing the Transaction File Report: |
| • | On the Main Menu, Select Reports and Choose the General Ledger sub-menu, then Click Transaction File. |
| • | The Transaction File report offers many options for which, and how, each Financial Transaction will be listed. |
| □ | Transaction File tabs - There are three tabs on the Transaction File dialog. |
| • | Options - Initially only the Options tab is shown (until you make your Options selections and Select Print). |
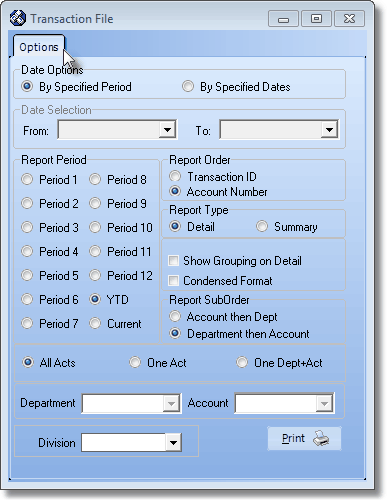
Transaction File Report - Options tab
| • | Date Options - Choose the Date Range of Transactions to be reported: |
| • | By Specified Period - The Transaction File report will be printed for a Specified (Financial Accounting) Period. |
| ▪ | The YTD (Year To Date) option is the default choice. |
| • | By Specified Dates - To view Financial Transactions created within a specified Date Range, Click the By Specified Dates button. |
| • | Date Selection - If the By Specified Dates option is chosen, the Date Selection section becomes active. |
| • | Enter the desired Date Range. |
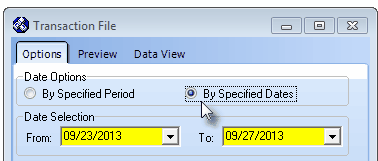
Transaction File Report - By Specified Dates - Date Selection
| ▪ | From - Use the Drop-Down Date Selection Box to Choose the starting date for this report. |
| ▪ | To - Use the Drop-Down Date Selection Box to Choose the ending date for this report. |
| • | Report Period - If the By Specified Period option was chosen, Choose the Financial Accounting Period to be reported. |
| ► | Note - Fiscal Year: This report uses the Fiscal Year Start Month of the Company's Fiscal Year (see the Setup Wizard chapter for additional information) to determine what Financial Transaction information will be reported (as illustrated in the examples listed below): |
| i. | If the report was printed at the end of October and the Company's Fiscal Year Start Month is September, selecting Period 1 would report Financial Transactions created in September in the current year, and selecting Period 2 would report Financial Transactions created in October in the current year. |
| ii. | If the report was printed at the end of October and the Company's Fiscal Year Start Month is September, selecting Period 3 would result in No Financial Transactions being available to report because no November Financial Transactions for the current Year would have been created yet. |
| iii. | If the report was printed at the end of October and the Company's Fiscal Year Start Month is January (the Company's Fiscal Year is the standard Calendar Year), selecting Period 3 would report Financial Transactions created in March in the current year. |
| iv. | If the report was printed at the end of October and the Company's Fiscal Year Start Month is September, but Financial Transactions are to be reported for a month prior to September, use the By Specified Date option. |
| • | Period 1 ... 12 - To choose to list the Financial Transactions for a specific Accounting Period within the Current Fiscal Year, that Accounting Period does not have to be Closed. |
| • | YTD - Choose Year To Date to list all the Financial Transactions created for all the Accounting Periods within the current Fiscal Year (See the Note - Fiscal Year section above to better understand the Fiscal Year). |
| • | Current - Choose Current to list only those Financial Transaction created for the Current Month. |
| ▪ | To view Financial Transactions from any earlier prior to the current Fiscal Year's Starting Month, use the Date Options choice: By Specified Dates, instead. |
| • | Report Order - These options allow you to set the order in which these Financial Transactions will be listed. |
| ▪ | This choice shows all Financial Transactions that were posted within the Period (or By Specified Dates) specified. |
| ▪ | All Financial Transactions are listed in groups by General Ledger Account Types (i.e., Assets, Liabilities, Equity, Sales and Expenses). |
| • | Transaction ID - Every individual Debit and Credit Financial Transaction is assigned an internal Transaction Number. |
| ▪ | It is sometimes useful to see the precise sequence in which a Sale (Payment, Receipt, Allocation, etc.) was posted - on a Transaction by Transaction basis - to the Transaction File. |
| ▪ | Choose this option to trace exact order in which entries were internally posted to the Transaction File. |
| • | Report Type - Specify how detailed this report should be. |
| • | Detail - By default, all Financial Transactions - within the chosen Period or Specified Dates - will be listed. |
| ▪ | Sub-Totals for the five General Ledger Account Types (i.e., Assets, Liabilities, Equity, Sales and Expenses) will be included. |
| o | See the "Show Grouping on Detail" section below for an additional formatting choice when this Detail option is selected. |
| • | Summary - No individual Financial Transactions will be listed - just each Account Number and Title, and the net amount of Debits and/or Credits posted to each Account Number. |
| ▪ | Sub-Totals are only provided for the five General Ledger Account Types (i.e., Assets, Liabilities, Equity, Sales and Expenses). |
| o | See the "Condensed Format" section below for an additional formatting choice when this Summary option is selected. |
| • | Show Grouping on Detail - When the Detail version is selected, Check this box to have the Account Group Headers and Footers, and the associated Sub-Totals included. |
| • | Condensed Format - When the Summary version is selected, Check this box to have the Account Group Headers and Footers included (no Sub-Totals will be shown unless the the Enable Multi-Departmental Reporting option in in effect). |
| • | Report Sub Order - Set the sequence in which these Financial Transactions should be listed: |
| ► | Note: If you've selected to print the report in Transaction ID order, the Show Grouping on Detail, Condensed Format and these Report Sub Order options will not be available. |
| ▪ | Account then Dept - If this option is selected, because you have not selected the Transaction ID order option, the Account Number assigned to a Financial Transaction will be listed, then within that Account, all Financial Transactions (for that Account Number) will be listed in Department Number order (e.g., all Financial Transactions for Department 0, then Department 1, etc.). |
| ▪ | Department than Account - By default, if you have not selected the Transaction ID order option, the Department Number assigned to a Financial Transaction will be sorted for first, then within that Department Number, all Financial Transactions for each Account Number will be listed. |
| • | Which Accounts should be included? |
| • | All Acts - By default, All General Ledger Account Numbers which have Financial Transactions posted within the selected Period or Specified Dates identified above, will be listed. |
| • | One Act - List all the Financial Transactions that were posted to One Account (see the screen illustrated below). |
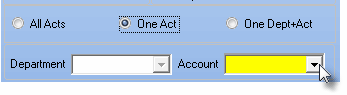
| ▪ | Account - Use the Drop-Down Selection List to Choose the desired Account Number. |
| • | One Dept+Act - List all the Financial Transactions that were posted to One Account within One Department (see the screen illustrated below). |
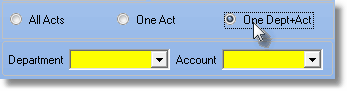
| • | Division - Optionally, you may also limit the list of Financial Transactions to only those that were posted to a specified Division or Division Group. |
| • | Print - Click the Print button  to Preview and optionally Print (to a File or a Printer) this Transaction File report. to Preview and optionally Print (to a File or a Printer) this Transaction File report. |
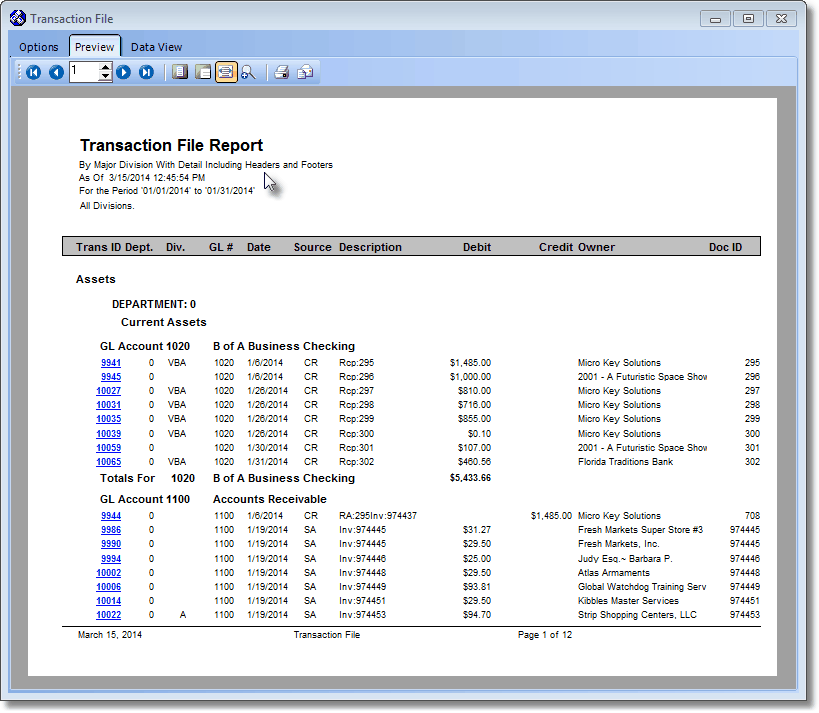
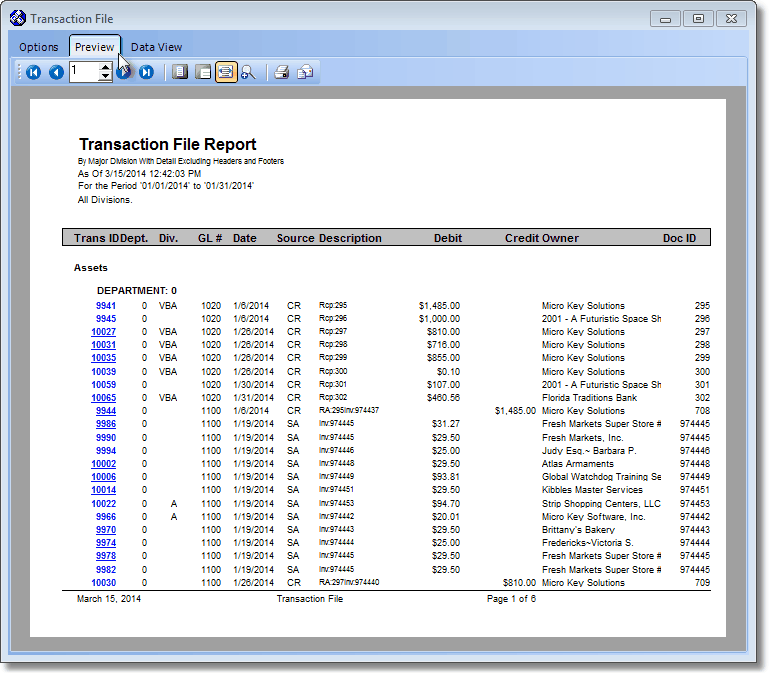
| □ | The Preview tab presents the report which resulted from the Options you've selected. |
| • | Trans ID - The Transaction ID for each entry is underlined and printed in Blue. |
| • | While Previewing the Transaction File, you may Click on any Trans ID's number to open the related Form (Receipt, Sale, Bill, Payment, etc.) which created the Financial Transaction. |
| • | Up Arrow/Down Arrow - hi - Moves the report one line up, or one line line down, respectively. |
| • | Page Up/Page Down - Moves the report to the previous or next page, respectively. |
Preview Tab's options - Transaction File
| • | Arrows - The arrows allow you to move back and forth, from page to page. |
| • | Number - Indicates the page number you are viewing. |
| • | You may also type in a specific page number, Press 8 Enter and that page will be displayed immediately. |
| • | If you enter an invalid page number, it will be ignored. |
| • | Fit To Page - Click the first button after the arrows to size a full page of the report to fit the screen. |
| • | Zoom To 100% - Click the second button after the arrows to display the page at 100% (of the printed view). |
| • | Fit To Page Width - Click the third button after the arrows to size the page of the report to fit the full width of the screen. |
| • | Zoom To Percentage - Click the fourth button after the arrows to re-size the page of the report by percentage. |

| • | When you Click the Zoom To Percentage button, the Percentage selector will be displayed. |
| • | You may then Click the Up or Down ‚ arrows to set the exact amount of Zoom you want. |
| • | Print - Click the Print button to Print (to a File or a Printer)  the displayed Profit & Loss Statement, and may also be converted to a PDF or various other types of documents, or into an Excel® Spreadsheet file the displayed Profit & Loss Statement, and may also be converted to a PDF or various other types of documents, or into an Excel® Spreadsheet file |
| • | Email - Click the Email button  to send the Report to an Email Address of your choosing. to send the Report to an Email Address of your choosing. |
| □ | Data View - This view provides a tabular (spreadsheet style) presentation of the selected data. |

Transaction File - Data View
| • | Arrows - Click the arrows to move through the record. |
| • | Export - Exporting the data from this Data View Form (note the "fly-over" help available on these buttons): |
| • | Export to CSV - Click the first button after the arrows to export the data to a Comma Separated Values (CSV) file format. |
| • | Export To Excel - Click the second button after the arrows to export the data to an Excel (.xls) file format. |
| • | Export To Html - Click the third button after the arrows to export the data to an HTML formatted file. |
| • | Exit the Form by Clicking the Close button x on the right at the top of the Form. |
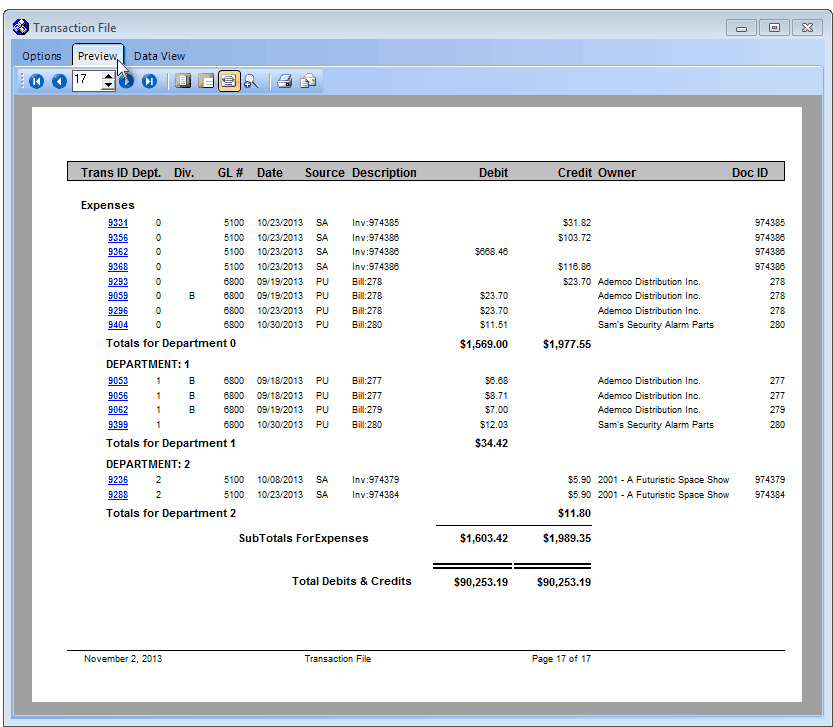
| □ | Analyzing Transactions - This deliberately complicated transaction illustration (shown in the report sample below) is provided to demonstrate how you can "see" what the General Ledger System is doing automatically, in the background. (See Understanding a General Ledger for more information.) |
| • | To help explain the Transaction File report sample below, a (not shown) previous Sale was recorded in a past month, including the Sales Tax that was charged on that sale, and that Invoice has now been credited by creating a Credit Memo. |
| • | Some History: If you made a Sale that had been charged sales tax, when it was recorded: |
| 1. | The Gross amount of the Sale (the sale itself and the tax on that sale) was added (Debited) to the Accounts Receivable account number (Accounts Receivable is an Asset and Assets are Debit accounts); |
| 2. | The Sales Tax was added (Credited) to the Sales Tax Liability account number (Sales Tax Liability is a Liability and Liabilities are Credit Accounts) because you will have to pay the state that money to them, later; and then |
| 3. | The actual Sale Amount was added (Credited) to the Sales account number (Sales are a Revenue account and Revenues are Credit accounts). |
| • | A Credit Memo: So, now we want to remove that Sale by creating a Credit Memo (which will later be allocated to that Invoice - thus cancelling it out). |
| 4. | The Gross amount of the Sale (the sale itself and the tax on that sale) is subtracted (Credited) from the Accounts Receivable account number (Accounts Receivable is an Asset and Assets are Debit accounts, so subtracting from this Debit account is a Credit transaction); |
| 5. | The Sales Tax is subtracted (Debited) from the Sales Tax Liability account number (Sales Tax Liability is a Liability and Liabilities are Credit Accounts, so subtracting from this Credit account is a Debit transaction) because you will have to get back the state sales tax money, |
| 6. | The actual Sale Amount is subtracted (Debited) from the Sales account number (Sales are a Revenue account and Revenues are Credit accounts, so subtracting from this Credit account is a Debit transaction). |
| • | In Balance - The net result is that the Debits (should) equal the Credits. |
Transaction File Report sample

