| □ | The Accounts Receivable Summary Report is a multi-purpose report. |
| • | Some important features and benefits of the Accounts Receivable Summary Report are: |
| • | It provides a review of the overall status of your business's Receivables. |
| • | It is part of the Month Closing process. |
| • | It offers a snap-shot view of the Company's potential Cash Flow. |
| • | It lists the Average Monthly Recurring Revenue being billed to the Account. |
| • | To view the Accounts Receivable Report, on the Main Menu Choose the Reports menu and Select the Accounts Receivable sub-menu. Then Click Accounts Receivable |
| • | When a a Subscribers Form is open, the default Oprtions are different (see the "Accounts Receivable Summary Report Options" section below). |
| □ | Accounts Receivable Summary Report tabs - There are three tabs on the Accounts Receivable Report Options dialog. |
| • | Options - Initially only the Options tab is shown (until you make your Options selections and Select Print). |
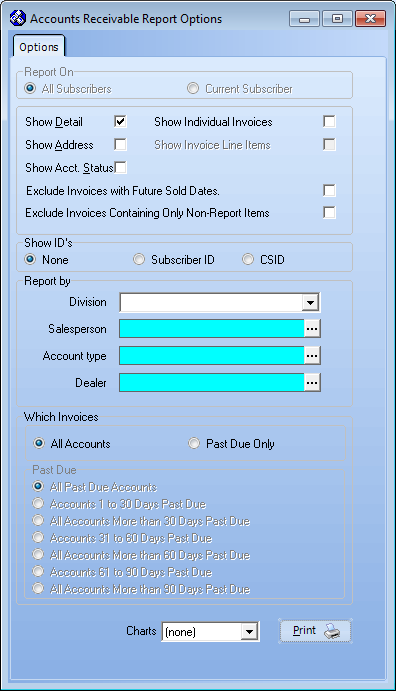
Accounts Receivable Report - Options tab
| • | The Accounts Receivable Summary Report offers many ways to fine-tune exactly what you want to look at. |
| ▪ | You can look at a particular Division (or Division Group) to see how their collection department is performing |
| ▪ | Use it's Past Due Reporting capabilities as part of the Collections process |
| ▪ | Use it as a follow-up guide for the Salesmen whose Commissions may depend on their Sales being paid. |
| ▪ | Save it as a permanent record of your Monthly and End of Year Receivables. |
| □ | Accounts Receivable Summary Report Options |
| • | Report On - (Limited only by what is a qualifying Account based on the selections in Which Invoices below): |
| • | All Subscribers - This is the only choice when this Accounts Receivable Report is chosen from the Reports Menu with no Subscribers Form open. |
| • | Current Subscriber - If the Accounts Receivable Report is chosen from the Reports Menu when a Subscribers Form is open: |
| ▪ | The Current Subscriber option will be the default. |
| ▪ | However, the All Subscribers option may also be selected, if needed. |
| • | Selection & Content - Offers many ways to customize what and how your Accounts Receivable Report is listed. Choose the ones that best service your current needs. |
| • | Show Detail - Check this box to get line items detail for all applicable Subscribers (see Which Accounts below). If this is left Unchecked, you will get a one page Accounts Receivable Summary report. |
| • | Show Address - If Checked (Show Detail must also be Checked), each Subscriber's address information will be included |
| • | Show Accounts Status - If Checked (Show Detail must also be Checked), the Dates and Amounts of their Last Sale, Payment and Pending Credits will be included. |
| • | Show Individual Invoices - If Checked, all qualifying outstanding Invoices will be listed. |
| ▪ | Even if you do not Check this option, when previewing the report, you may still Click on a Subscriber's Name within the report to expand that portion of the report to include all the Invoices in the Preview. |
| ▪ | Click on a Subscriber a second time to collapse the detailed information. |
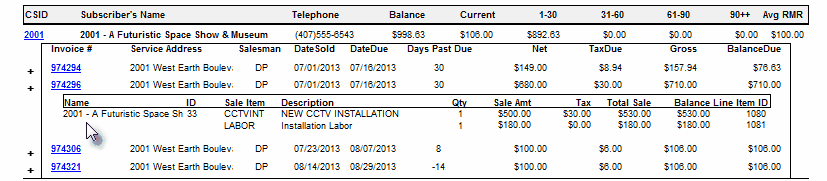
| • | Show Invoice Line Items - This field will only be available if the Show Individual Invoices option has been Checked above. |
| • | If Checked, all Invoice Line Item Detail will be listed for each Invoice that is included in the report. |
| • | Exclude Invoices with Future Sold Dates - If Checked, Sales Invoices Dated after Today (such as Recurring Revenue Invoices created in advance of the actual Sale Date) will be excluded from the report. |
| • | Exclude Invoices Containing Only Non-Report Items - Generally designed for the Salesmen to use for their follow-up Collections process, or for calculating their Commissions. |
| • | Show ID's - Click the desired radio button to Choose: |
| ► | Note: If the Subscriber's ID (Record Number) or the Subscriber's CSID is included in the Preview., Click the ID or CSID number to view that Subscribers Form. |
| • | None - No CSID or Subscriber ID number will be included in the report. |
| • | Subscriber ID - The Subscriber's ID (Record Number) will be included in the Preview. |
| ▪ | The number shown to the left of the Subscriber Name is that Subscriber's record ID. |

When Subscriber ID option was chosen - Subscriber ID #34 was selected - That Subscriber Form is displayed
| ▪ | To view this Subscribers Form when previewing the Accounts Receivable Report, Click the ID number. |
| ▪ | Click on a Subscriber's Name within the report to expand that portion of the report to include all that Subscriber's Invoices in the Preview. |
| • | CSID - The Subscriber's Primary CSID will be included in the Preview. |
| ▪ | If that Subscriber CSID is Clicked within the Preview, the Subscribers Form is opened and displays that Subscriber's record. |
| • | Regardless of whether None, Subscriber ID or CSID was Chosen or the Show Invoice Line Items option was Checked: |
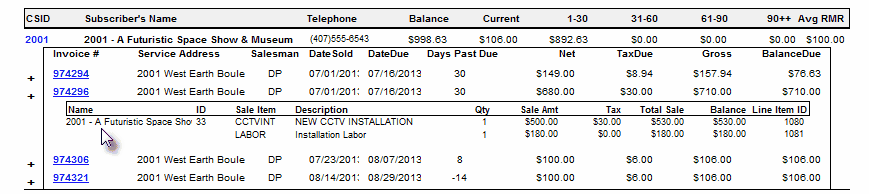
Accounts Receivable Report - Preview tab showing CSID column and selected Subscriber Invoices displayed
| ▪ | Click on a Subscriber's Name within the report to expand that portion of the report to include all the Sales Invoices for that selected Subscriber in the Preview. |
| ▪ | Click the Plus Sign ("+") to the left of the Invoice Number to see that Invoice's Detail Line Items. |
| • | Report by - Create special "filters" to limit the information based on certain Codes assigned to Subscribers: |
| • | Division - If blank, all qualifying Accounts will be included - subject to the selection(s) chosen for any other Report By options. |
| ▪ | If a Division is selected using the Drop-Down Selection List provided, this report will be limited to Subscribers who have been assigned that Division code. |
| • | Salesperson - If blank, all qualifying Accounts will be included - subject to the selection(s) chosen for any other Report By options. |
| ▪ | To limit this report to including only those Invoices assigned specified Salespersons' Employee Code(s), Click the Ellipse to open the Select Salespersons dialog. |
| ▪ | Selected - To Choose the required Salesperson(s), Check the Selected box for one or more Salespersons on this Select Salespersons dialog. |
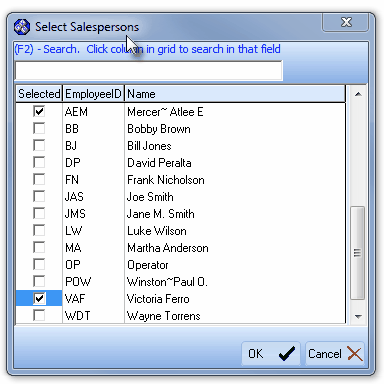
Select Salespersons dialog
| ▪ | Click the OK übutton to Close the Select Salespersons dialog. |
| ▪ | The Selected Employee Code(s) will be insert into the Salesperson field. |

Report By: Salesperson field
| ► | Note: In some cases, the Salesman's Employee Code assigned to a Subscriber record may be different than the Employee Code actually assigned to an Invoice. If different, the Salesman's Employee Code assigned to the Sales Invoices determines which Subscribers will be included, not the Employee Code originally assigned to the Subscriber. |
| • | Account Type - If blank, all qualifying Accounts will be included - subject to the selection(s) chosen for any other Report By options. |
| ▪ | Selected - To Choose the required Account Type(s), Check the Selected box for one or more Account Types on this Select Account Types dialog. |
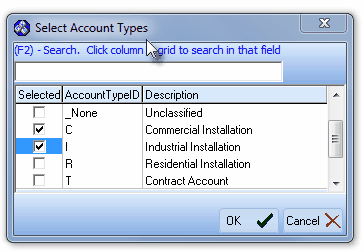
Select Account Types dialog
| ▪ | Click the OK übutton to Close the Select Account Types dialog. |
| ▪ | The Selected Account Types will be insert into the Account Type field. |
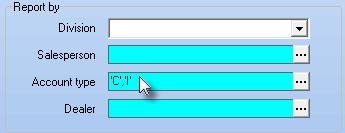
Report By: Account Type field
| • | Dealer - If blank, all qualifying Accounts will be included - subject to the selection(s) chosen for any other Report By options. |
| ▪ | Selected - To Choose the required Dealer(s), Check the Selected box for one or more Dealers on this Select Dealers dialog. |
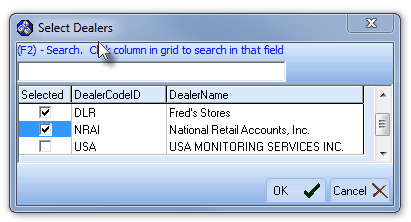
Select Dealers dialog
| ▪ | Click the OK übutton to Close the Select Dealers dialog. |
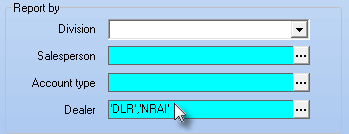
Report By: Dealer field
| • | Which Invoices - Choose what status of Invoices will be included: |
| • | All Accounts - By default, All Accounts will be included. |
| • | Past Due Only - Click this button to report only those Accounts which have Invoices that are Past Due. |
| • | Past Due - If Past Due Only is selected, Choose which Subscribers who are Past Due are to be included: |
| • | All Past Due Accounts - List All Subscribers that are Past Due. |
| • | Accounts 1 to 30 Days Past Due - List only Subscribers that have Invoices from 1 to 30 Days Past Due. |
| • | All Accounts More than 30 Days Past Due - List only Subscribers that have Invoices More than 30 Days Past Due. |
| • | Accounts 31 to 60 Days Past Due - List only Subscribers that have Invoices from 31 to 60 Days Past Due. |
| • | All Accounts More than 60 Days Past Due - List only Subscribers that have Invoices More than 60 Days Past Due. |
| • | Accounts 61 to 90 Days Past Due - List only Subscribers that have Invoices from 61 to 90 Days Past Due. |
| • | All Accounts More than 90 Days Past Due - List only Subscribers that have Invoices More than 90 Days Past Due. |
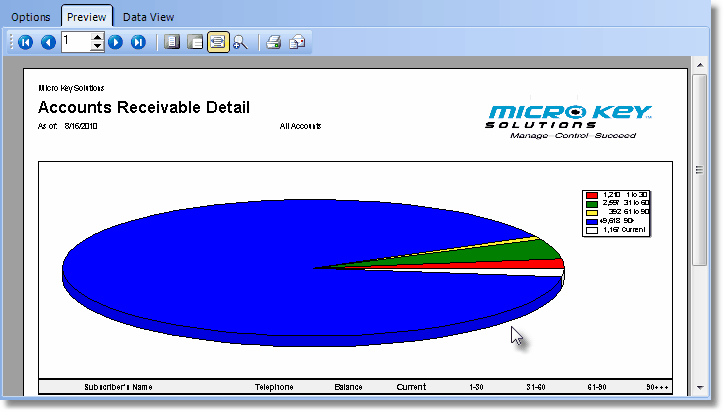
| • | Charts - Using the Drop-Down Selection List provided, you may request that a Pie or Bar Chart be included as part of this report's output. |
| • | Print - Click the Print button to Preview or Print (to a File or a Printer) this report. |
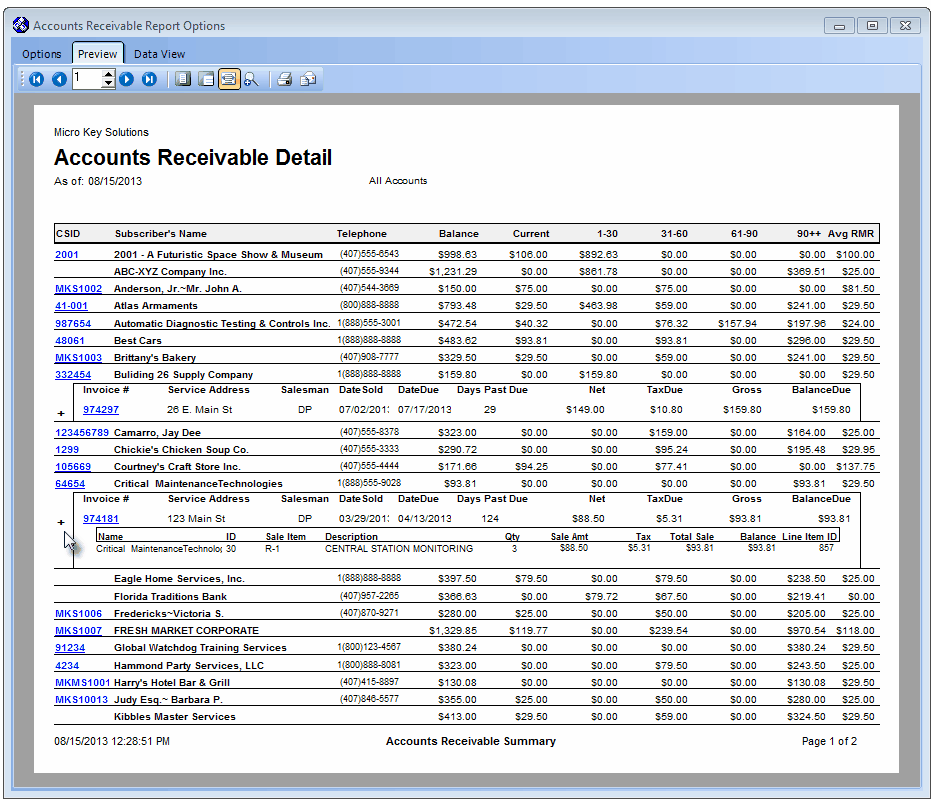
| □ | Accounts Receivable Report Preview - The Preview tab presents the report which resulted from the Options you've selected. |
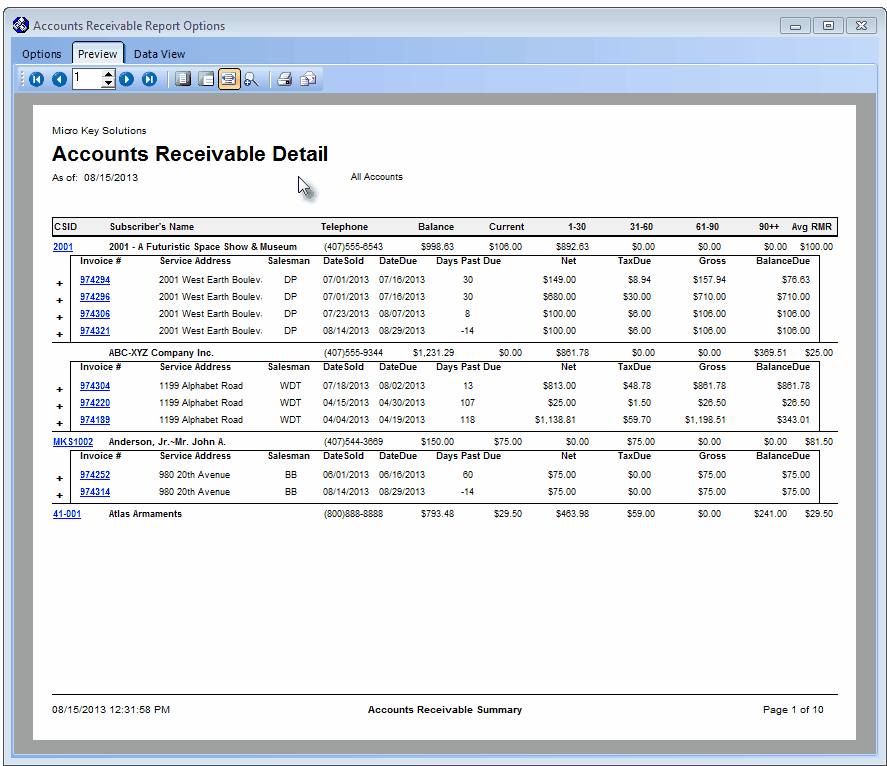
Accounts Receivable Report - Preview with Detail
| • | Data Viewing options within the Accounts Receivable Report's Preview tab: |
| • | Click on the Subscriber's Name and the list of the Invoices making up the Amounts Due will be displayed. |
| • | Click the Plus Sign (É) to the left of any listed Invoice and the Detail Line Items of the Invoice will be displayed. |
| • | Click on the Invoice Number (underlined and displayed in blue) and the actual Invoice form will be opened for that Invoice. |
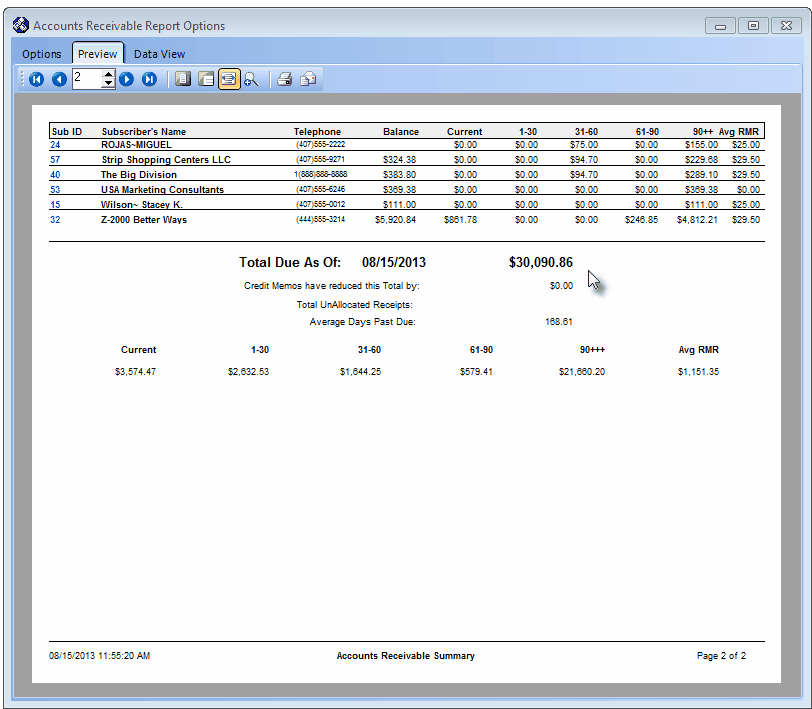
Accounts Receivable Report - Preview of Totals page
| • | Up Arrow/Down Arrow - hi - Moves the report one line up, or one line line down, respectively. |
| • | Page Up/Page Down - Moves the report to the previous or next page, respectively. |

Accounts Receivable Report - Preview Buttons
| • | Home -  - Using either the screen or your Keyboard's Home key, moves the report to the top of the first page. - Using either the screen or your Keyboard's Home key, moves the report to the top of the first page. |
| • | End -  - Using either the screen or your Keyboard's End key, moves the report to the bottom of the last page. - Using either the screen or your Keyboard's End key, moves the report to the bottom of the last page. |
| • | Arrows - The arrows allow you to move back and forth, from page to page. |
| • | Number - Indicates the page number you are viewing. |
| • | You may also type in a specific page number, Press 8 Enter and that page will be displayed immediately. |
| • | If you enter an invalid page number, it will be ignored. |
| • | Fit To Page - Click the first button after the arrows to size a full page of the report to fit the screen. |
| • | Zoom To 100% - Click the second button after the arrows to display the page at 100% (of the printed view). |
| • | Fit To Page Width - Click the third button after the arrows to size the page of the report to fit the full width of the screen. |
| • | Zoom To Percentage - Click the fourth button after the arrows to re-size the page of the report by percentage. |

| • | When you Click the Zoom To Percentage button, the Percentage selector will be displayed. |
| • | You may then Click the Up or Down ‚ arrows to set the exact amount of Zoom you want. |
| • | Print - Click the Print button to Print (to a File or a Printer)  the displayed Accounts Receivable Report. the displayed Accounts Receivable Report. |
| • | Email - Click the Email button  to send the Report to an Email Address of your choosing. to send the Report to an Email Address of your choosing. |
| • | To Exit the Preview tab and Close this Report dialog Form, Click the Close button x on the right at the top of the Preview tab. |
| □ | Data View - This view provides a tabular (spreadsheet style) presentation of the selected data. |
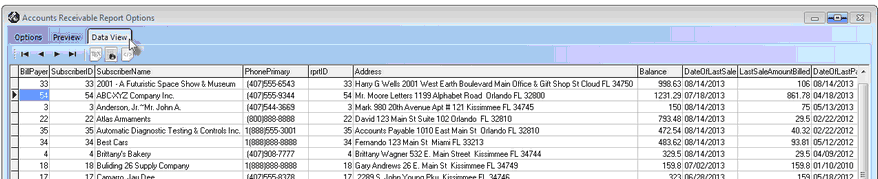
Accounts Receivable Report - Data View
| • | Arrows - Click the arrows to move through the record. |
| • | Export - Exporting the data from this Data View tab (note the "fly-over" help available on these buttons): |
| • | Export to CSV - Click the first button after the arrows to export the data to a Comma Separated Values (CSV) file format. |
| • | Export To Excel - Click the second button after the arrows to export the data to an Excel (.xls) file format. |
| • | Export To Html - Click the third button after the arrows to export the data to an HTML formatted file. |
| • | To Exit the Data View tab and Close this Report dialog Form, Click the Close button x on the right at the top of the Data View tab. |

