| • | The illustration below shows the MKMS Desktop with the Main Menu at the top, the Accounts Receivable Menu Bar on the Main Shortcut Bar, the Prospect Form and its Quick Access Menus. |
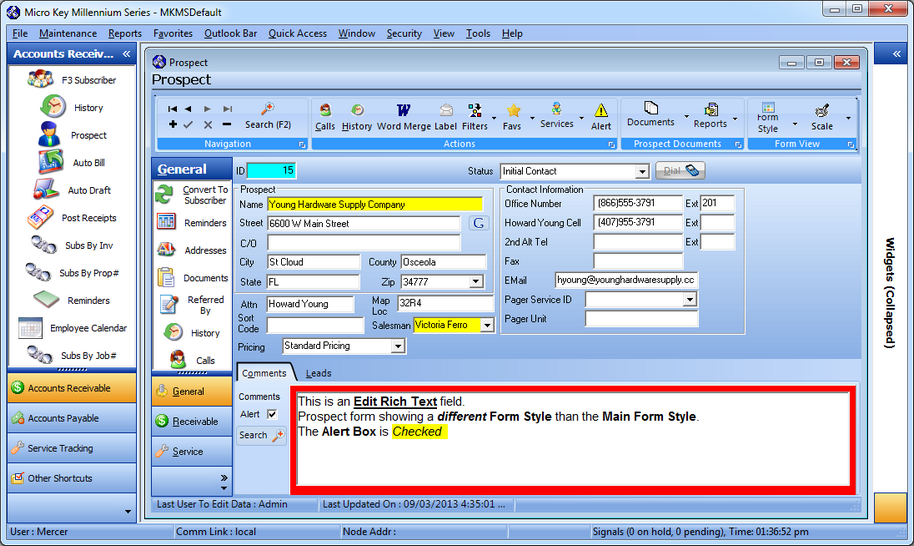
Prospect Form - with Quick Access Menu with the Prospect Form, and the Accounts Receivable Outlook Bar menu beneath top Main Menu
| • | The Prospect Form has three Quick Access Menus: |
| I. | General - Has seven selections: |
| 1. | Convert to Subscriber - Convert the currently selected Prospect record to a Subscriber (and once it is converted to Subscriber, and optionally convert any related Proposals to Invoices. |
| 2. | Reminders - Enter a Reminder related to the currently selected Prospect. |
| 4. | Documents - Used to Attach or Link an electronic Document such as a Word document, image file, PDF, or URL to the currently selected Prospect record. |
| 5. | Referred By - Indicate who Referred this Prospect. |
| 6. | History - Lookup any Proposals, Calls, Emails, etc. relating to the History of contacts with this Prospect. |
| 7. | Calls - Easily document the purpose, time, date, reason and results of any incoming or outgoing Calls To/From this Prospect. |
| II. | Receivable - It's only option is Proposal. |
Entering a New Prospect
| □ | This Prospect Form is very similar to the Subscribers Form. |
| • | To open the Prospect Form, on the Accounts Receivable Menu Bar on the Main Shortcut Bar Click the Prospect . |
| • | Alternatively, open the Prospect Form at anytime, by Pressing Ctrl+F3, or from the Main Menu, Choose Maintenance and Select Prospect Tracking/Proposals then Click the Prospects option. |
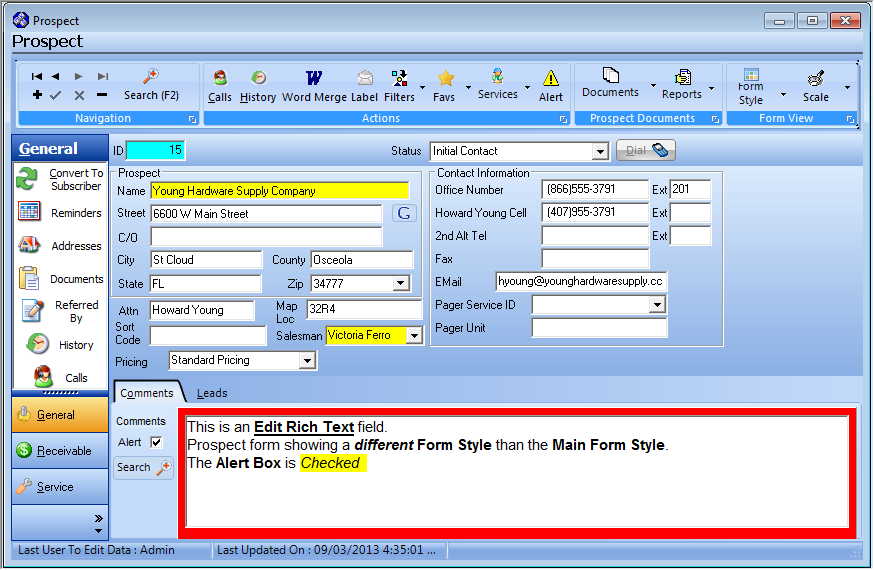
Prospect Information Form showing the General Quick Access Menu and the Comments tab
| □ | Prospect - Creating a new Prospect record: |
| • | Click Add ("+") to start an new Prospect record. |
| • | Use the Drop-Down Selection List provided to Choose this, or a different Prospect Status, as appropriate. |
| • | The Status may be changed at anytime based on subsequent contacts with this Prospect. |
| • | Name. - Enter the Prospect's Name (up to 70 characters) as explained below: |
| • | Entering a Business Name |
| ▪ | Enter the Name as it would normally be listed in the Telephone Directory |
| ▪ | If a prefix is part of the Name but that Name is not normally alphabetized by that prefix (such as the word "the"), enter the name followed by a tilde ("~") and the prefix. |
| ▪ | Example: "ABC Company~The" |
| • | Entering an individual Person's Name |
| ▪ | The Last Name is entered first |
| ▪ | Type a Tilde ("~") which tells the system that everything after it is the Prospect's first name and middle initial. |
| ▪ | Enter the First Name and Middle Initial |
| ▪ | For Prefixes (Mr., Mrs., Ms., etc.), enter them after the Tilde and before the first name |
| ▪ | For Suffixes (MD., Jr., III, etc.), enter them after the Last Name and before the tilde. |
| ▪ | Example: "Smith, MD~Dr. James T." |
| • | Street - Enter the Street address number and name. |
| • | C/O - The Care Of field also provides a place to expand the Subscriber's address information, and will appear below the Attention line (up to 30 characters in length), if entered. |
| • | City, County State, Zip - Enter the City (up to 25 characters in length), optionally the County (up to 20 characters in length) which is entered for informational purposes only and does not print on a Proposal, State code (or Province), and Zip (or Postal) code. |

| ▪ | The Zip field in the Prospect Form will have a Drop-Down Selection List . |
| ▪ | In this Zip field, when the Zip Code (Postal Code) is Selected (and/or entered) for that record's location, the associated City and State (Province) - but not County - information will be automatically inserted into those related fields. |
| • | Attn - The Attention line will be printed below the Prospect's Name on their Proposal's Mailing Address. So this may be used for a building name, a person, suite number, additional address information or skipped entirely - depending on what you need. |
| • | Map Loc - Enter a Map book or other Location information which can be used to record the page number and map coordinates, or GPS coordinates of this location. |
| • | Sort Code - Up to 20 characters and may be entered to help you classify this Prospect record. |
| • | The Prospect Listing report allows you to Filter based on - among many other fields - the Sort Code. |
| • | Salesman - , using the Drop-Down Selection List provided, Choose the appropriate Salesman that is assigned to this Prospect. |
| ▪ | When assigning a Salesperson to Prospect, only those Employees whose Employee Type is identified as either Sales or All will be available (in the Drop-Down Selection List list) for populating the Salesman field. |
| • | Google Maps® - Click the  to open a Digital Map Display showing the exact location of this Prospect. to open a Digital Map Display showing the exact location of this Prospect. |
| □ | Contact Information - Continue the Prospect entry by completing the Status field and Contact Information box. |
| • | Status - Using the Drop-Down Selection List provided, Choose the appropriate Prospect Status for this new Prospect which defines where it is within this Prospect's Sales Cycle. |
| • | Primary Tel - Enter the primary telephone number following the rules below. |
| • | If you have not canceled Telephone Number Formatting in Company Options, Formatting - of parentheses and dashes - is applied automatically by the system. |
| ▪ | If no area code is needed, enter the telephone number (it cannot start with a 1) |
| ▪ | If you have 10 digit dialing where no "1"prefix is needed, but you do need to dial an area code as part of the telephone number: |
| o | Press the <Space Bar> first. |
| o | Then enter the three digit area code. |
| o | Finally enter the seven digit telephone number. |
| o | Correct formatting will occur automatically. |
| ▪ | Long distance numbers (those requiring a "1" prefix) are entered as such with the parentheses and dash applied automatically |
| • | Ext - Enter any Extension required. |
| • | Alt 1.. Alt 2 - Continue with the Alternate Numbers as needed following the telephone number entry rules above. |
| ► | Important Note: The Field Names for each of the first three Telephone Number fields (i.e., Primary Telephone, 1st Alt Tel, and 2nd Alt Tel) may be User Defined for each Prospect by Double-Clicking the Field Name to be changed to open the Modify Label? dialog. |
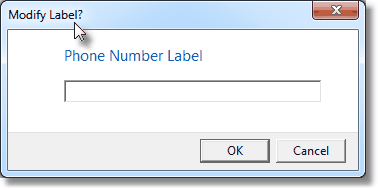
Modify Label? dialog
| ▪ | Enter the desired Telephone Number Title Name and Click OK. |
| ▪ | That Title Name will replace the existing Field Name. |
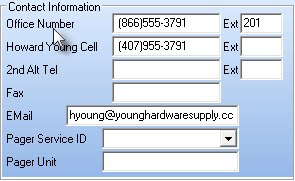
Contact Information with New Telephone Names
| • | Fax- Enter a Fax number and/or an E-mail address. |
| • | EMail - Enter the appropriate Email Address to be used for contacting this Prospect. |
| • | Pager Service ID - If needed. |
| • | Click the Save ("ü") to record the Prospect entry. |

Post changes to record?
| • | If the User attempts to Close this Form by Clicking the Close Icon (T) before saving the current entry (or modification), a Post changes to record? message will be displayed. |
| ▪ | Yes - Click the Yes button to record the entry (or modification) and Close the Form. |
| ▪ | No - Click the No button to abandon the entry (or modification) and Close the Form. |
| • | Duplicate Account Warning - If the Telephone Number of this new Prospect Information record you are saving already exists in another Prospect record, a Duplicate Account dialog will be displayed. |
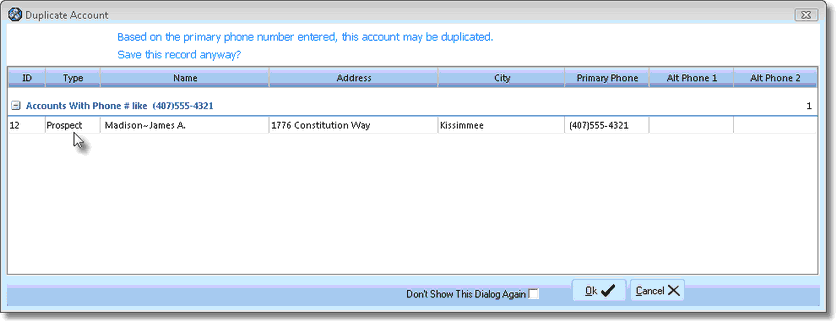
Duplicate Account dialog
| • | If you know that this Telephone Number is being used by another Prospect record that already exists, and that is acceptable (perhaps it is a sub-location of a main Account or for some other reason, more than one Prospect will have the same main number), Click the OK button to save the record as requested. |
| • | If this is not the case, and one or more Prospect records are listed, determine whether duplicates are acceptable, whether you need to correct this, or another record's primary telephone number. |
| ▪ | Click the Cancel button and change the current record. |
| ▪ | Click the OK button to accept the current record. |
| ▪ | Go to the other record(s) and make the primary telephone number changes there, if appropriate. |
| □ | Updating Prospect information: |
| • | Once you have completed a Prospect entry, you may return to this Form at any time and View or Update the record, as needed. |
| • | Particularly, you may want to update the Prospect Status previously assigned to this record. |
| • | Press F2 or Click the Search at the top of the Prospect Form to look up a specific Prospect's record that you need to View or Update. |
| • | To make entries, Click on the field(s) needing revision and add or change the data, as needed. |
| • | Click Save ("ü") to store these changes. |
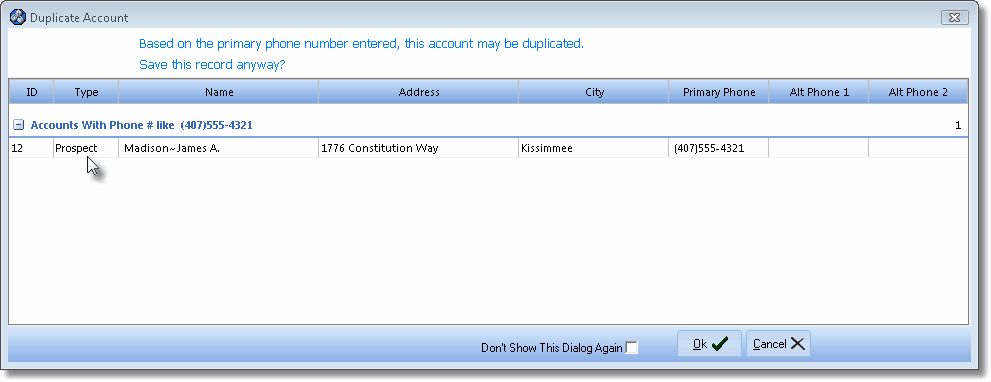
Prospect Form Duplicate Account Warning message
| • | Duplicate Account Warning - If the Primary Telephone Number of the Prospect record you are attempting to save already exists in another Prospect record, a Duplicate Account dialog will be displayed. |
| • | In most cases this display indicates that the current record to which modifications were made is the only record with the Primary Telephone Number in question. |
| ▪ | If this is the case, Click the OK button to save the record as requested. |
| • | If this is not the case, determine whether the duplicates are acceptable, or whether you need to correct this, or another record's number. |
| ▪ | Click the Cancel button to change the current record, or Click the OK button to accept the current record. |
| • | Go to the other record(s) and make the changes, if appropriate. |
| • | Don't Show This Again - Check this box if you want to turn off the Duplicate Account checking process. |
| ► | Warning: Once the Duplicate Account checking process is turned off, Technical Support must be contacted to re-activate this feature! |

