|
Prospect Filters This Help File Page was last Modified on 04/20/2013 |

|

|
|
|
Prospect Filters This Help File Page was last Modified on 04/20/2013 |
|
|
Prospect Filters
This Help File Page was last Modified on 04/20/2013
|
Prospect Filters This Help File Page was last Modified on 04/20/2013 |
|
|
|
|
Prospect Filters This Help File Page was last Modified on 04/20/2013 |
|
|
| □ | The Prospect Form's Filters Icon offers selective viewing of a predefined group of Prospects; and the Word Merge Icon offers selective printing of a predefined group of Prospects; both through the creative use of these Prospect Filters. The same is true when using the Subscriber Filters. |
| • | This is a very powerful capability allowing you to create a highly targeted selection criteria for on screen selective viewing of Prospects, printing specially defined Prospect Lists and creating a precise group of Mail Merged documents. |
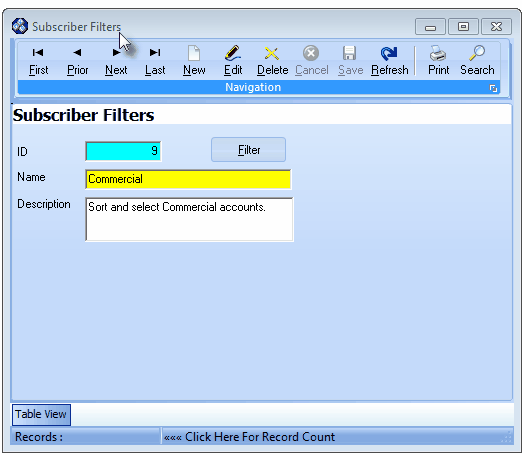
| □ | Using a Prospect Filter or Subscriber Filter - These Predefined Subscriber and Prospect Filters may be used in various ways within MKMS: |
| • | In the Prospect Tracking System: |
| • | When printing the Prospect Information Report |
| • | When printing the Prospect Listing Report |
| • | Filtering which Accounts will be available for viewing on the Prospect Form |
| • | In the Accounts Receivable System |
| • | Filtering which Accounts will be available for viewing on the Subscribers Form |
| • | While selecting Accounts using Word Merge |
| • | When printing the Subscriber Listing |
| □ | Naming a Prospect Filter: |
| • | From the Main Menu Select Maintenance, Select the Prospect Tracking/Proposal Items sub-menu and Click Prospect Filters. |
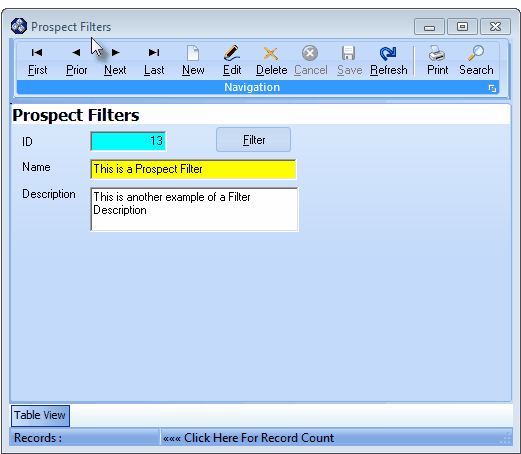
Prospect Filters and Subscriber Filters Forms
| • | Navigation Menu - The Navigation Menu is located at the top of the Prospect Filters Form. |

| • | This Navigation Menu provides the normal Record Movement, New, Edit, Delete, Cancel, Save, and Refresh options; as well as special Print and Search functions. |
| • | The Center Horizontal Bar may be Dragged Down or Up, as needed. |
| • | Record Editing section - The details of the currently selected record are displayed below the Navigation Menu at the center (Main Body) of the Prospect Filters Form. |
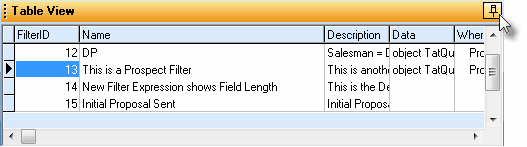
| • | Table View tab - A tabular (spreadsheet style) Table View of the currently defined Prospect Filters is accessible by Clicking the Table View tab at the bottom of the Prospect Filters Form. |
![]()
| • | To display a specific Prospect Filter record in the Record Editing section, Click on that record within the Table View section, or use the Search Icon (see the "Using the Special Functions" section later in this chapter). |
| • | This Table View information may be Pinned in Place by Clicking the Pin Icon on the right. |
Prospect Filters Form - with Table View tab Pinned Open
| ▪ | You may Un-Pin this Table View by Clicking the Pin Icon again. |
| ▪ | Click on any listed record to display that information in the center (Main Body) of the Form. |
| • | There are six columns of data in this Prospect Filters Record Listing: |
| 1) | Filter ID - The record ID Number assigned by the system when the record was initially saved. |
| 2) | Name - The name given to this Prospect Filter |
| 3) | Description - The detailed description given to this Prospect Filter |
| 4) | Data - Internal Filter related information stored for this Prospect Filter |
| 5) | Where Clause - Internal Filter related information stored for this Prospect Filter |
| 6) | Order Clause - Internal Filter related information stored for this Prospect Filter |
| • | Each column's Header Name describes the data contained in that column. |
| ▪ | Clicking on a Header Name will set the order in which the Prospect Filters will be listed. |
| ▪ | Clicking on the same Header Name will set the order in the opposite direction (ascending vs. descending). |
![]()
| ▪ | The Header Name that is determining the Order of the list will have an Icon indicating the Order displayed next to that Header Name. |
| • | To define a Prospect Filter: |
| • | Click the |
| ▪ | ID - A record ID Number will be assigned by the system when the record is saved. |
| ▪ | Name - Enter a brief Name for the Filter. |
| o | The Name assigned here must be a unique filter name and can not be a duplicate of any other filter name used - even within the Subscriber Filters Form. |
| ▪ | Description - Enter a detailed Description of this Filter consisting of up to 50 characters of Upper and lower case letters, numbers, spaces and typical punctuation marks. |
| • | Click the |
| • | The system will assign an ID. |
| • | Any number of additional Prospect Filters may be created. |
| □ | Defining a Prospect Filter (and a Subscriber Filter): |
| • | Click the Filter button on the Prospect Filters (and a Subscriber Filters) Form. |
| • | The Filter dialog will be displayed with the Filtering and Ordering Choices on top and the Selected Records List of Prospects (or Subscribers) at the bottom. |
| • | As the Filter conditions are constructed, the qualifying records are displayed in the Selected Records List below the Filtering and Ordering Choices dialog. |
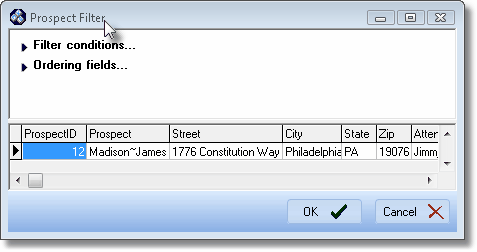
Prospect Filter dialog
| □ | Selecting the Records to be Included in the list: |
| • | The Filter Conditions Choices - Click the u Filter Conditions right arrow to display + (new condition). |

Prospect Filter design Form
| • | There are two ways to use the new condition option: |
| 1. | Click the Plus (+) sign to select from one of the the following options: |
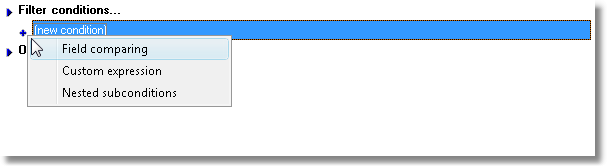
| o | Field Comparing - Use this choice to enter an expression representing the desired Relationship between a field and an actual character(s) entry, two fields, or an actual character(s) entry and a field. |
| i. | You may enter more than one field comparing condition. |
| ii. | Each time you add another one, you will be given the choice of applying a different Connector (see Connector below). |
| iii. | (In the example below, the Connector is AND (its an additional condition being added to an existing filter condition) and the Field Comparing expression is Zip = 34746(meaning that as long as the Zip Code is 34746, the record should be selected.) |
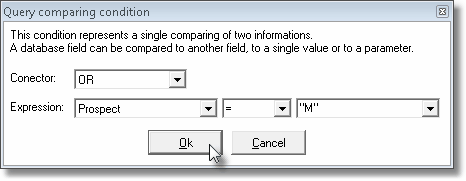
Query comparing condition
| o | Connector - Determines how the filter expression will be handled. |
| ► | Blank (the default) means that, if this expression is True (it matches the current record's data), that Subscriber's record will be included in the list. |
| ► | NOT (choice is accessible using the Drop-Down Selection List ) means that, if this expression is True (it matches the data), that Subscriber's record will be excluded from the list. |
| ► | You may enter more than one Field Comparing expression. If entering more than one Field Comparing expression, you will be required to enter a Connector of either (1) AND - the default - (2) AND NOT, or (3) OR. |
| i. | If AND is the Connector and the Field Comparing expression is True, this record must also be included (assuming it already qualified for the first comparison). However, if the Field Comparing expression is False but the Connector is AND, the record must be excluded from the selection. |
| ii. | If AND NOT is the Connector and the Field Comparing expression is False this record is to be included. However, if the Field Comparing expression is True but the Connector is AND NOT, the record must be excluded from the selection. |
| iii. | If OR is the Connector, whether or not the Field Comparing expression is True, if this expression is True then the record will be included. |
| a. | First Expression - Enter a character expression or value, or use the Drop-Down Selection List to Choose a Field in the Prospect (or Subscriber) table. |
| b. | The Comparison - Sets what relationship that is acceptable between the two expressions. These are: |
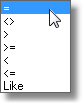
= The First expression is Equal to the Last,
<> The First expression is Not equal to the Last,
>= The First expression is Greater than or Equal to the Last,
> The First expression is Greater than the Last,
< The First expression is less than the Last,
<= The First expression is less than or equal to the Last,
Like The First expression is Like the Last (excluding case).
| c. | Last Expression - Enter a character expression, or use the Drop-Down Selection List to Choose a Field in the Prospect (or Subscriber) table. |
| o | Custom expression - This choice allows you to enter a specific SQL Query. |
| ► | Unless you understand the SQL programming language, or have specific instructions from a Tech Support person, you may not want to use this option. |
| o | Nested sub-conditions - This choice allows you to enter a specific Nested SQL Sub-Query. |
| ► | Unless you really understand the SQL programming language, or have specific instructions from a Tech Support person, you may not want to use this option. |
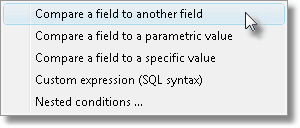
| 2. | Click new condition and Select from one of these five Filter Condition options: |
Five Filter Condition options
| i. | Compare a field to another field - This is When (or When not) the Field1 is equal (less than, greater then, not equal, etc.) to Field2. |
| ii. | Compare a field to a parametric value - This is When (or When not) the Field1 is equal (less than, greater then, not equal, etc.) to parameter. |
| iii. | Compare a field to a specific value - This is essentially a "When (or When not) the Field1 is equal (less than, greater then, not equal, etc.) to a value. |
| iv. | Custom expression (SQL syntax) - When (SQL syntax). |
| v. | Nested conditions - This option assumes that at least one Filter Condition already exists to which will added this additional condition as an And (or And not, Or, Or not) comparison. |
Nested Condition relationships to previous Filter condition
| o | When a Filter Condition option is selected, a filter definition detail line is inserted. |
| o | This filter definition detail line contains When, (undefined), equal, field, and another (undefined) field (see the illustration below). |
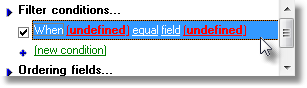
| o | Each underlined word in the filter definition detail line has its own Drop-Down Selection List (or value based data entry field). |
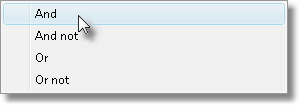
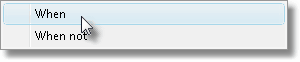
| ◆ | When - Use the Drop-Down Selection List to Choose one of the following (either, or) options. |
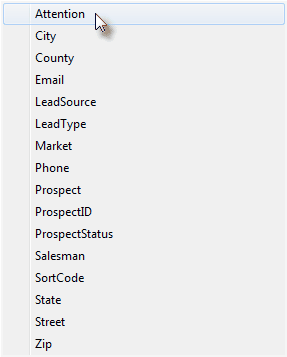
| ◆ | (undefined) - Use the Drop-Down Selection List to Choose one of the available fields in the Prospect (or Subscriber) table. |
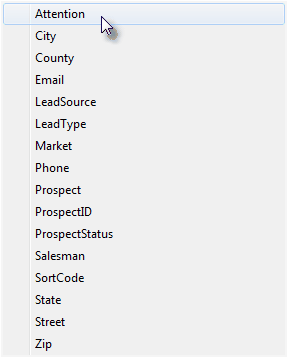
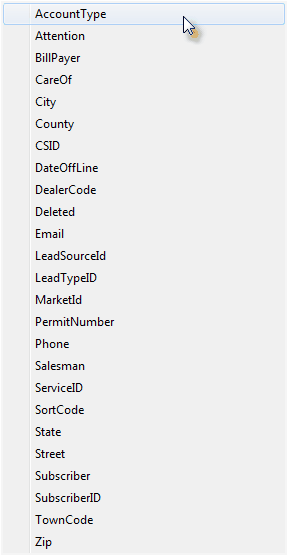
Prospect fields... available for setting a Filter Subscriber Filtering fields
| ◆ | equal - Use the Drop-Down Selection List to Choose one of the relationships between the field above and the next selection. |
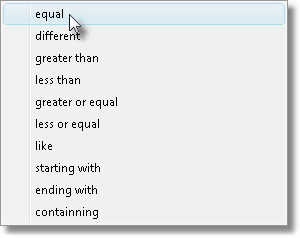
Relation options for Filter Condition
| ◆ | field - This selection sets the definition for the choice that follows. |
| ◆ | (undefined) - Based on the selection immediately above, this option will provide a list to Choose one of the fields in the Prospect (or Subscriber) table, or a data entry field (as shown below) for defining the value or parameter required. |
![]()
| ► | Note: These are examples of Filter Conditions: |
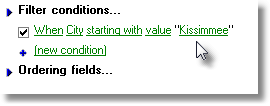
Example of Comparison filtering
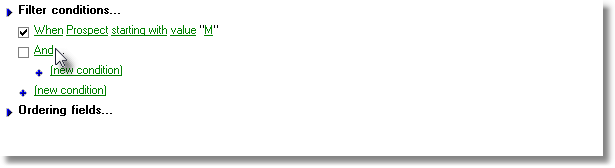
Example where a Condition is defined and another (nested) Condition is being started
| • | Click the OK button on the Prospect Filters dialog to save the entry. |
| • | The Prospect Filters (or Subscriber Filters) dialog will close. |
| • | Click Save ("ü") to record this Prospect Filter entry. |
| □ | Setting the Order in which the Data will be listed: |
| • | There are two Ordering Choice options: |
| 1. | Right-Click u Ordering Fields... |
![]()
| • | Click Include |
| ▪ | The dba.PropSearch selector will appear if defining a Prospect Filter. |

| ▪ | The dba.SubSearch selector will appear if defining a Subscriber Filter. |
![]()
| • | Click the dba.PropSearch or dba.SubSearch selector's right arrow to open the Drop-Down Selection List to Choose from the available Prospect (or Subscriber) table fields to sort this list. |
Prospect sorting order list Subscriber sorting order list
| ▪ | Repeat for an additional sort order requirement. As an example, if you wanted the list sorted by Zip Code, then within each Zip Code by Prospect Name: enter those two fields, one at a time, as two separate Ordering Fields. |
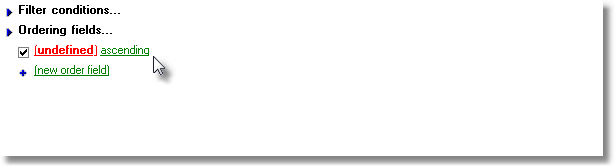
| 2. | Click on the u Ordering Fields... right arrow. |
| ▪ | The + (new order field) selection will appear. |
| ▪ | Click on (new order field) to establish the sequence in which the data will be listed. |
Ordering fields - New Order Field's options
| ◆ | (undefined) - Click here and use the Drop-Down Selection List to Choose the Prospect (or Subscriber) table field that will be used to set the order (see below) in which the records will be listed. |
Prospect fields... available for setting the list's order
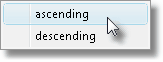
| ◆ | ascending - Click here to set the order in which these records will be listed. |
| ▪ | Repeat this sequence to set a compound order such as by City, then within that city, by Zip Code, and within that Zip by Salesman. |

Example of an Ordering Fields... entry
| • | Click the OK button on the Prospect Filters dialog to save the entry. |
| • | The Prospect Filters (or Subscriber Filters) dialog will close. |
| • | Click Save ("ü") to record this Prospect Filter (or Subscriber Filter) entry. |
| □ | Creating Filters is a very advanced topic. |
| • | Much can be learned about this filter dialog by the trial and error method. |
| • | No harm can be done the the data. |
| • | Prospect Filters and Subscriber Filter that are not useful may easily be deleted. |
| • | Detailed information beyond what is presented here is beyond the scope of these Help Files. |
| □ | Using the Special Functions on the Navigation Menu at the top of the Prospect Filters Form: |
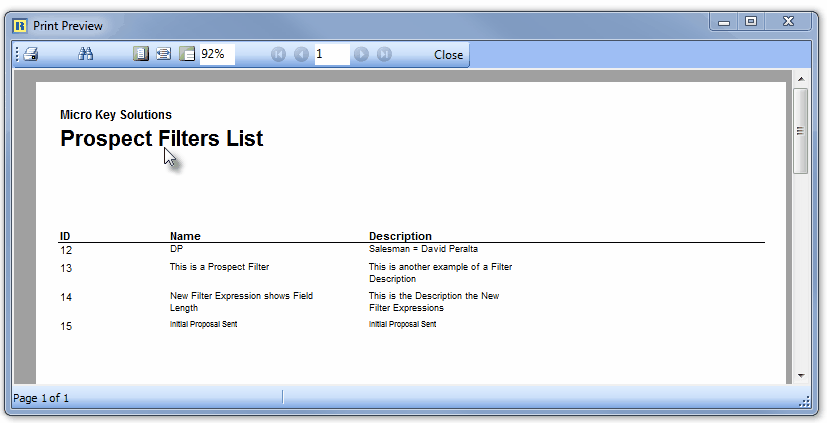
| • | Print - Click the Print Icon to View and/or Print a list of the Prospect Filters. |
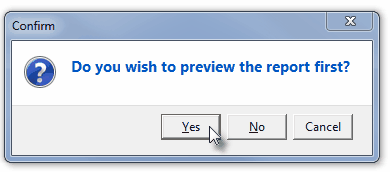
| • | Yes - Click the Yes button to View a copy of the report. |
| • | No - Click the No button to open the Windows® Print dialog where a copy of the report may be sent to a selected Printer, or Printed to a File. |
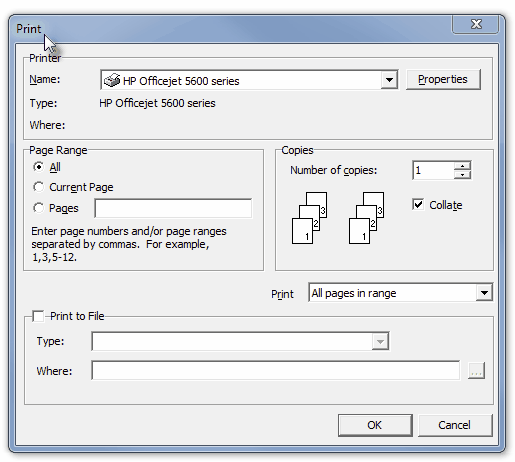
| • | Cancel - Click the Cancel button to close this Print question and return to the Form. |
| • | Search - Click the Search Icon to open the Search Filters dialog. |
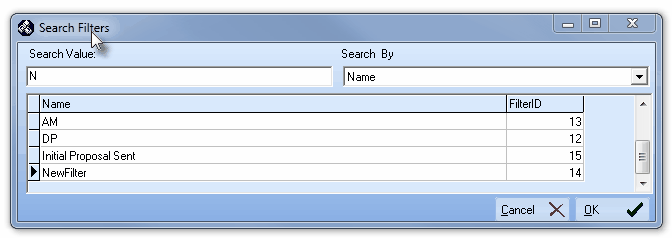
Search dialog
| • | See the "Using the Generic Search dialog" section in the Advanced Search Dialog chapter for more information about this Search dialog. |