| □ | Widgets - are located on the right-hand side of the main MKMS screen and provide a User Specified selection of Informational Snapshots. |
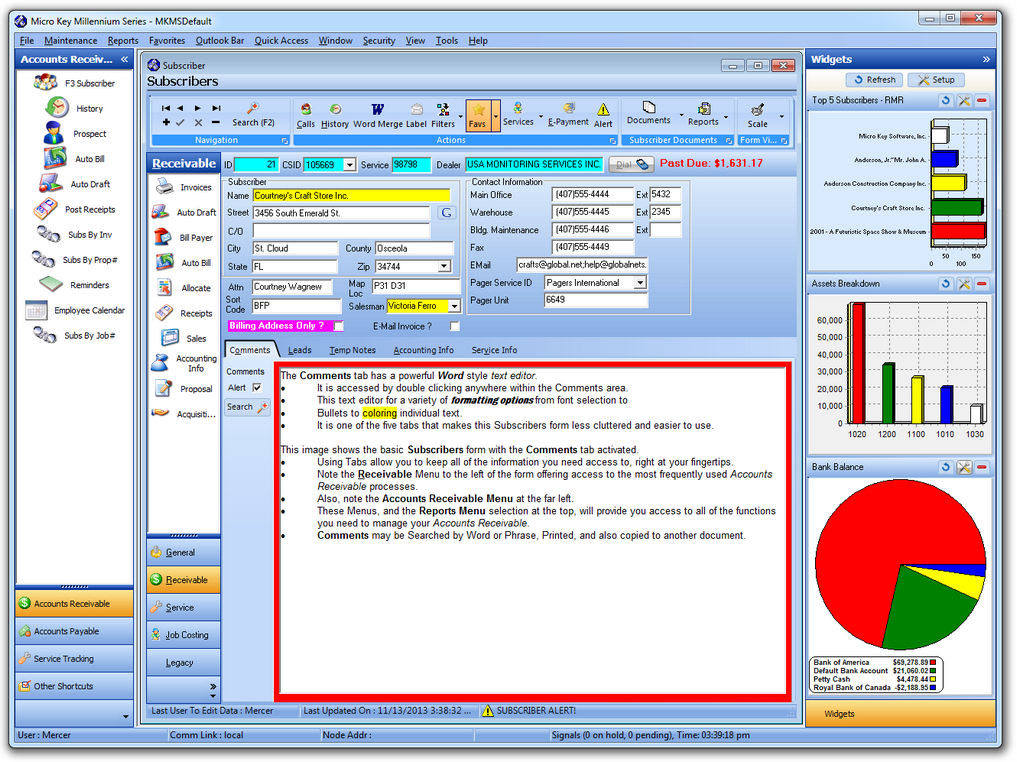
The Widgets Dashboard - containing a User Selected group of Widgets - is displayed on the right side of the main MKMS Form
| • | Displayed vertically within a Widgets Dashboard, the information for each Widget is shown either as a Tabular List, or as a Bar or Pie Chart - and may be instantly updated with the most current information at the Click of its Refresh button. |
| • | There are currently 23 Widgets available from which to choose, and any combination of these may be selected for inclusion within each User's Widgets Dashboard. |
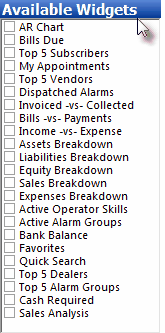
Available Widgets
| • | After reading this this chapter, you may want to try each of these Widgets |
| ▪ | In this way, you will find the one(s) that best serve your informational needs. |
| • | See the "Understanding a Widget" below, and the "Selecting Your Widgets" section in Widget Dashboard Configuration for detailed instructions on how to select and setup your desired Widgets. |
| • | These Widgets are Information Snapshots providing a concise view of the indicated data. |
| • | Each Widget has a Maintenance icon which displays the available Configuration Options for that specific Widget, but not all Widgets require Configuration Option selection(s). |
| • | In the illustration below the mouse pointer is on the Maintenance Icon and the four Configuration Options for the Top 5 Customers Widget are listed below it. |
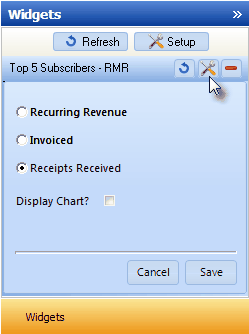
Widget Maintenance Icon with Options
| ▪ | Once the Configuration Option Choice(s) are made, Clicking the Save button activates those selected option(s). |
| ▪ | The same Widget may be selected, and then be displayed in the Widgets Dashboard more than once - each with a different set of Configuration Options chosen. |
| • | Click the Refresh button to view the most current, up to the minute data for all of your selected Widgets. |

Refresh button on Widgets Dashboard
| • | Click the Refresh icon on a specific Widget item to Refresh only that data (which requires the use of far less system resources). |

Refresh button on the Widget item
| • | The Widgets Dashboard displays only those Widgets that the current User has specified (and for which Access Rights have been granted).. |
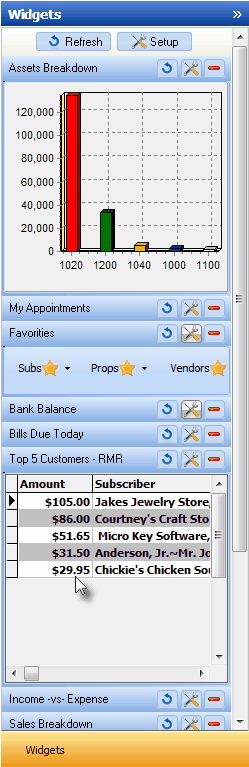
Widgets Dashboard
| • | A simple to use Setup dialog (Dashboard Config) allows each User to specify which Widgets will be displayed on their PC's Widgets Dashboard. |
| • | See the "Selecting Your Widgets" section in Widget Dashboard Configuration chapter for complete information on how to choose which Widgets will be displayed. |
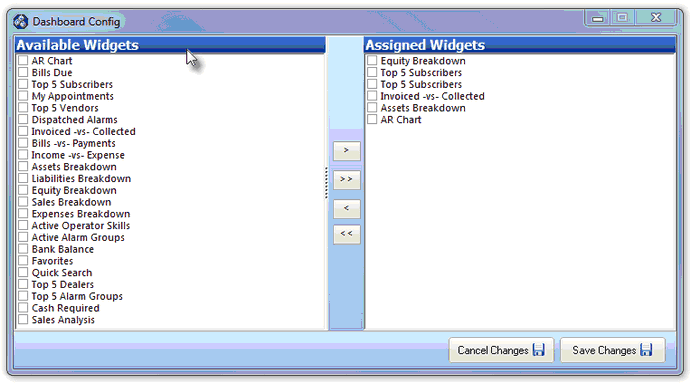
Widgets Dashboard Config dialog
| □ | Resetting the Widgets Dashboard - If you want to have all of the Widgets removed from the Widgets Dashboard, or have a problem setting and/or resetting the Widgets that appear on your Widgets Dashboard: |
| i. | Click the Setup button at the top of the Widgets Dashboard to open the Dashboard Config dialog. |
| ii. | Click the Double Left Arrow <<. which will move all of the Assigned Widgets to the Available Widgets column. |
| iii. | Click the Save Changes button to close the Dashboard Config dialog. |
| iv. | Click the Setup button at the top of the Widgets Dashboard to reopen the Dashboard Config dialog. |
| • | Try Them - Select and Install every Widgets and examine the information presented by the Widget item. To do so: |
| a. | Click the Setup button at the top of the Widgets Dashboard to open the Dashboard Config dialog. |
| b. | Click the Double Right Arrow >> to move all Available Widgets to the Assigned Widgets column. |
| c. | All Widgets will now be also listed in the Assigned Widgets column. |
| d. | Click the Save Changes button to close the Dashboard Config dialog. |
| e. | All Widgets will now be listed on the Widgets Dashboard. |
| f. | Click the Red Minimize button to "collapse" as many Widgets as required to properly view the specific Widget(s) you want to test. |
| • | Information for over 20 currently available Widgets is found within the chapters listed below: |
| 2. | Bills Due - Lists those Invoices from Vendors which are Unpaid and have a Due Date identified that meets the selected Data Range. |
| 3. | Top 5 Subscribers - Lists certain Subscribers rated as the Top 5 in one of three selected transaction types that were dated within the last 12 months. |
| 4. | My Appointments - Lists, determined by the selected Configuration Option, the Appointments for Today or the current Work Week (Mon - Fri) that have been previously entered for the current User. |
| 7. | Invoiced -vs- Collected - Provides a Pie Chart view which compares the Dollar Volume of Sales that were Invoiced versus the Amount of Receipts that were Collected within the Current Calendar Month. |
| 8. | Bills -vs- Payments - Provides a Pie Chart view which compares the Dollar Volume of Bills (Invoices from Vendors) that were recorded, versus the Dollar Volume of Payments (Paid to Vendors) that were recorded within the Current Calendar Month. |
| 18. | Favorites - Displays three option buttons - each representing one of three different record types. These buttons provide a Drop-Down list of the current User's Favorite Account Names. Selecting one of these Account Names will open the related Form with that specific account already displayed. |
| 19. | Quick Search - Provides an easy method to Search the Account Name fields of Subscribers, Prospects and Vendors - all at the same time - and displays a list of each record that matches their Search Entry. The User may Double-Click the line that corresponds to the record they were Searching for to open that corresponding Form. |
| ► | Note: The other Search option, located on the Other Shortcuts Menu, provides a Global Database Table Look-up function that is more advanced than this Widget provides. |
| 20. | Top 5 Dealers - Displays the Alarm Count for up to 5 Alarm Dealers (which have occurred within the Date Range specified in Configuration Options). |
| 22. | Cash Required - Displays the Bills Due, Receipts, and Required Amount (Bills - Receipts = Cash Required) for Today (the default), the current Week and the current Month. |
| 23. | Sales Analysis - Displays Sales (Report and Non-Report) for Today, the Current Week and the Current Month, and which may be filtered by Division and/or Salesperson. |
| • | Decide which Widgets will best serve your needs. |
| • | Follow the "Resetting the Widgets Dashboard" directions outlined above to Reset the Widget Dashboard. |
| • | Load only those Widgets (into your Widgets Dashboard) which you have identified as specifically useful to you. |

