Preparing for the Inventory Tracking & Job Costing Setup Wizard
| • | By properly preparing for the Setup Wizard, the actual execution of that Setup Wizard should be a quick and easy process. |
| • | Enter Sale-Purchase Item codes for the Non-Inventory related Expenses (see the "Non-Inventoried Job Cost Categories" section below). |
| • | Finally, run the Inventory Tracking and Job Costing Setup Wizard (see the "Setup Wizard for Inventory Tracking & Job Costing" section at the end of this chapter) |
Job Costing Related Sale-Purchase Items
| □ | Job Costing considerations: Prior to using this setup wizard you should pre-define some entries based on your own preferences and needs. |
| • | Sale-Purchase Item updates required to accommodate special Subscriber Billing and Vendor Purchase requirements of the Job Costing system. |
| • | Enter a Sale-Purchase code of JOBINV (or similar) with a Type of Sales, and a Description of "Job Invoicing Code". |
| • | Enter a Sale-Purchase code of JOBCOM (or similar) with a Type of Purchase, and a Description of "Commission for Job #:", and select the Job Cost Category of Commission. |
| • | Enter a Sale-Purchase code of JOBEXP (or similar) with a Type of Purchase, a Description of "Expense for Job #: ", and select the Job Cost Category of Expense. |
| • | Enter a Sale-Purchase code of JOBMAT (or similar) with a Type of Purchase, a Description of "Materials Cost for Job #: ", and select the Job Cost Category of Materials. |
| • | Enter a Sale-Purchase code of JOBSUB (or similar) with a Type of Purchase, a Description of "Sub Contractor Charge for Job #: ", and select the Job Cost Category of Sub Contract. |
| • | Enter a Sale-Purchase code for PARTS with a Type of Both and a Description of "Parts for Installations & Service". |
Non-Inventoried Job Cost Categories
| • | To accommodate this, you should assign Job Cost Categories - and each selected category's associated Labor related information - to each Sales-Purchase Item that may be used within the Job Costing process. |
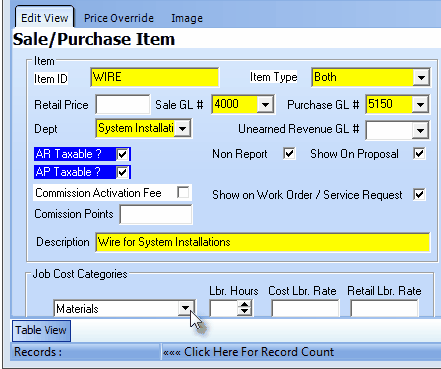
Job Cost Categories & Labor related fields on Sale-Purchase Item Form
| • | The Non-Inventoried Job Cost Categories are: |
| ▪ | Expenses - costs specific to an Installation |
| ▪ | Labor - if selected, enter the number of Hours and the Cost for each for this expense (see the "Labor Hours and Cost Labor Rate" section below). |
| ▪ | Materials - for identifying lump-sum materials costs not defined as Inventory Items or as any of the other Job Cost Categories. |
| ▪ | Sub-Contractors - fees paid to non-employees for the completion of a Job which would be entered as a lump-sum amount. |
| • | If you have not already done so, enter the Job Cost Category for each appropriate Sales-Purchase Item likely to be used to record these various expenses by using the Drop-Down Selection List provided. |
| ▪ | The Job Cost Categories field is not available on the Sales-Purchase Item Form when you are defining an actual Inventory Item or Kit. |
| • | Labor Hours and Labor Rate - The Labor related data entry considerations on the Sales-Purchase Items Form: |
| ▪ | Labor Hours - ("Lbr. Hours") - This field is used to define - when this is an Inventory Item - the average number of Labor hours required to install this Part. |
| ▪ | Cost Labor Rate - ("Cost Lbr. Rate") - This field is used to estimate - when this is an Inventory Item - the average internal Cost for each hour required to install this Part. |
| ▪ | Retail Labor Rate - ("Retail Lbr. Rate") - This field is used to estimate - when this is an Inventory Item - the average Retail Charge for each hour required to install this Part. |
| ► | Note: If this Inventory (Sale-Purchase) Item is included in a Proposal and subsequently converted to a Job, this Retail Labor Rate information is included in the Job Estimate tab. |
| ▪ | Labor Hours - ("Lbr. Hours") - This field is used to estimate the average number of Labor hours required for the designated Job Cost. |
| ▪ | Cost Labor Rate - ("Cost Lbr. Rate") - This field is used to estimate the average internal Cost for each hour required for the designated Job Cost. |
| ▪ | Retail Labor Rate - ("Retail Lbr. Rate") - This field is used to estimate the average Retail Charge for each hour required for the designated Job Cost. |
Other Job Costing Startup Entries
| □ | Enter Job Types information to establish codes for the typical types of Jobs that your Company performs. |
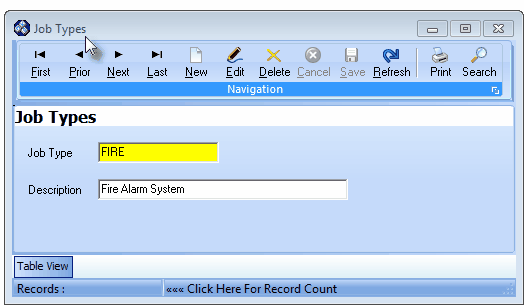
Job Types Form
| • | Enter the Pay Rates for those Employees who will work at least some of the time as a Technician, and are identified as such because they are assigned a Type of All or Technician. |
| ► | Note: Five Employee Type assignments are available: All, Administration, Operator, Sales and Technician. |
| • | To assign an Employee the rights of a Job Manager, their Employee Type field on the Personal tab must be set as either All or Administration. |
| • | The Job Manager? Check box will be “Grayed” out if the Operator, Sales, or Technician Type is assigned to the Employee. |
Setup Wizard for Inventory Tracking & Job Costing
| • | To run the setup wizard for Inventory Tracking and Job Costing Setup, from the Main Menu Select File and Choose Start Inventory Tracking/Job Costing. |
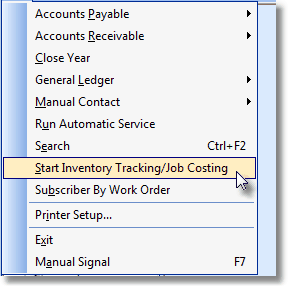
File Menu - Start Inventory Tracking/Job Costing
| □ | There are three Inventory Valuation Methods available: |
| 2. | LIFO - Last In / First Out - The cost as determined by the most recent price paid for this item as recorded on a Bill. |
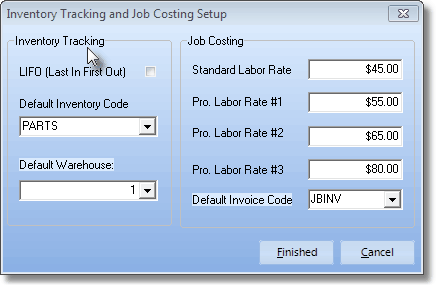
Inventory Tracking Setup
| • | However, from an accounting standpoint, you may want to alter this default behavior by having that Price In Value reset, based on the most recent Cost recorded on an Invoice for the Purchase of this Inventory Item. |
| ▪ | This automatic reset process that is based on the most recent price paid, is called Last In-First Out, or LIFO for short. |
| ▪ | Therefore, if you want to use the Fixed Price In method of Inventory Valuation, do not Check this box. |
| • | As another Inventory Valuation option, you may use the Average Cost of Inventory for Inventory Valuation, |
| ▪ | Then, once the setup wizard is completed, set the AverageCostInventory option to True ("T") in the Company Settings dialog - accessible from within the Company tab of the User Options Form. |
| • | Default Parts Code - Use the Drop-Down Selection List to Choose the default Parts code (which for simplicity should be PARTS). |
| • | Default Warehouse - The default entry is the system's predefined Default Warehouse. |
| • | Use the Drop-Down Selection List to Choose a different Warehouse Name, if desired. |
| • | Click the Finished button and Confirm that you have correctly entered the Information; or Click Cancel to abort the entry if you need to start over. |
| ◆ | Close the MKMS application, then restart it to activate the Inventory Tracking and Job Costing systems. |
| ► | Note: If Legacy Job Costing records exist within the MKMSdefault database, the following fields will be displayed, otherwise these fields will not be displayed at all. |
| ▪ | Last Job No. - No longer Used - This was a Legacy Job Costing function where the next Job Number to be assigned could be specified by entering the Last Job Number that was used (or what you wanted to represent as that last number thereby identifying what the next number should be). |
| ► | Note: In Version 2.0.X Job Costing, the system automatically assigns a Record Number for each new Job Costing project, and that number cannot be changed. |
| ▪ | Labor Rates: - No longer Used - This was a Legacy Job Costing function where the Labor Rates defined below would represent the Hourly Rate that is Invoiced to a Subscriber - with those Labor Rates being calculated based on the set of Technician Skills that would be required to complete a specific type of Job Task assignment. |
| o | Standard Labor Rate - Enter the minimum labor rate that will be charged. |
| o | Pro. Labor Rate #1 - Enter the minimum Professional level labor rate that will be charged. |
| o | Pro. Labor Rate #2 - Enter the second level Professional level labor rate that will be charged. |
| o | Pro. Labor Rate #3 - Enter the highest level Professional labor rate that will be charged. |
| ▪ | Default Invoice Code - Enter the Sale-Purchase Item that is to be used when creating a Job Costing Invoice. |
| □ | Additional Steps you may want to perform: |
| • | Consider creating User Defined Kits to speed the Ordering and Invoicing the Purchase of Inventory. |

