| □ | Defining an Action Plan (following this example should provide a good understanding of how Action Plans are created and how they actually function): |
| • | To enter an Action Plan, on the Main Menu Select Maintenance and Choose Central Station, then Click Action Plans. |
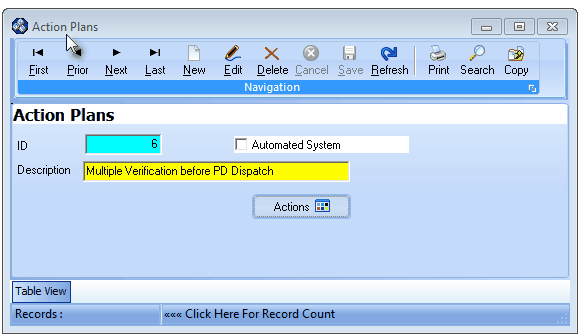
Action Plans Form
| • | Define an Action Plan to provide any Central Station using MKMSCS Central Station Monitoring module to Processing Alarms, the ability to customize the Signal Processing instructions that must be performed by the Operator for every type of Active Signal (which is any Signal requiring an Operator's Response). |
| • | Click the  Icon to start the Action Plan entry in the Record Editing section. Icon to start the Action Plan entry in the Record Editing section. |
| • | ID - This is the system assigned record number that is inserted when the Action Plan is initially saved. |
| • | Description - Enter a brief description of up to 40 characters in length describing the purpose of, or usage for this Action Plan. |
| ▪ | The Description may up to 40 characters in length and include upper and/or lower case letters, numbers, spaces and normally used punctuation marks. |
| • | Click the  Icon to record this Action Plan entry. Icon to record this Action Plan entry. |
| • | Repeat this process, as needed, to define each required the Action Plan. |
| • | Once you have entered an Action Plan's Description and saved that record, the next step is to define the Action Steps that are required to complete the Action Plan's Signal Processing Objectives using the Action Plans Designer Dialog. |

| • | To define these Action Steps, Click the Actions button on the Action Plans Form (shown in the illustration above) to open the Action Plans Designer Dialog (the illustration below shows a portion of an Action Plan that's already defined). |
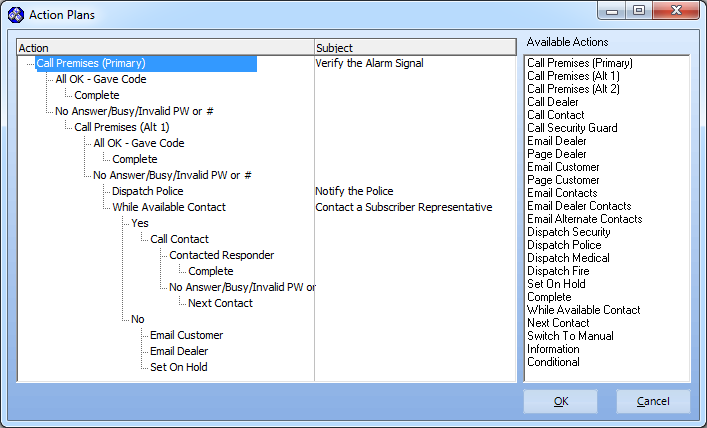
#1 - Action Plans - creation dialog
| • | Available Actions - These are the "building blocks" that are used to create the exact step-by-step Signal Processing instructions for the Operator. |

#2 - Action Plans - Available Actions
| • | Call Premises (Primary) - Dial the Subscriber's Primary Telephone Number as entered in the Contact Information section of the Subscribers Form |
| • | Call Premises (Alt 1) - Dial the Subscriber's first Alternate Telephone Number as entered in the Contact Information section of the Subscribers Form |
| • | Call Premises (Alt 2) - Dial the Subscriber's second Alternate Telephone Number as entered in the Contact Information section of the Subscribers Form |
| • | Call Dealer - Dial the Dealer Telephone Number entered in the Contact Information section of the Dealer Form whose Dealer Code has been assigned to the Subscriber (whose Alarm Signal is being processed) in the Dealer field on the Central Station Data Form |
| • | Email Dealer - Send an Email reporting this Alarm Signal to the Dealer Email address entered in the Contact Information section of the Dealer Form whose Dealer Code has been assigned to the Subscriber (whose Alarm Signal is being processed) in the Dealer field on the Central Station Data Form |
| • | Email Customer - Send an Email reporting this Alarm Signal to the Email address entered in the Contact Information section of the Subscriber Form |
| • | Page Customer - Transmit a Page reporting this Alarm Signal using the Pager Service Telephone Number associated with the Pager Service ID and related information assigned to the Subscriber in the Contact Information section of the Subscriber Form |
| • | Email Contacts - Send an Email reporting this Alarm Signal to any Email address entered in the Communications tab of the Subscriber's People To Call record(s). |
| • | Email Dealer Contacts - Send an Email reporting this Alarm Signal to any Email address entered in the Communications tab of the Dealer's assigned Call List of People To Call record(s). |
| • | Email Alternate Contacts - Send an Email reporting this Alarm Signal to any Email address entered in the Communications tab of the Subscriber's Alternate Call List People To Call record(s). |
| • | Dispatch Police - Dial the Police Department Telephone Number associated with the Town Code identified on the Central Station Data Form for this Subscriber and Request that they Respond to this Alarm Signal |
| • | Dispatch Medical - Dial the Medical Department Telephone Number associated with the Town Code identified on the Central Station Data Form for this Subscriber and Request that they Respond to this Alarm Signal |
| • | Dispatch Fire - Dial the Fire Department Telephone Number associated with the Town Code identified on the Central Station Data Form for this Subscriber and Request that they Respond to this Alarm Signal |
| ▪ | However, if the RestartActionPlanFromOnHold option in the Company Setting tab on the Users Options Form is set to True ("T"), the processing guidance will revert to the beginning step defined in that Action Plan. |
| • | Complete - Mark the Alarm Signal as Completed (refer to the "Completion - The final step required to Process an Alarm Signal" section of the Completion - Finalizing the Alarm chapter for additional information) |
| • | While Available Contact - Choose this as an Action Step to indicate that all available Contacts within this Subscriber's Global Call List should be Dialed until an actual Contact is made, until the list of available Contacts has been exhausted. |
| • | Next Contact - Choose this as an Action Step to indicate that the Operator should Dial the next available Contact within this Subscriber's Global Call List |
| • | Switch To Manual - When this Action Step is inserted as the next step in an Action Plan, on the Signal Processing Form the Switch To Manual action will take place without the Operator being required to Press the Ctrl+Shift+M keystrokes (or select the button labeled Switch To Manual), and the Action Plan tab heading will automatically change to an Operator Guided Response tab heading. |
| • | Information - Choose this as an Action Step to display Informational and/or Instructional data for the Operator (see the "Defining the Properties of an Action Step or a Response Step" section below for related information) |
| • | Conditional - Choose this as an Action Step to indicate that the Operator will be provided (up to) three selectable Options - each with its own Instructions and Action Step(s) (see the "Understanding the Conditional Action Step" section below for more information) |
| • | Entering an Action Plan - A "How To" sample Action Plan exercise (which references the "#1 - Action Plans creation dialog" illustration above): |
| ► | Note: The Action Steps and related Response Steps explained below are color coded in various ways. |
| ▪ | This is done to highlight them - indicating that they are a selected item from the Available Actions column (see the #2 - Action Plans - Available Actions illustration above). |
| ▪ | This color coding is also intended to make it easier for you to follow along with the sample Action Plan exercise. |
| ▪ | Action Steps are never actually color coded unless they are currently in a Dead-End status (see "Identifying and Correcting a Dead-Ended Response Step" below). |
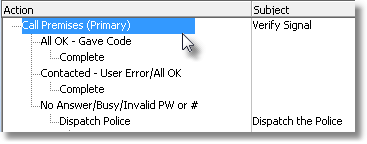
Highlighted Call Premises (Primary) Action Step
| • | Call Premises (Primary) - When the Signal requires a Verification call (as most do), in the Available Actions column Select the Call Premises Action Step and Copy it into the Action column using either the Drag & Drop, or the Right-Click Option List method. (See the Action Plans - An Overview chapter for instructions on how to Copy an Action Step in the Available Actions Column into the Action Column.) |
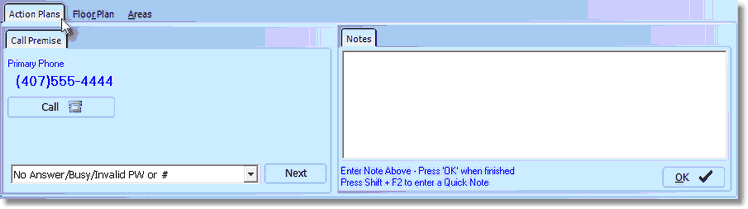
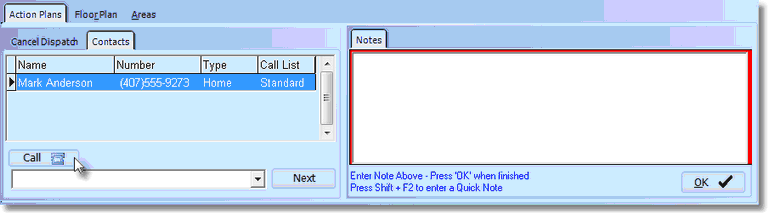
Verification Call initiated by the Action Plan
| ▪ | The first entry in the sample Action Plan is the Action Step requiring the Operator to make a Verification call. |
| o | The result of Call Premises (Primary) will be that, once an Operator acknowledges the Alarm Signal assigned this Action Plan, the Action Plan tab on the Signal Processing screen will automatically present the Call Premises tab and related dialing information. |
| ▪ | There are (usually) several Response Steps defined in the Verification Responses Form which are used to describe different types of Verification responses. |
| ▪ | All of these potential Response Steps will be inserted below the selected Action Step but some will (usually) not be needed for this situation. |
| ▪ | To Delete an unnecessary Response Step from the Action list, Right-Click on the Response Step to be removed, and Choose Delete from the menu that is presented. |
| • | All OK - Gave Code - Based on the meaning of this Response Step, enter the next appropriate step. |
| ▪ | Complete - Copy the appropriate Action Step from the Available Actions column into the Action column, immediately under the Response Step, which best describes the appropriate next step action required, based on that Response Step. |
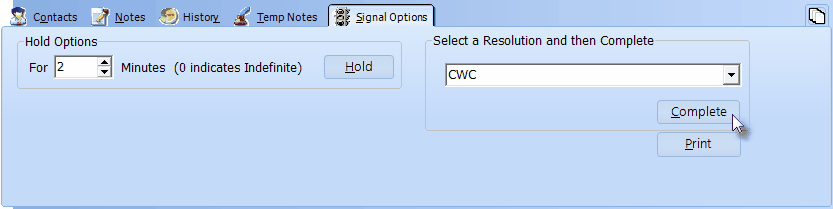
Signal Options tab with Resolution Code selected, Complete button chosen
| • | Contacted - User Error/All OK - Based on the meaning of this Response Step, enter the next appropriate step. |
| ▪ | Complete - Drag & Drop the appropriate Action Step from the Available Actions column into the Action column, immediately under the Response Step, which best describes the appropriate next step action required, based on that Response Step. |
| • | No Answer/Busy/Invalid PW or # - Based on the meaning of this Response Step, enter the next appropriate step. |
| ▪ | Dispatch Police - Copy the appropriate Action Step from the Available Actions column into the Action column, immediately under the Response Step, which best describes the appropriate next step action required, based on that Response Step, which in this case is a Dispatch. |
| o | None of the Dispatch (Security, Police, Fire, or Medical) options may have a specific Action Step assigned. |
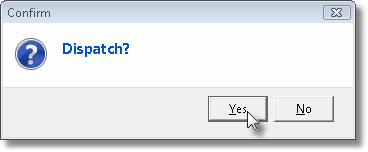
| o | Only the While Available Contact (see While Available Contact below), Set On Hold and Complete follow up Available Actions are allowable when a Dispatch Action Step is assigned. |
| o | Once one of these Available Actions are assigned, then additional Action Steps may be added to the Available Actions, as appropriate. |
Dispatch is initiated per Action Plan
| • | Certain Action Steps initiate a function which is executed either by the Action Plan (by the software), or by the Operator. |
| • | Copy the appropriate Action Step from the Available Actions Column into the Action Column, immediately under the previous Action Step. |
| ▪ | While Available Contact - If a People To Call Contact record is available, the Action Plan will execute the Yes step(s), otherwise the Action Plan will execute the No step(s). |
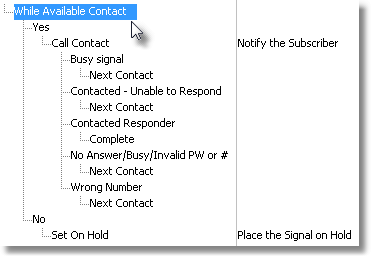
| o | Yes - This Response Step indicates that the Action Step, requiring the Operator to make a Notification call, is able to be executed. |
| i. | There are (usually) several Response Steps defined in the Verification Responses Form that describe different types of Notification responses. |
| ii. | Each of these potential Response Steps will be inserted below the Yes but some will (usually) not be needed for this situation, and therefore should be deleted. |
| iii. | To Delete a Response Step from the Action Column, Right-Click on the Response Step to be removed, and Choose Delete from the option list presented. |
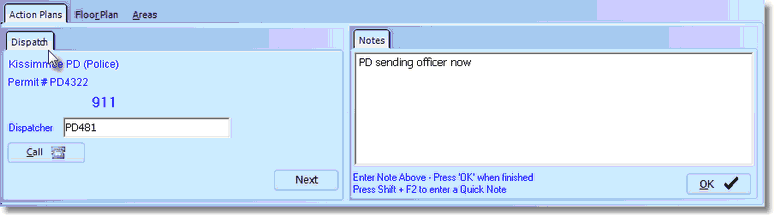
Notification Call is initiated per Action Plan
> Call Contact - Copy the appropriate Action Step from the Available Actions Column into the Action Column, immediately under the Response Step and in this case, it is that the Operator will attempt (either manually, or by using the Automatic Dialing feature) the next available Notification Call.
~ Busy Signal - Based on the meaning of this Response Step, Copy the next appropriate Action Step from the Available Actions Column into the Action Column.
* Next Contact - This Action Step checks for the availability of another Contact and loops to the Yes or No option as appropriate.
~ Contacted - Unable to Respond - Based on the meaning of this Response Step, Copy the next appropriate Action Step from the Available Actions Column into the Action Column.
* Next Contact - This Action Step checks for the availability of another Contact and loops to the Yes or No option as appropriate.
~ Contacted Responder - Based on the meaning of this Response Step, Copy the next appropriate Action Step from the Available Actions Column into the Action Column.
* Complete - This Action Step executes the Completion process.
~ Wrong Number - Based on the meaning of this Response Step, Copy the next appropriate Action Step from the Available Actions Column into the Action Column.
* Next Contact - This Action Step checks for the availability of another Contact and loops to the Yes or No option as appropriate.
| o | No - This Response Step indicates the Action Step that requires the Operator to make a Notification call cannot be executed because there are no more Contacts available. |
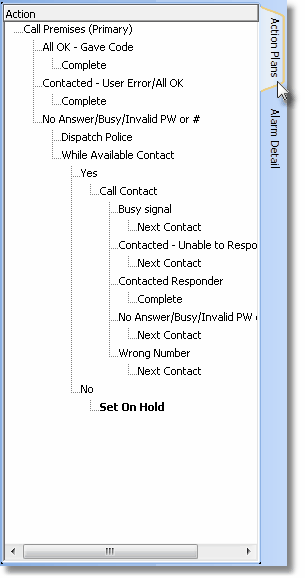
> Set on Hold - This Action Step presents the Operator with the On Hold option on the Signal Options tab of the Signal Processing Form.
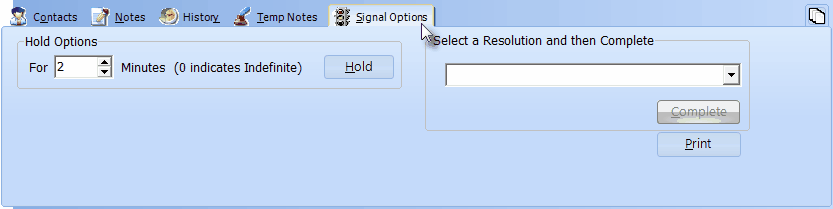
Signal Options tab with Hold Options shown
| □ | Resizing the Columns and the Action Plans Designer Dialog Form: |
| • | As more and more Action Steps are defined in the Action Column, the Action Tree will expand laterally to the point where you may not be able to see all of the Action Steps and Response Steps that have been defined. |
| • | One of the Properties (see "Defining the Properties of an Action Step or a Response Step" below) of an Action Step is the optional Subject describing the Action Step which may also exceed the space provided to display that Subject. |
| • | To provide enough viewing area to see all of the important information for this Action Plan, the Action Column's width may be expanded by Dragging the divider between the Action and Subject Column's Header to the right. |
| • | To ensure that the Subject Column is wide enough, Drag the right side of the Action Plans Form to the right, which will increase the available space for that Subject Column. |
| □ | Identifying and Correcting a Dead-Ended Response Step: |
| • | As you Copy an Action Step into the Action Column, if it entails the need of a Response Step, either because of a Verification or Notification procedure, the Action Plans Designed Dialog will automatically include the Response Step(s) associated with the selected Action Step. |
| • | Initially, all of these Response Steps will be shown as Dead-End entries because the subsequent Action Step that would be required as a result of these Response Steps has not yet been defined. |
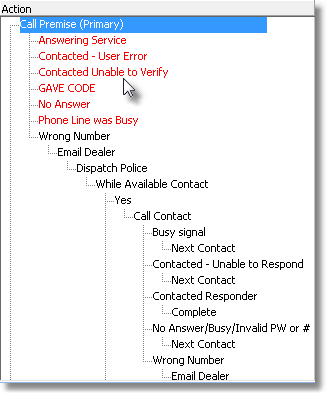
The Dead-End entries are identified with Red Type
| • | These Dead-End entries - those that, when the Operator gets to a particular Response Step, there is no Next Step to take, yet the Signal is not yet Completed - are easily corrected by assigning the appropriate Action Step - based on the Response the Operator received - so the Operator knows what to do (what the next appropriate Action Step to perform should be) after receiving that Response. |
| ▪ | In the example illustration above: |
| o | The Wrong Number Response Step has the required additional Action Steps to Complete the Signal. |
| o | The Answering Service Response Step does not, and so represents a Dead-End entry. |
| • | There should be No Dead-End entries remaining in any completed Action Plan. |
| □ | Understanding the Conditional Action Step: |
| • | Choose Conditional as an Action Step to indicate that the Operator will be provided (up to) three selectable Options - each with its own Subject Description and specific Instructions for the Option |
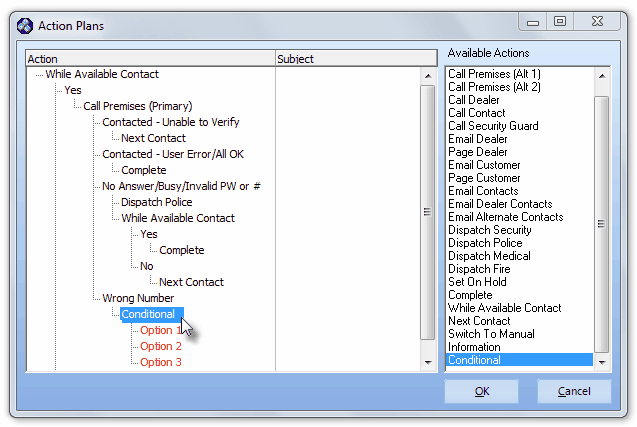
Action Plans Designer Dialog - Conditional Action Step selected
| • | Adding a Conditional Option to the Action Plan: |
| • | Drag & Drop the Conditional Action Step from the Available Actions column to the Action column into the appropriate location. |
| ▪ | The Conditional Action Step will insert three subordinate Options (labeled Option 1, Option 2, and Option 3) immediately below it. |
| ▪ | Right-Click the Option to be renamed and Choose Rename |
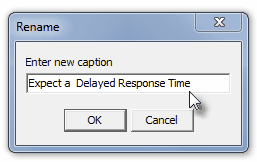
Conditional Option - Rename dialog
| ▪ | Enter the new caption Name in the Rename dialog. |
| ▪ | Click the OK button to save this entry. |
| ▪ | Repeat this step to Name all of the Options which will be needed. |
| ▪ | Delete any Option steps that will not be needed (Right-Click the unnecessary Option and Choose Delete) |
| • | Define the Properties of each Option |
| ▪ | Right-Click the Option to open the Action Plan - Properties dialog. |
| a) | Subject - A Subject is an Explanation of this Option Step that is displayed on a tab within the Signal Processing screen, to succinctly define for the Operator, what he or she is to do, or the situation being explained. |
| b) | Force Note - A Force Note Check box, when Checked, requires that the Operator must enter a Note about the Option Step which they've just completed. |
| c) | Content - When the Operator must talk to a person during a Verification, Dispatch, or Notification procedure, this Content field - which may include "Macro Substitution Entries" - is used to provide the script which tells the Operator what to say or do for this Option Step. |
| o | See the "Defining the Properties of an Action Step or a Response Step" section immediately below for more information. |
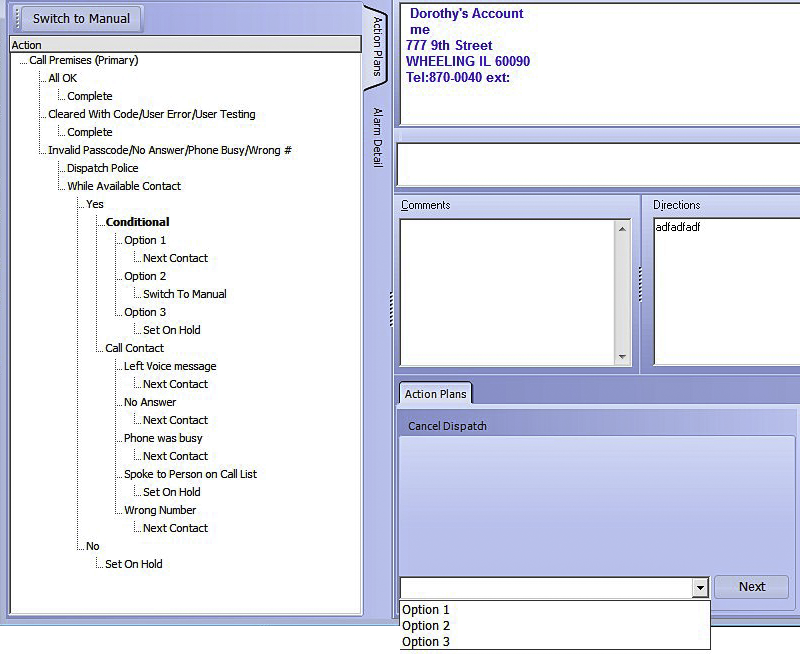
Conditional Action Step - Up to 3 Options - Example of how this is displayed to an Operator
| □ | Defining the Properties of an Action Step or a Response Step - Assign any of the specific Properties to each Action Step and Response Step within an Action Plan, as needed. |
| • | Defining the Properties of an individual Action Plan entry: |
| • | After an Action Step and/or a Response Step is Copied into the Action Column, if appropriate, Right-Click that Action Step to open the option list. |

| ▪ | You can also Double-Click that Action Step to open the Action Plan - Properties dialog. |
| • | Each Action Step and Response Step within an Action Plan may have any, or all, of these three Properties defined: |
| 1. | Subject - A Subject is an Explanation of the Action Step that is displayed on a tab within the Signal Processing screen, to succinctly define for the Operator, what he or she is to do. |
| 2. | Force Note - A Force Note Check box, when Checked, requires that the Operator entered a Note (in the Notes field) about the Action Step or Response Step which they've just completed. |
| ▪ | In most cases this makes sense and - as an Action Step and/or Response Step - the Forced Note request is displayed. |
| ▪ | If you define the need for a Forced Note on an Action Step and/or Response Step which may require many incremental steps (e.g., While Available or Call Contact) before that Action Step and/or Response Step is considered completed, the Forced Note will not be requested until all of those required incremental steps have been completed. |
| ▪ | Therefore, the Forced Note requirement should be assigned to the originating Action Step or Response Step that is to be performed by the Operator. |
Note field outlined in Red indicates this Action Plan requires that a Note be entered
| ▪ | Once the Note is entered and saved by the Operator, the Red outline around the Notes field is removed. |
| ▪ | Entering and saving a Note completes the Forced Note requirement. |
| 3. | Content - A Content entry that allows you to tell the Operator exactly what to say and/or do (using the script entered in the Content field), when a Verification, Dispatch, or Notification is the purpose of the Action Step. |
| □ | Using the Action Plan - Properties dialog - The Action Plan - Properties dialog provides a method to define the Subject (general purpose) for this Action Step, and by using Macro Substitutions, to provide a Signal Specific "script" in the Content field for the Operator to follow while processing this Signal. |
| • | See the "Macro Substitutions" section below. |
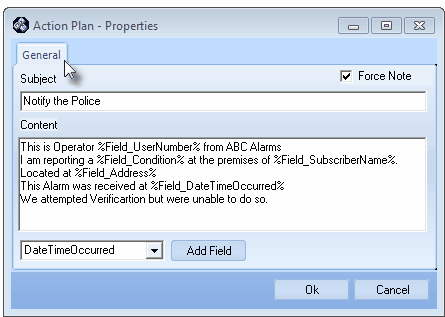
Action Plan - Properties tab
| • | Properties dialog tabs: There are three possible tabs that can be displayed on the Action Plan - Properties Form. |
| • | General tab - This tab will always be displayed. |
| ▪ | Subject - This entry will be displayed on a tab within the Signal Processing screen to notify the Operator of the type of Action Step (s)he is about to perform. |
| o | Enter a brief Description of the Action Step. |
| ▪ | Content - When the Operator must talk to a person during a Verification, Dispatch, or Notification procedure, this Content field - which may include "Macro Substitution Entries" as shown above - is used to provide the script which tells the Operator what to say (usually to a Contact or a Dispatcher) as they execute the Action Step. |
| o | See the "Creating a script with Macro Substitutions in the Content field" section below for more information. |
| ▪ | Force Note - Check this box to require the Operator to enter a Note or Comment (using either the Quick Note feature or by making a Manual Entry, as appropriate) to document the results of the Action Step that was just completed. |
| o | If you define the need for a Forced Note on a While Available Action Step, no Forced Note will be requested. |
| o | Instead, define the need for a Forced Note on an Action Step and/or Response Step that is an incremental step (e.g., Call Contact following a While Available Call Action Step), the Forced Note will be requested each time one of those required incremental steps (a Call to a Contact) has been executed. |
| o | If you define the need for a Forced Note on a Call Premises Action Step, as long as there is a Premises Number to call (i.e., Primary, Alt 1, Alt 2) the Forced Note will be requested each time one of those incremental calls have been executed. |
| • | On Hold tab - If the selected Action Step is Set On Hold, the On Hold tab will be displayed next to (and in addition to) the General tab on the Action Plan - Properties Form - but is only filled in if this Action Plan will be used by the Automated System Action Plans Service application |
| ▪ | In any other case where the Operator processes the Alarm Signal, he/she will manually enter this information. |
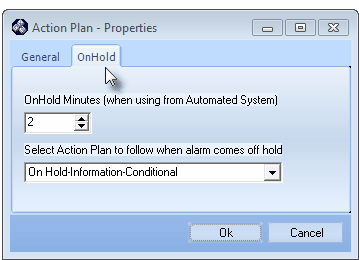
Action Plan - Properties dialog - On Hold tab
| ▪ | On Hold Minutes (entered only when using the Automated System) - To override the On Hold Default (time in minutes) pre-set in the On Hold sub-tab on the Central Stations Options tab on the User Options Form, enter the number of minutes this Signal should remain On Hold . |
| o | This On Hold Minutes value may be entered for any Action Plan with a Set On Hold Action Step defined. |
| o | This On Hold Minutes value may also be used to specify the number of minutes this Signal should remain On Hold during which time the Automated System Action Plan would be performed (thus allowing enough time for the required Notification(s) to occur before the "next step", or Completion step is executed). |
| o | Unless the Action Plan has a Complete Action Step defined to occur sometime after the Set On Hold Action Step is executed (as it would in most Automated System Action Plans), when this Signal comes Off Hold it would be retuned to the Alarm Stack as a Pending Signal. |
| ▪ | Select Action Plan to follow when the alarm comes off hold - Using the Drop-Down Selection List provided, Choose the appropriate Action Plan. |
| o | Instead of being retuned to the Alarm Stack as a Pending Signal, a different Action Step or Response may be desired. |
| o | This "next step" may be defined within a different Action Plan than the Action Plan with the Action Step that originally put this Signal On Hold |
| o | So, this field may be used to return control to the Action Plan which originally triggered the On Hold procedure (by entering nothing), direct control to a different Action Plan by entering that selection, or direct control to the {Default} option which would return control to the Operator Guided Response procedure thus placing the Signal back into the Alarm Stack as a Pending Signal. |
| o | However, if the RestartActionPlanFromOnHold option in the Company Setting tab on the Users Options Form is set to True ("T"), the processing guidance will revert to the beginning step of the originating Action Plan. |
| • | Complete tab - If the selected Action Step is Complete, the Complete tab will be displayed next to the General tab on the Action Plan - Properties Form but is only filled in if this Action Plan will be used by the the Automated System Action Plan application (in any other case where the Operator processes the Alarm Signal, he/she will manually enter this information). |

Action Plan - Properties dialog - Complete tab
| ▪ | Resolution Code (entered only when using the Automated System) - When Completing a Signal is the final step in an Automated System Action Plan, use the Drop-Down Selection List provided to Choose the appropriate Resolution Code. |
| • | Creating a script with Macro Substitutions in the Content field: |
| • | Text - Enter the necessary instructions, scripting, and/or description, inserting Macro Substitutions where required, for the Operator to use so she/he may properly execute the Action Step. |
| • | Field Names - The Drop-Down Selection List at the bottom of the Action Plan - Properties dialog provides a list of Field Names which may be inserted into the text of the Content entered above, thereby implementing a Macro Substitution. |
| ▪ | Understanding a Macro Substitution - Macro Substitution Entries are specially formatted words and characters that instruct MKMSCS to insert the associated Central Station data stored in the indicated field within the MKMSDefault database, in the location of the Macro Substitution Entry. |
| • | Add Field - Once you have used the Drop-Down Selection List to Choose the appropriate Macro Substitution Field Name, Click the Add Field button to insert that Macro Substitution Entry at the current location of the Text Pointer within the Content field. |
| ▪ | Any number of Macro Substitutions may be used in any place within the text of the Content field. |
| • | OK - Click the Ok button to store all of the defined Properties of this Action Plan's Action Step or Response Step. |
| • | Cancel - Click the Cancel button to abort this entry. |
| • | In either case, you will be returned to the Action Plans Designer Dialog (the one where the Action and Response Steps that you have entered are listed). |
| • | You may enter additional Action Steps and/or Response Steps, and assign Properties, as needed. |
| • | OK - You must Click the OK button on the Action Plans Form (the one where all of the Action Steps that you have entered are listed in the Action Column) to save the Action Steps. |
| • | Cancel - Click the Cancel button to abort these entries. |
| • | You will be returned to the main Action Plans Form. |
| • | Click Save ("ü") on the main Action Plans Form |
| □ | Properly saving your Action Plan. |
| • | You must Click Save ("ü") on the main Action Plans Form to actually record all of your Action Steps and Response Steps and their individual Properties. |
| ► | Important Note: To be sure that your entries are recorded and saved correctly, there may be up to Five (5) Saves required at various times during this data entry process: |
| 1. | Save the initial Action Plan Description: Click Save ("ü") on the main Action Plans Form. |
| 2. | Save the Action Steps as they are entered: Click the OK button on the Action Plans Designer Dialog. |
| 3. | Save the Properties as they are entered: Click the OK button to store each Action Step's Properties. |
| 4. | Re-Save the final list of Action Steps when you are finished with your entries: Click the OK button on the Action Plans Designer Dialog. |
| 5. | Re-Save the initial Action Plan Description: Click Save ("ü") on the main Action Plans Form. |
| ◆ | Important Notes: Those Signals that are assigned an Action Plan will appear in the Signal Processing screen with an Action Plans tab on the left. |
| I. | An entry is inserted into the Alarm Signal History indicating that Action Plan ID #nn was initiated. |
| II. | The current Action Step being performed by the Operator is displayed in Bold Letters. |
| III. | As each Action Step is completed, that information is inserted into the Alarm Detail tab located beneath the Actions Plans tab (as shown in the illustration below). |
Action Plans tab on the Signal Processing screen

