| □ | Automating the Technician Scheduling process will greatly enhance the Service Manager's (or dedicated Scheduler's) effectiveness in managing service operations within the Service Department. |
| • | The stress of having the right people in the right places at the right time whether tracking 2, 20 or 200 Technicians - knowing who is available, what their Skills are, getting them to where they need to be when they need to be there, servicing the Accounts that need to be serviced, knowing that the Technicians are qualified to perform certain services, and having a clear view of the status of each service call scheduled for a specific day - can be overwhelming. |
| • | This Technician Scheduling Form provides the tools needed to get that job done, efficiently and effectively. |
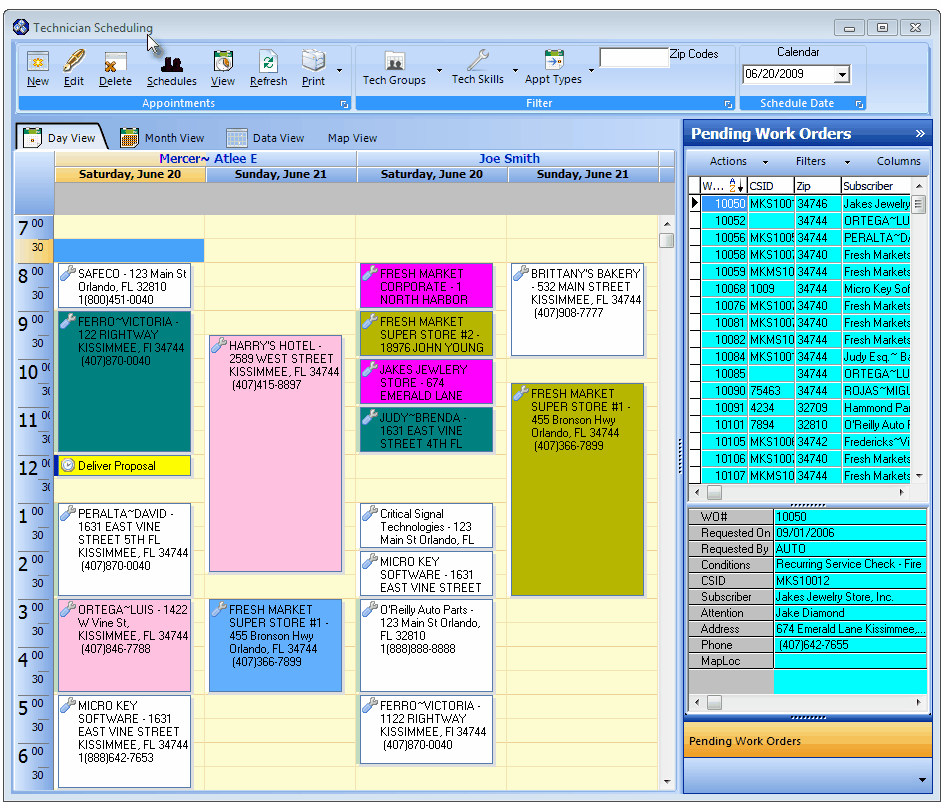
Technician Scheduling Form - 2 Day View - with Scheduled Work Orders
| • | Technician Scheduling is one of the most powerful and useful features within MKMS providing (among others) the following features and functions: |
| a. | Displays - in the Pending Work Orders Listing - all Un-Scheduled Work Orders, or by choice, any Work Order that has not been Completed. |
| b. | The Pending Work Orders Listing may be filtered, rearranged, resorted, |
| c. | Displays a Google Maps® graphic for a Selected Work Order. |
| f. | Can limit the Appointments displayed in the Technician Schedules Grid based on the Appointment Type, the Technicians assigned to a Technician Service Group, and/or those Technicians with a particular set of Skills. |
| g. | Define a Schedule Grid format as needed and instantly make changes as needed. |
| h. | Easily Assigns a Technician to, and Schedules a Technician for, a Work Order using a basic Windows® Drag & Drop process. |
| j. | Provides direct access to the Subscriber Form for a selected Work Order. |
| k. | Provides direct access to the Service Request Form for a selected Work Order. |
| l. | Uses a colored-coding system to identify the Status of each Work Order. |
| o. | Can Email the Work Order related Appointment information to the Technician assigned to that Work Order. |
| p. | Can be Re-sized both horizontally and/or vertically, as needed; with the Pending Work Orders Listing expandable widthwise, also. |
| • | Using this Technician Scheduling Form, the Scheduler will be able to set the Schedule Date(s) to be viewed, identify the Technicians who will be included in the displayed Schedule, select a Work Order and Drag & Drop it to the appropriate Time Slot of the appropriate Technician, and repeat this process as needed. |
| □ | Understanding the various sections of the Technician Scheduling Form: |
| • | At the top of the Technician Scheduling Form there are three Menu sections. |
| • | Each section has its own set of Icons, which will provide access to the functions provided by this Technician Scheduling Form: |
| 1. | Appointments Menu Icons - Allows for the Entry of New Appointments, Editing of existing Appointments, Deletion of Appointments, defining which Technician's Schedules will be displayed, formatting of the View of the Technician Schedules Grid, and the Printing of Technician Schedules (see the "Using the Appointments section Icons" section below and the Schedules chapter for additional information). |
| 3. | Schedule Date Menu Icon - Provides a Calendar field for selecting the Schedule Date for the Technician Schedules Grid (see "Using the Calendar to Set the Schedule Date" section immediately below). |
| • | In the body of the Technician Scheduling Form there are two sections. |
| • | These sections are used to view the currently selected Technician's Schedules, and to view and schedule Service Requests. |
| 1. | A Technician Schedules Grid which has four available tabs - one of which will be active at all times (1. Day View, 2. Month View, 3. Data View, and 4. Map View) showing the Schedules of selected Technicians who are chosen using multiple selection and filtering criteria, displaying selected Types of Appointments that are scheduled for those Technicians, and the available Time Slots that can be scheduled - all based on a specified Schedule Date. |
| ◆ | For more information relating to the Technician Schedules section, see the "Understanding the Technician Schedules section of the Technician Scheduling Form" below, the Visible Schedules, Planner View, and the Appointment Editor chapters. |
| 2. | A Pending Work Orders Listing with multiple selection and filtering capabilities which provides the Service Manager (or dedicated Scheduler) the ability to limit this Listing to a manageable, definable set of Work Orders. |
| • | Setting the Schedule Date |
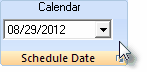
| • | Using the Calendar - Based on the needs of the Scheduler, set the Schedule Date to limit the Technician Schedules Grid to a view only those Day(s). |
| ▪ | Use the Drop-Down Date Selection Box in the Calendar field on the Schedule Date section at the top right of the Technician Scheduling Form to Select the (starting) Schedule Date to view existing Appointments, and the available Time Slots which may be used to Set New Appointments. |
Technician Scheduling Calendar
| • | Locate the appropriate Month and Year. |
| ▪ | Click on the single left t and right u arrows to move to the previous or next Month. |
| ▪ | Click on the double left tt and right uu arrows to move to the previous or next Year. |
| • | Select the Schedule Date to be activated in the Technician Schedules Grid. |
| ▪ | This will become the Schedule Date to which Appointments (for Work Orders and other types of Appointments) will be assigned (and/or viewed, if already scheduled). |
| ▪ | If the (Technician Schedules) Day View is set to display more than one day at the same time (a Multi-Day View), the Calendar field selection will identify for the first day of the series that will be shown (see the Planner View chapter to learn how to setup a Multi-Day View). |
| • | Using the Appointments Menu Icons: |
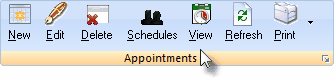
Technician Scheduling Form - Appointments Icons
| • | When the Technician Scheduling Form is opened, the User should perform these basic "set-up" tasks. |
| ▪ | Set the Schedule Date for which the (existing) Appointments are to be (displayed) assigned. |
| o | See the "Setting the Schedule Date" section above. |
| ▪ | Set the Display format of the Technician Schedules Grid displayed in its Day View tab. |
| o | See the Planner View chapter for a discussion of this step. |
| ▪ | Choose which Technician's Schedules will be visible. |
| o | See the Schedules chapter for a detailed explanation of this step. |
| ▪ | Filter which Technicians and/or Appointments will be displayed in the Technician Schedules Grid based on the current need. |
| o | See the "Using the Filter Menu Icons" section below |
| • | Use the following Appointments section Icons to perform the first three (and other) "set-up" tasks listed above: |
| ▪ | Edit - To modify Appointment information for a currently scheduled Work Order: |
| o | Click on that Appointment on the Day View (Technician Schedules Grid's) tab of the Technicians Scheduling Form. |
| ▪ | Delete - To remove an Appointment for a currently scheduled Work Order from the Technician Scheduling Form (this will Delete the Appointment, but will not delete the actual Work Order itself): |
| o | Click on that Appointment to be Deleted from the Day View of the Technicians Scheduling Form. |
| o | Confirm you want to Delete this Appointment and it will be removed from the Schedule. |
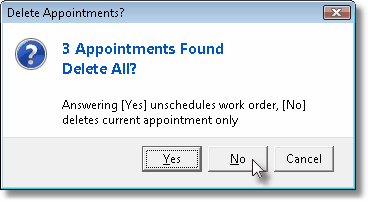
| o | The Delete Appointments? message will be displayed if you have more than one Technician scheduled for the Work Order for which you are deleting an Appointment: |
Delete Appointments? message
| o | Yes - Click the Yes button to Delete all Appointments for this Work Order. |
| o | No - Click the No button to Delete the Appointment for this Work Order Only (no other Appointments for this Work Order will be affected). |
| o | Cancel - Click the Cancel button to abort the Delete process altogether. |
| o | Click the Refresh button (see below) to update the Pending Work Order Listing - the result of this Refresh is dependent on any Filters placed on the Pending Work Order Listing and what was deleted (i.e., All or One Appointment) - See the Scheduling with the Pending Work Orders Listing chapter additional information. |
| ▪ | Schedules - Click Schedules (which lists those Employees with an Employee Type of Technician - or All positions) to Choose the specific Technician(s) (or the Technician Group Members) who should be displayed on the Day View (Technician Schedules section) of the Technicians Scheduling Form. |
| ▪ | View - Click View to set up the Planner View of the Day View. |
| o | The Planner View allows you to specify what, and how the Schedule is to be displayed within the Day View format of the Technicians Scheduling Form. |
| o | See the "Schedule Views" and the "Schedule Date" sections immediately below. |
| ▪ | Refresh - Click the Refresh Icon to "pull" the most recent Technician Scheduling data from the file server. |
| o | To get the latest data for all the outstanding Work Orders, Click Refresh. |
| o | Automating the Refresh process - Although the User may Choose to Refresh the Technician Scheduling data whenever appropriate, this process may be automated within the Company Settings dialog accessed in the Company tab of the User Options Form: |
| i. | Auto Refresh Schedule - When the AutoRefreshSchedule option is set to True ("T") an Auto Refresh Process will be run on the Technician Schedule Form regularly (based on the number of Seconds specified in the AutoRefreshScheduleInterval below. |
| ii. | Auto Refresh Schedule Interval -When the AutoRefreshSchedule option above is set to True ("T"), the AutoRefreshScheduleInterval value that is set here will determine the time (in Seconds) between each Auto Refresh Process. |
| • | Print - There are two ways to produce a printed document containing Technician Scheduling information: |
| 1. | Click Print (not the Down Arrow q to the right of the Print Icon) to produce a screen print of the Technician Schedules that includes all of the Technician Scheduling information currently displayed on the screen's View. |
| o | The resulting document is formatted appropriately, depending on whether you have the Day View or Month View format currently displayed (no printout is provided when viewing the Data View format). |
| o | There is no Preview option, the Technician Schedule from the Day View or Month View format is immediately printed to the default printer of the current workstation. |
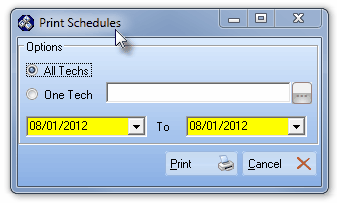
| 2. | Click the Down Arrow q to the right of the Print Icon (from within the Day View or Month View format) and Select Technician Schedules to open the Print Schedules dialog shown below (this is the only option provided when viewing the Data View format and Print or the Print Down Arrow q is Clicked). |
Print Schedules dialog for Technician Schedules Report
| o | Print the schedules of All Technicians, or Select and print One Technician. |
| o | By default, the Date Range offered is Today, but the Technician Schedule(s) printed may be for more than one day, if required. |
| o | Click the Print button to View and/or Print the Selected Technician Schedule(s). |
| o | There are no print options for the Map View format. |
| • | Using the Filter Menu Icons: |

Technician Scheduling Form - Filter Icons
| • | When the Technician Scheduling Form is opened, the User should perform these basic "set-up" tasks. |
| ▪ | Set the Schedule Date for which the (existing) Appointments are to be (displayed) assigned. |
| o | See the "Setting the Schedule Date" section above. |
| ▪ | Set the Display format of the Technician Schedules Grid as displayed in its Day View tab. |
| o | See the Planner View chapter for a discussion of this step. |
| ▪ | Choose which Technician's Schedules will be visible. |
| o | See the Schedules chapter for a detailed explanation of this step. |
| ▪ | Filter which Technicians and/or Appointments will be displayed in the Technician Schedules Grid based on the current need. |
| o | By default, All Appointments for All Subscribers will be included in the Technician Schedules section based solely on having an Appointment scheduled on the selected Schedule Date (see the "Setting the Schedule Date" section above). |
| o | The Technicians displayed in the Technician Schedules Grid are (normally) those who were Selected using the Schedules Icon on the Appointments Menu (see the "Using the Appointments section Icons" section above and the Schedules chapter for a detailed explanation). |
| • | The following Filter Menu Icons may be accessed to perform the Filtering "set-up" task for the Technician Schedules: |
| ▪ | Tech Groups - This Icon provides as a shortcut to Choose the Technicians who will be included in the Technician Schedules. |
| o | If appropriate, Click on the Tech Groups Icon to display a list of the previously defined Technician Groups. |
| o | Check the desired Technician Groups whose Members (i.e., those Technicians assigned to each selected Technician Group) are to be included in the Technician Schedules section - whether or not they (the Members) have existing Appointments entered for the selected Schedule Date. |
| ▪ | Tech Skills - By default, any Technician chosen to be included within the Technician Schedules section, is selected without regard to their Technician Skill(s). |
| o | This Tech Skills Icon provides a shortcut to identify those Technicians with specifically identified Technician Skill(s) |
| o | If appropriate, Click on the Tech Skills Icon to display a list of those previously defined Technician Skill(s) |
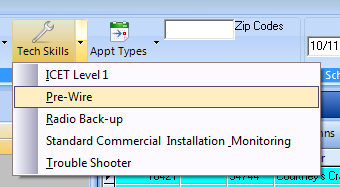
| i. | Only those Technicians with the selected Skills will be included in the Technician Schedules section - whether or not they have existing Appointments entered for the selected Schedule Date. |
| ii. | To revert the listed Technician Schedules section to those Technicians previously selected from the Visible Schedules dialog, Un-Check all of the selected Technician Skill(s) in the Tech Skills list. |
| ▪ | Appt Types - By default, All Appointment Types are displayed within the Technician Schedules section for the selected Technicians and selected Schedule Date. |
| 1) | All - All Appointments - regardless of type - will be displayed. |
| 2) | Installs - Appointments for Service Requests that have been assigned a Work Order Type of Installation Order (to identify all of the Inventory Components required for a new, or add-on type of installation). |
| a) | Standard Work Order - For general service work that is to be performed at a Subscriber's premises. |
| b) | Fire Alarm Test - For a system wide Fire Alarm Test. |
| c) | Fire Extinguisher Inspection - For performing a Fire Extinguisher Inspection procedure. |
| o | A specific Appointment Type may be chosen and only those Appointment Types will be displayed in the Technician Schedules. |

Appointment Types
| o | If appropriate, Click on the Appt Types Icon to display a list of those Appointment Types. |
| o | Check the Appointment Type(s) to be included (those Appointment Types not Checked will be excluded from the Technician Schedules). |
| o | See the "Choosing the Appointment Types to be Viewed" discussion below. |
| ▪ | Zip Codes - Enter a Zip Code which will be compared with the Zip Codes defined in the Coverage Area tabs of Employees who are Technicians with the result being that those Technicians who are assigned to that Zip Code will be included on the Technician Schedules section (see the "Understanding the Technician Schedules section of the Technician Scheduling Form" discussion below) of the Technician Scheduling Form. |
| • | Choosing the Appointment Types to be Viewed: |
| ▪ | In large companies, there may be several Users accessing the Technician Scheduling Form at the same time, but for different reasons: |
| a. | The Service Manager may want to be able to view All Appointments. |
| b. | The Installation scheduler may only want to view Installs. |
| c. | The Job Foreman may only want to view Appointments for Jobs. |
| d. | The Service Dispatcher may only want to view Work Orders. |
| e. | And someone else may only want to view Appointments classified as Other. |
| ▪ | To accommodate this issue, the User may use the Appt Types Drop-Down Selection List provided to restrict the Appointments that will be displayed on the Technician Scheduling Form to a specific Appointment Type by Selecting that Appointment Type from the list presented. |
| ▪ | Once a specific Appointment Type selection has been made, two changes occur in what the Users can View on the Technician Scheduling Form. |
| 1. | The Technician Scheduling Form will only display the selected Appointment Type regardless of which Planner View has been chosen. |
| 2. | If a New Appointment is created with a different Appointment Type than the Appointment Type that is currently selected to be viewed, it will not appear on the Technician Schedules section of the Technician Schedule Form until either All or that Appointment Type is Chosen. |
| □ | Understanding the Technician Schedules section of the Technician Scheduling Form: |
| • | The Technician Schedules section on the Technician Scheduling Form has four tabs available (each of which is illustrated below) to provide various "views" of the existing Appointments for the designated Technicians, and theTime Slots that are available for scheduling new Work Orders for those Technicians: |
1. Day View - Displays a Schedule Grid with the selected Technicians - chosen using multiple selection and filtering criteria, and displaying the selected Types of Appointments scheduled for those Technicians - for a one, three, five or seven day period (as explained in the Planner View chapter) commencing on the specified Schedule Date.
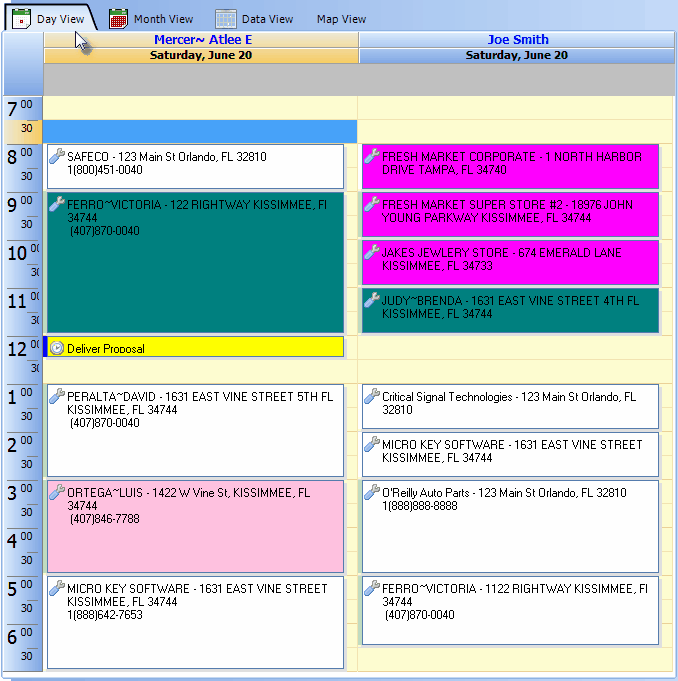
Technician Scheduling Form - Technician Schedules - Day View tab showing two Technicians
2. Month View - Displays a full month's Calendar showing the Scheduled Work Orders - those Work Order Appointments being displayed on bars that provide "fly-over" information (similar to Tool Tips in Windows® applications) about each Appointment.
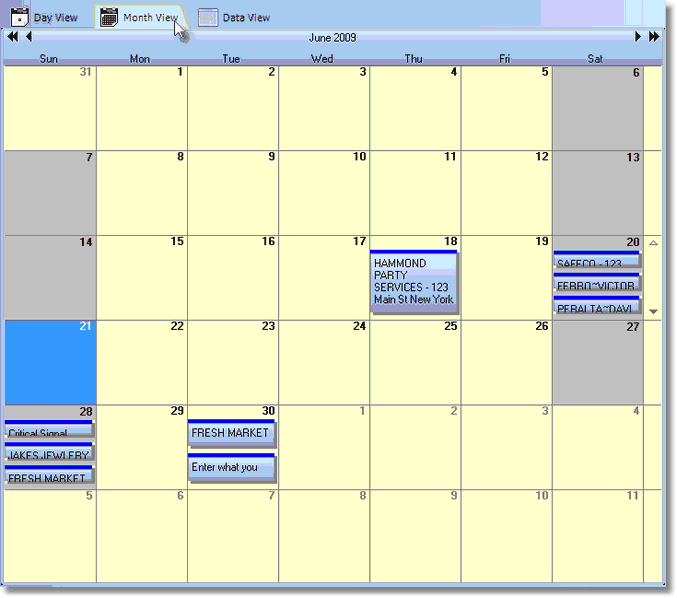
Technician Scheduling Form - Technician Schedules - Month View tab
3. Data View - Displays an easier to view (tabular chart) for when multiple Technician's schedules are activated at the same time (see example below).
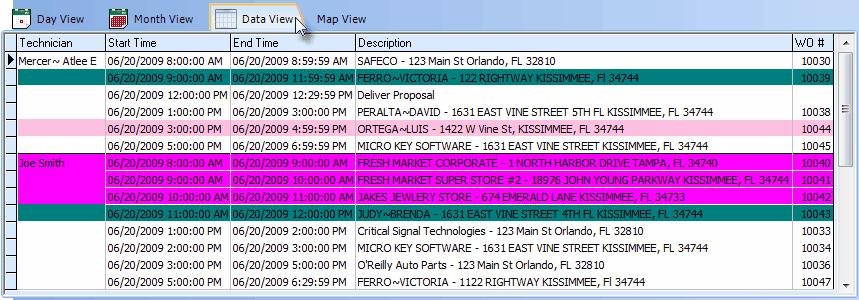
Technician Scheduling Form - Data View tab - two Technicians' Schedules
4. Map View - Displays the location(s) of each of the Work Order Appointments on a Google® Map and provides a tabular list of these Work Order Appointments based on what is currently listed on the Day View tab.
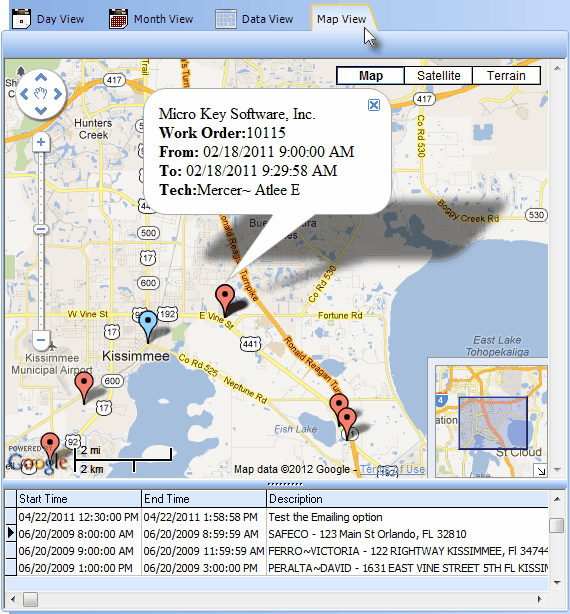
Technician Scheduling Form - Map View tab
| • | Unscheduled Work Orders will be identified with a Blue Flag and Scheduled Work Orders with a Red Flag. |
| • | Multiple Work Order Appointments scheduled at the Same Location are only Flagged once. |
| □ | Understanding the Pending Work Orders Listing section of the Technician Scheduling Form: |
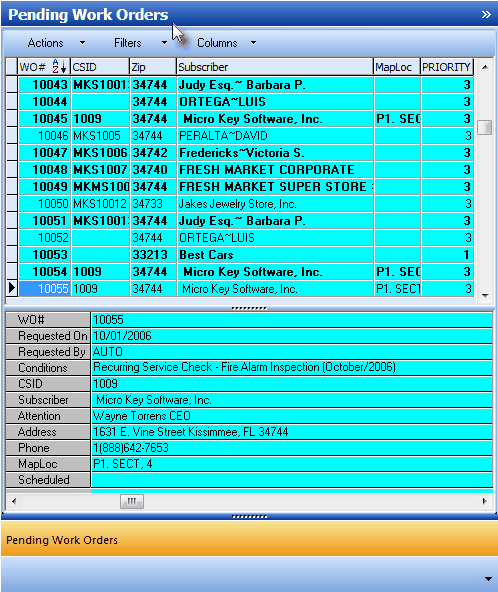
Technician Scheduling Form - Pending Work Orders Listing
| • | Pending Work Orders Listing section contains a Menu with three Icons offering specific Actions, special Filters, and Column options. |
| • | Using these Actions, Filters, and Column options - alone or in concert with each of the others - the contents of the Pending Work Orders Listing may be searched, mapped, filtered to limit the list in a host of different ways, and sorted in any order required. |
| □ | Understanding the relationship between the Employee Calendar and the Technician Scheduling Form: |
| • | Each of your Employees are assigned an Employee Type of either Administrator, All, Technician or Operator. |
| • | All Employees are included on the Employee Calendar's Visible Schedules list. |
| • | Only Employees assigned an Employee Type of All or Technician are available to be viewed on the Technician Scheduling Form. |
| • | All of your Technician's schedules on the Technician Scheduling Form are automatically displayed on the Employee Calendar if they are selected to be displayed. The same is true in reverse in that if a Technician is scheduled on the Employee Calendar, (s)he would not be available for a Service Call within that time period . |
| • | So, if an Employee that is assigned the Employee Type of All or Technician is scheduled within the Employee Calendar, those appointments will also be shown in the Technician Scheduling Form. |
| • | Conversely, those Employees who are not assigned an Employee Type of All or Technician are only available to be scheduled within the Employee Calendar Form, and are never available to be shown on the Technician Scheduling Form at all. |

