| □ | This Job Tasks tab provides the means to define the specific segments - work components - of a Job, then create Work Orders to get these Job Tasks completed, and finally to enter Invoices to bill the Subscriber for that work. |
| • | There are five basic steps for using the Job Tasks tab's features, listed in the order they should be executed: |
| 1. | Locate the Job and then Select the Job Task tab. |
| 4. | Generate an Invoice for that Work Order when the Job Task has been Completed: |
| 5. | Mark the Job Task as Completed by entering a completion date. |
Job Costing Form - Job Task tab
| • | To enter a Job Task, on the Main Menu, Select the Maintenance menu and Choose Job Costing. |

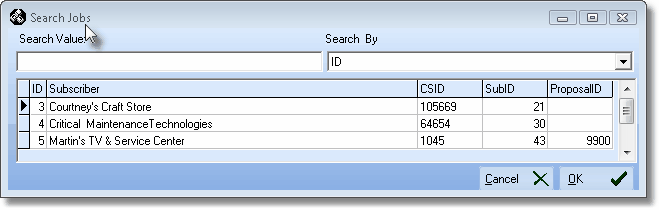
| • | Locate the Job to which you need to add a Job Task by Clicking the Search icon at the top of the Job Costing Form which will open the Search Jobs dialog. |
Search Jobs dialog on the Job Costing Form
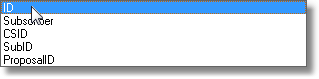
| • | Search By - Use the Drop-Down Selection List to Choose your desired search method. |
| • | Search Value - Enter the characters that will best locate the desired Job. As you enter information, the record pointer4will be continually relocated based on your entry. |
| • | OK - Click OK ü when you have the correct Job located. |
| • | Select the Job Tasks tab. |
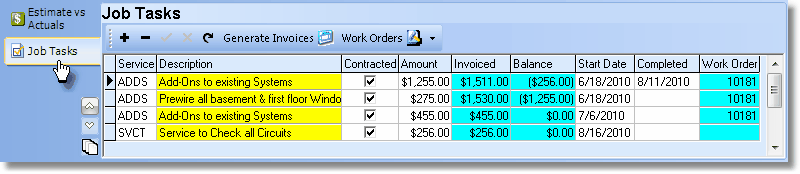
| □ | Add the Job Task: Using this tab, you may define Job Tasks, review existing Work Orders and/or create new Work Orders to get these Job Tasks completed, and generate Invoices for those Job Tasks. |
| • | Click Add ("+") and create a New Job Task by entering the information in the fields listed below. |

Job Task tab on the Job Costing Form
| • | Service - Use the Drop-Down Selection List to Choose a Service Type that best describes this Job Task. |
| • | This is not a mandatory field, but if at all possible, use a predefined Service Type. |
| • | You will not be able to reassign the Job Task for an Invoice (if it was created from within this Job Task tab) unless the Service field is populated with a predefined Service Type. |
| • | Description - The default Description originally entered for the selected Service Type will be inserted. |
| • | Edit the default Description as needed. |
| • | Up to 70 characters may be entered. |
| • | Note that a Description of that length may not be printed in its entirety on some reports. |
| • | Contracted - Check this box, when your Company and the Subscriber have actually been Contractually obligated to perform this Job Task. |
| • | By default, this box is Checked. |
| • | Amount - Enter the Amount, representing this phase of the installation, that should be Invoiced for this Job Task. |
| • | Invoiced - This value is maintained by the system and shows that portion of the Amount (see above) that has been Billed to the Subscriber. |
| • | Balance - This value is maintained by the system and shows that portion of the Amount (see above) that has not yet been Billed to the Subscriber (or, if the value shown is in parentheses, is what was Over Billed to the Subscriber in comparison to the agreed upon, contracted Amount). |
| • | Start Date - Use the Drop-Down Date Selection Box to enter the Date this Job Task should be Started. |
| • | Completed - Do not enter a date here, yet (see Mark the Job Task Completed below). |
| • | Work Order - Click Down-Arrow ‚ on the Work Orders icon at the top of the Job Tasks tab, and Select the New Work Order option. |
| □ | Generate an Invoice for that Work Order - This feature is used to progressively Invoice your Subscribers for the Job. |
| • | As an example, if the Pre-Wire portion of an installation that you are Job Costing has been completed, you may want to Bill the Subscriber for that portion of the Job. |
| • | See Generate Invoices for instructions on how to create a Bill for some, or all, of the Job Tasks you've entered for this Subscriber's Job. |

