| • | This may for a Guard Response Service provided by Security Companies, a Technician from your Company, or an emergency maintenance service of some other type. |
| • | Regardless of the reason for this Dispatch, the responding person(s) will need detailed information about the Alarm Signal to which they're being sent. |
| • | Response Tickets are created for the type of response that cannot be provided by Police, Fire or Emergency Medical personnel - so that the responding person(s) will know - based on the documentation provided by the Operator - what and why they must provide this response. |
| • | A Response Ticket - containing the Subscriber's Location, Alarm Signal information, and any Operator Notes - is used for this purpose and will usually need to be printed (and then faxed) with the specific information required to properly perform this Dispatched Individual. |
| • | Access to this form is not available unless the User has been granted full rights to the Response Ticket Analysis Form within User Access Rights Form. |
| • | An Alarm Signal is "on screen" - actively being processed - that indicates this is required. |
| • | A Guard Response Service, an emergency maintenance service, or a Technician from your Company - not defined within the Town Codes form - is required to provide this response. |
| • | When documentation must be printed (and then faxed) to the appropriate personnel, a Response Ticket is required. |
| • | Even if the Dispatch is made Verbally, a Response Ticket should be created for tracking (and billing) purposes. |
| • | A Central Station Supervisor (or other qualified individual) may further document, amend, and otherwise modify the original Response Ticket, as required, using this Response Ticket Analysis dialog (the form is shown later, below). |
| • | New Response Tickets may be created. |
| • | Existing Response Tickets may be retrieved and modified. |
| • | Using this Response Ticket Analysis dialog, further processing including Response Completion information, and Response Ticket Invoicing is performed within the MKMS management module. |
| □ | Locating the desired Response Ticket record(s) - There are several ways to define a selection criteria to specify which Response Ticket(s) you want to view, update, complete and/or invoice. |
| a. | Select the field that you want to Search By to locate the Response Ticket records. |
| b. | Limit the Response Ticket records that will be listed to special cases (e.g. have been, or have not been Completed, and/or have been, or have not been Invoiced). |
| c. | Limit the Response Ticket records that will be listed to a specific CSID. |
| d. | Limit the Response Ticket records that will be listed to a range of dates based on when the Response Ticket was created. |
| e. | Limit the Response Ticket records that will be listed using any combination of these filters and selectors! |
| □ | Accessing the Response Ticket Analysis Form: |
| • | In the MKMS application on the Main Menu Select Maintenance, Choose Central Station and Click Response Ticket Analysis. |

Response Ticket Analysis dialog
| □ | Entering your Search and/or Selection Criteria: |
| • | You may use any combination of the choices described below to create a list of Response Ticket records from which to work. |
| • | Invoice Date - If you will be Invoicing your Subscribers for the cost of these alarm response services as provided for on the selected Response Tickets, use the Drop-Down Date Selection Box to Choose the Sale Date that you want to be assigned to those Invoices. |

Response Ticket Analysis search options
| • | Options - Choose whether you want to only view Open, Closed, or All Response Tickets. |
| • | All - This is the default choice. To view all of the Response Tickets - whether or not they were previously Completed, Click the All button. |
| • | Open Tickets - To view only those Response Tickets that have not been Completed, Click the Open Tickets button. |
| • | Closed Tickets - To view only those Response Tickets that were previously Completed, Click the Closed Tickets button. |
| • | Limiting the List based on whether or not they were previously Invoiced: |
| • | All - This is the default choice. To view all of the Response Tickets - whether or not they were previously Invoiced, Click the All button. |
| • | Invoiced - To view only those Response Tickets that were previously Invoiced, Click the Invoiced button. |
| • | Not Invoiced - To view only those Response Tickets that have not been Invoiced, Click the Not Invoiced button. |
| • | Select CSID - Choose whether you want to view All Response Tickets, or only those for a specifically selected CSID. |
| • | All - To view all of the Response Tickets, Click the All button. This is the default choice. |
| • | One CSID - To view the Response Tickets for a specific CSID, Click the One CSID button. |
| • |  - If One CSID was selected, Click the Ellipse button to open a Search dialog to locate the desired CSID. - If One CSID was selected, Click the Ellipse button to open a Search dialog to locate the desired CSID. |
| • | Date from...to - Use the Drop-Down date Selections Boxes to set the Date Range of the Response Tickets to be viewed. |
| • | The default Date Range is the most recent Month and includes Today. |
| • |  - Click the Refresh button to update the displayed list of Response Tickets based on the selection criteria you've defined. - Click the Refresh button to update the displayed list of Response Tickets based on the selection criteria you've defined. |
| □ | Locating specific record(s) after selecting the limits of your list: |
| • | Search By - Select the field that you want to Search By to locate the Response Ticket records. |
| • | You may use the Search By method to locate a specific Response Ticket record or to locate the first instance of the selected Search By field based on your entry in the Search field. |
| • | If no Search By action is taken, all Response Ticket records will be listed (subject to the other selection criteria explained below). |
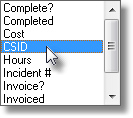
| • | Use the Drop-Down Selection List to Choose the Search By Field on which you want to perform the search. |
| • | The record choice is made based on the information that is entered in the (F2) Search field representing data that should exist in the selected Search By Field that you've chosen (see below). |
Sample Search By selections
| • | (F2) Search - Based on the Search By Field you've chosen, enter the characters (or numbers) required to locate the desired Response Ticket record. |
| • | Complete? - Not available unless previously Completed. |
| ▪ | If record(s) were previously Checked as Completed, you may enter "T" for True or "F" for False to position the cursor at the first record that matches your entry. |
| ▪ | Choosing this option will display the first record with this "T" for True or "F" for False value. |
| • | Completed - Enter "T" for True or "F" for False to position the cursor at the first record that has been completed. |
| ▪ | Choosing this option will display the first record with this "T" for True or "F" for False value. |
| • | Cost - Enter the whole dollar value to position the cursor at the first record that matches this cost. Only records with that cost are listed. |
| • | CSID - Enter the CSID to position the cursor at the first record with that CSID. Only records with that CSID are listed. |
| • | Hours - Enter the number of hours to position the cursor at the first record that matches your entry (because there may be multiple Response Tickets for the same Subscriber). Only records with that number of hours are listed. |
| • | Incident # - Enter the Incident number, that the system assigned in Processing, of the Alarm Signal for which the desired Response Ticket was created. |
| • | Invoice? - Not available unless previously Invoiced. |
| ▪ | If record(s) were previously Checked as Invoiced, you may enter "T" for True or "F" for False to position the cursor at the first record that matches your entry. |
| ▪ | Choosing this option will display the first record with this "T" for True or "F" for False value. |
| • | Invoiced - Enter "T" for True or "F" for False to position the cursor at the first record that has been invoiced. |
| ▪ | Choosing this option will display the first record with this "T" for True or "F" for False value. |
| • | Subscriber - Enter the first few letters of the Subscriber's Name. |
| ▪ | This is an incremental search in that the more letters you enter the closer you will get to the desired Response Ticket record. |
| • | Ticket - Enter the Response Ticket number assigned by the system. |
| • | - Click the Refresh button to update the displayed list of Response Tickets based on the selection criteria you've defined. |
| □ | Filter and Clear buttons -   |
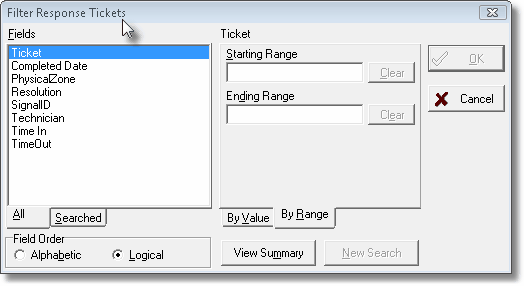
| • | The Filter button on the bottom of the Response Ticket Analysis Form provides access to the Filter Response Tickets dialog. |
| • | Once a filter is set using the Filter Response Tickets dialog, Click the Clear button on the bottom of the Response Ticket Analysis Form to remove that filter. |
| • | The Filter Response Tickets dialog allows you to custom define a complex Filter Expression to selectively limit which Response Ticket records will be listed. |
| • | The steps and choices described below may be combined to build a very complex filter. |
Filter Response Tickets dialog
| • | Fields - Offers two tabs to either Choose the Field that will be used for the Filter Expression, or to review the previous Searches performed during this session using the Filter Response Tickets dialog. |
| • | All - Select this tab to view all of the Field Names that are available for defining a Filter Expression. |
| • | Searched - Select this tab to view all of the previously defined Searches (Filter Expressions). |
| • | Field Order - Choose the order in which the Field Names will be listed in the Fields box - either alphabetically, or based on the type of field it represents. |
| • | Alphabetical - List the Field Names alphabetically by their assigned name. |
| • | Logical - List the Field Names based on the type of data it represents (Numerical, Date, Character, Date/Time). |
| • | Field Selected - Displays the Field Name (selected above). |
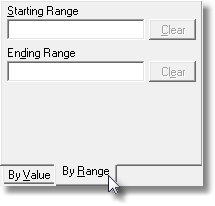
By Range tab - Filter Response Tickets
| • | By Range - Presents Starting and Ending (date, time, or numerical) Range fields (see above) that are used to define the range of (date, time, or numerical) values that are acceptable when compared to the contents of the Field Name (selected above). |
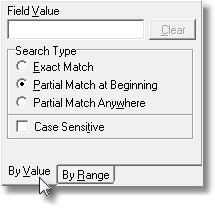
By Value tab - Filter Response Tickets
| • | By Value - Presents Field Value (character) data entry field (see above) that is used to define the expression that is acceptable when compared to the contents of the Field Name (selected above). |
| ▪ | Exact Match - Perform a non-case sensitive comparison of the entry to the exact contents of the Field Name (selected above). |
| ▪ | Partial Match at Beginning - Perform a non-case sensitive comparison of the entry, only based on the characters actually entered, from the beginning of the contents of the Field Name (selected above). |
| ▪ | Partial Match Anywhere - Perform a non-case sensitive comparison of the entry, only based on the characters actually entered, on any part of the contents of the Field Name (selected above). |
| ▪ | Case Sensitive - Check this box to enforce a precise case sensitive comparison of your Field Value entry to the contents of the Field Name (selected above) based on the matching characteristics defined above.. |
| • | View Summary - If you are defining a complex Filter Expression, you may want to review your entries as you go using the Show Search Summary dialog. |
| • | To do so, Click the View Summary button. |
| • | Click the OK ü button to close the Show Search Summary dialog. |
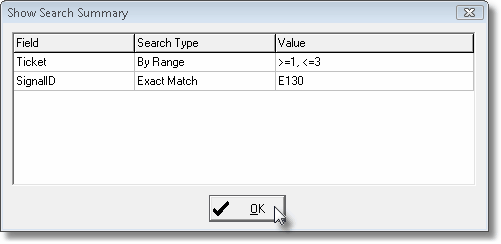
Show Search Summary dialog
| • | New Search - To start over, Click New Search to remove any Filter Expression(s) already defined, but not yet executed. |
| □ | There are four tabs on the Response Ticket Analysis Form. Except for the Main tab, these tabs (Completed, Invoiced, and Exceptions) are populated during the current session to provide a view of what has been done. Once the Response Ticket Analysis Form is closed, the contents of these tabs are emptied. |
| 1. | Main - The tab where the information relating to the actual event that required a Response Ticket be created, and the Resolution of this event, are entered. |
| 2. | Completed - During this session within the Response Ticket Analysis Form, once a Response Ticket has been updated using the Ticket # information form, the Complete? box is Checked, those updates saved, and then the Complete button is selected on the Response Ticket Analysis Form, that Response Ticket record is added to the list in the Completed tab for this session, giving you a list of which ones you've completed in this session. |
| 3. | Invoiced - During this session within the Response Ticket Analysis Form, once a Response Ticket is updated with Hours and Cost information, the Invoice? box is Checked, these pricing updates are saved, and then the Invoice button is selected on the Response Ticket Analysis Form, that Response Ticket record is added to the list in the Invoiced tab, giving you a list of which ones you've invoiced in this session. |
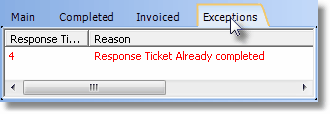
| 4. | Exceptions - If any of the above processes failed, the related Response Ticket records are inserted in the Exceptions tab. |
| □ | There are five basic steps to follow when using the Response Ticket Analysis Form: |
| 1. | Locate the Response Ticket record that needs to be modified, completed, invoiced, etc. (see Entering your Search and/or Selection Criteria above) |
| 2. | Double-Click on the specific Response Ticket record to open the Ticket # processing form (also see Main below). |
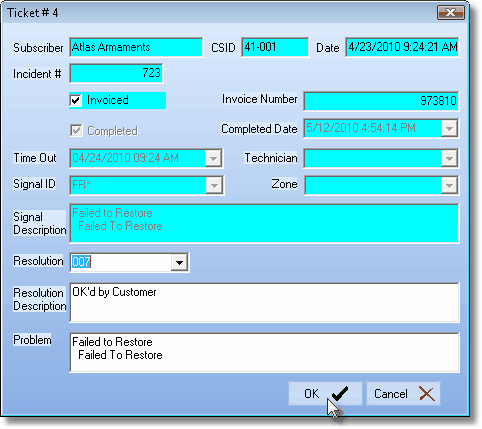
Ticket # form opened by Double-Clicking a specific Response Ticket record
| 3. | Update that form with the required information (see Using the Ticket # Information Entry Form below). |
| 4. | Mark it Completed when all required processing is done (see Completed below). |
| 5. | Invoice for the work required for the response (see Invoiced below). |
| □ | Main - Updating an existing Response Ticket using the Response Ticket Analysis Form by Double-Clicking on the desired Response Ticket record to open the Ticket # Form: |
| • | Predefined Information: This information is inserted based on the original Alarm Signal and the Response Ticket created by the Operator and any additional information added later. |
| • | Subscriber - The name of the Subscriber whose Subscriber Panel record contains the CSID which transmitted the original Alarm Signal. |
| • | CSID - The CSID that was transmitted with the Alarm Signal for which the Response Ticket was created by the Operator. |
| • | Date - The date and time the Response Ticket was created by the Operator. |
| • | Incident # - The system assigned control number of the Alarm Signal for which the Response Ticket was created. |
| • | Invoiced - This box will be Checked if the services provided for this Response Ticket have been Invoiced to the Subscriber. |
| • | Invoice Number - The Invoice Number assigned by the system when this Response Ticket was Invoiced. |
| • | Completed - This box will be Checked if this Response Ticket has been previously marked as Completed. |
| • | Completed Date - The date assigned by the system when this Response Ticket was marked Completed. |
| • | Time Out - The time - entered by the Operator - when this Response Ticket was assigned to the appropriate responder. |
| • | Technician - If this is a Manually Entered Response Ticket, a Technician will be entered. |
| • | Signals ID - There are two possible sources of this entry: |
| 1. | If an Alarm Signal occurred that required this Response Ticket the Signal ID for the event will be entered here. |
| 2. | If this is a Manually Entered Response Ticket, a Signal Identifier will have been entered by the User who created the Response Ticket. |
| • | Zone - There are two possible sources of this entry: |
| 1. | If an Alarm Signal occurred that required this Response Ticket and a Physical Zone was also transmitted, that Zone will be entered here. |
| 2. | If this is a Manually Entered Response Ticket, and a Physical Zone was entered by the User who created the Response Ticket, that Zone will be entered here. |
| • | Signal Description - There are two possible sources of this entry: |
| 1. | If an Alarm Signal occurred that required this Response Ticket the Condition Code's description will be entered here. |
| 2. | If this is a Manually Entered Response Ticket, the issue(s) that made this response necessary, entered by the User who created the Response Ticket, will appear here. |
| • | Updated information: This information may have been updated more than once, if required. |
| • | Resolution - Chosen Resolution Code. |
| • | Resolution Description - Detailed explanation of the Resolution of the Response Ticket. |
| • | Problem - Entry that better reflects what the actual issue was as seen and resolved by the assigned Responder. |
| □ | Using the Ticket # Information Entry Form: |
| • | Double-Click on an existing Response Ticket record to open the Ticket # Form: |
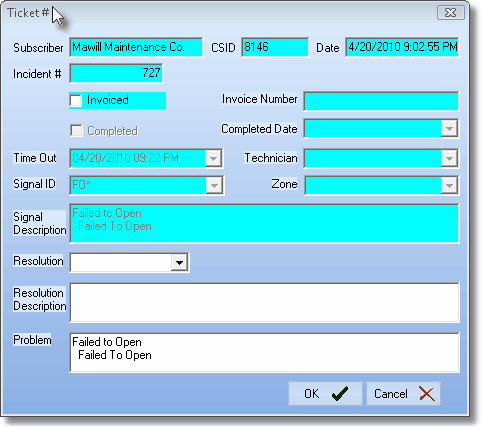
Ticket # form opened by Double-Clicking a specific Response Ticket record
| • | Predefined Information: This information is inserted based on the original Alarm Signal and the Response Ticket created by the Operator. |
| • | Subscriber - The name of the Subscriber whose Subscriber Panel record contains the CSID which transmitted the original Alarm Signal. |
| • | CSID - The CSID that was transmitted with the Alarm Signal for which the Response Ticket was created by the Operator. |
| • | Date - The date and time the Response Ticket was created by the Operator. |
| • | Incident # - The system assigned control number of the Alarm Signal for which the Response Ticket was created. |
| • | Invoiced - This box will be Checked if the services provided for this Response Ticket have been Invoiced to the Subscriber. (See Invoiced below) |
| • | Invoice Number - The Invoice Number assigned by the system when this Response Ticket was Invoiced. |
| • | Completed - This box will be Checked if this Response Ticket has been previously marked as Completed. (See Completed below) |
| • | Completed Date - The date assigned by the system when this Response Ticket was marked Completed. |
| • | Time Out - The time - entered by the Operator - when this Response Ticket was assigned to the appropriate responder. |
| • | Technician - If this is a Manually Entered Response Ticket, a Technician will be entered. |
| • | Signals ID - There are two possible sources of this entry: |
| 1. | If an Alarm Signal occurred that required this Response Ticket the Signal ID for the event will be entered here. |
| 2. | If this is a Manually Entered Response Ticket, a Signal Identifier will have been entered by the User who created the Response Ticket. |
| • | Zone - There are two possible sources of this entry: |
| 1. | If an Alarm Signal occurred that required this Response Ticket and a Physical Zone was also transmitted, that Zone will be entered here. |
| 2. | If this is a Manually Entered Response Ticket, and a Physical Zone was entered by the User who created the Response Ticket, that Zone will be entered here. |
| • | Signal Description - There are two possible sources of this entry: |
| 1. | If an Alarm Signal occurred that required this Response Ticket the Condition Code's description will be entered here. |
| 2. | If this is a Manually Entered Response Ticket, the issue(s) that made this response necessary, entered by the User who created the Response Ticket, will appear here. |
| • | Update with appropriate information: This information should be entered, as required. |
| • | Resolution - Use the Drop-Down Selection List to Choose the appropriate Resolution Code. |
| • | Resolution Description - Enter a more detailed explanation of the Resolution of the Response Ticket. |
| • | Problem - Modify this entry - by default, it will be the description of the Signal ID - to better reflect what the actual issue was as seen and resolved by the assigned Service Responder. |
| • | Save the record: Click the OK ü button to record your entries and Close the form (or Cancel to ignore your entries and Close the form). |
| □ | Completed - The Response Ticket records that have been successfully completed during this specific analysis session will be listed within the Completed tab. |
| • | To Complete a Response Ticket record, follow the steps outlined below. Once completed, the Response Ticket will be listed within the Completed tab. |
| • | Select the appropriate record. |
| • | Double-Click that item to open the Ticket # dialog (see Using the Ticket # Information Entry Form for an illustration of a sample Ticket # Form). |
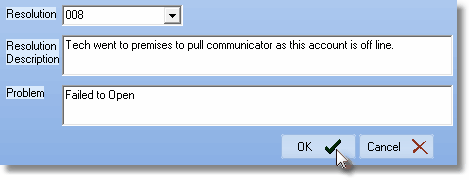
| • | Resolution - Use the Drop-Down Selection List to Choose the appropriate Resolution Code. |
| • | Resolution Description - Enter a more detailed explanation of the Resolution of the Response Ticket. |
| • | Problem - Modify this entry - which by default will be the description of the Signal ID - to better reflect what the actual issue was as seen and resolved by the assigned Service Responder. |
| • | Save the record: Click the OK ü button to record your entries and Close the form Ticket # (or Cancel to ignore your entries and Close the form). |
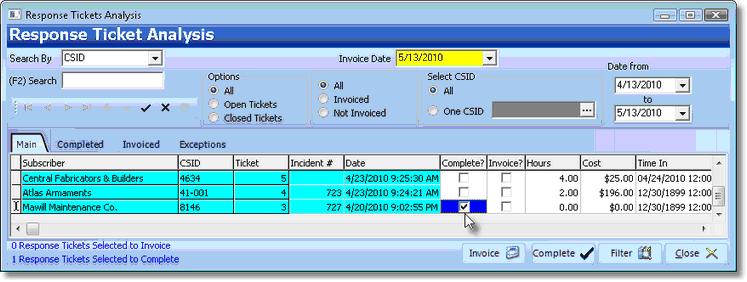
Response Ticket Analysis form with Complete box Checked
| • | Complete? - Check the Complete? box to indicate that the appropriate information for this Response Ticket record has been entered on the Ticket # Form. |
| • | Complete ü button - When all of the Response Ticket records have been updated with the necessary information, and their Complete? boxes have been Checked, Click the Complete button on the bottom of the Response Ticket Analysis Form. |
| • | The Response Ticket records that have been successfully completed will be listed within the Completed tab. |
| • | Any records that could not be successfully Completed will be listed within the Exceptions tab (see Exceptions below). |
| □ | Invoiced -The Response Ticket records that have been successfully invoiced (see above) will be listed within this tab. |
| • | To Invoice a Response Ticket record, follow the steps outlined below. Once completed, the Response Ticket will be listed within the Invoiced tab. |
| • | Select the appropriate Response Ticket record. |
| • | Hours - Enter the Time required to complete the tasks assigned to the Service Responder. |
| • | Cost - Enter the Hourly Rate to be charged to the Subscriber for the task completed by the Service Responder.. |
| • | Invoice? - Check the Invoiced? box to indicate that the appropriate Hours and Cost to Invoice this Response Ticket record has been entered |
| • | Invoice button - When all of the Response Ticket records have been updated with Hours and Cost information, and their Invoice? boxes have been Checked, Click the Invoice button on the bottom of the Response Ticket Analysis Form. |
| • | The Response Ticket records that have been successfully billed will be listed within the Invoiced tab. |
| • | Any records that could not be successfully Invoiced will be listed within the Exceptions tab (see Exceptions below). |
| □ | Exceptions - Any Response Ticket records that could not be Completed or Invoiced (because of a system problem, user error, or some missing data) will be listed for reference within this Exceptions tab. |
Exceptions tab on the Response Ticket Analysis form

