| □ | There are times when an Operator must perform a Dispatch for an Alarm Signal that does not require Police, Fire or Emergency Medical personnel. |
| • | This Dispatch may be for an emergency maintenance service, a specialized security response, or any other type of response that cannot be provided by normal Police, Fire or Emergency Medical personnel. |
| • | A Response Ticket may need to be printed (faxed, emailed, etc.) with specific information relating to this Dispatch. |
| □ | Why use the Response Ticket function? |
| • | Generally, a Response Ticket is initially created in MKMSCS by an Operator while Processing Alarms because: |
| • | An Alarm Signal is "on screen" - actively being processed - that indicates this is required. |
| • | A Guard Response Service or an emergency maintenance service, or a Technician from your Company - not defined within the Town Codes Form - is required. |
| • | A Response Ticket is required for any other appropriate reason and so must be printed (and faxed) to the responding personnel. |
| • | Existing Response Tickets may be retrieved, viewed and reprinted, if necessary. |
| • | No additional information may be entered here on a Response Ticket that has already been added, updates can only be made using the Response Ticket Analysis dialog . |
| • | However, new Response Tickets may be created without having an Alarm Signal currently on screen being processed. |
| • | Using the Response Ticket Analysis dialog, further processing, Response Completed information, and Response Invoicing may also be accomplished later within the MKMS management module. |
| □ | Response Tickets may be created (and printed as needed) two ways: |
| • | While an Alarm Signal is being Processed: |
| • | The Operator may Press Shift+F6 to create a Response Ticket. |
| • | A single Response Ticket record will be displayed with the current Alarm Signal information already entered. |
| • | Additional information may be added to provide guidance for the person who will be responding. |
| • | The Operator may print the Response Ticket record, if needed. |
| • | When an Alarm Signal is Not being Processed: |
| • | The Operator may Choose the Response Tickets option on the Actions Menu. |
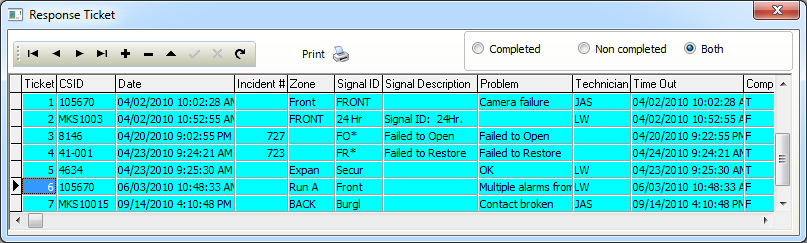
| • | The Response Ticket records Form will be displayed. |
| • | A new Response Ticket record may be entered by Clicking the Add (+) button. |
| • | The Operator may Select a specific Response Ticket record to Print. |
| □ | When a Response Ticket is required: |
| • | While an Alarm Signal is being Processed and an Operator must perform a Dispatch for an Alarm Signal that does not include Police, Fire or Emergency Medical personnel, use the Response Ticket to document the type of response that is required: |
| • | This may be for a Guard Response Service provided by Security Companies, an emergency maintenance service, or a Technician from your Company. |
| • | What ever the reason, the responding person(s) will need detailed information about the Alarm Signal to which they 're being sent. |
| • | Response Tickets may be used for virtually any type of response that cannot be provided by Police, Fire or Emergency Medical personnel - to know how to perform the appropriate alarm response. |
| • | A printed Response Ticket - containing the Subscriber's Location, Alarm Signal information, and any Operator Notes - will be printed (and then perhaps faxed) once the Operator has added the specific information required to properly perform this Dispatch. |
Response Ticket Form
| □ | Entering a Response Ticket: |
| • | The MKMSCS application provides the Operator with an easy to use method to document - based on the Alarm Signal currently being processed - the requirements of this specialized Dispatch. |
| • | When an Alarm Signal is on screen being Processed and the initial Verification has been completed, Press Shift+F6 to create a Response Ticket. |
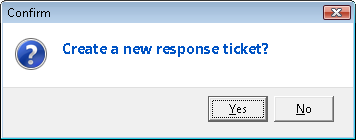
Create a new response ticket?
| • | Click the Yes button to Confirm that you do want to create a New Response Ticket. |
| • | The Response Ticket form will be displayed - with a record that is already populated with information related to the current Alarm Signal being processed. |
New Response Ticket with current Alarm Signal Information already entered
| • | Ticket ... Time Out - The information for the current Alarm Signal is automatically inserted. |
| ▪ | Signal ID - The Signal Identifier for the current Alarm Signal is automatically inserted. |
| ▪ | Zone - The Physical Zone (if provided) for the current Alarm Signal is automatically inserted. |
| ▪ | Technician - This field will be blank until the Supervisor (or other appropriate person) modifies or completes it using the Response Ticket Analysis Form. |
| • | Operator Actions - The Operator should enter any appropriate Notes, Time Out information and Problem clarification, as may be required. |
| ▪ | Time Out - By default, the current date and time is inserted in the Time Out field when this Response Ticket is requested. This information may be modified. |
| ▪ | Problem - The individual CSID Zone (or Panel Zone) description and the alarm's Condition Code description are inserted when this Response Ticket is requested. This information may be modified. |
| ▪ | Notes - The Operator may add any additional information that may be appropriate. |
| • | Click Save ("ü") to record the Response Ticket. |
| • | Print - Click the Print at the top of the Form to produce the Response Ticket. |
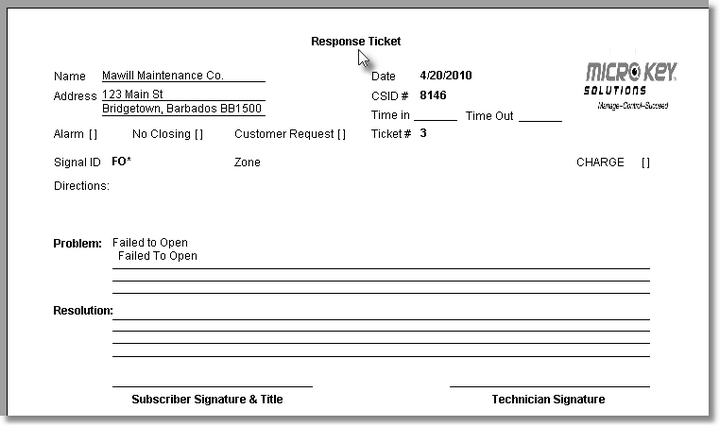
Sample Response Ticket
| □ | When an Alarm Signal is Not being Processed: |
| • | On the Actions menu Select Response Ticket, or Press Shift+F6 to open the Response Ticket dialog. |
Response Ticket dialog
| • | Click Add (+) to open the Search dialog so that the appropriate Subscriber record may be located. |
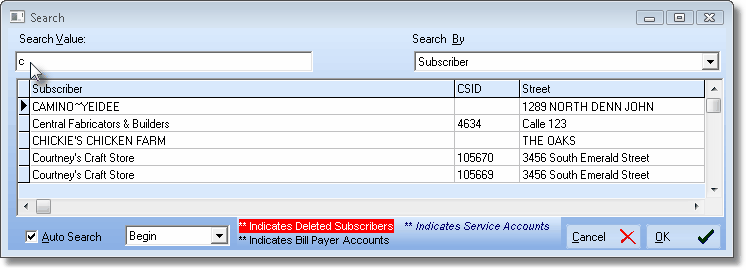
| • | Once the desired Subscriber record has been found, Click on that record and then Click the OK button. |
| • | A new record line will be inserted with the CSID (and the current Date and Time) of the selected Subscriber. |

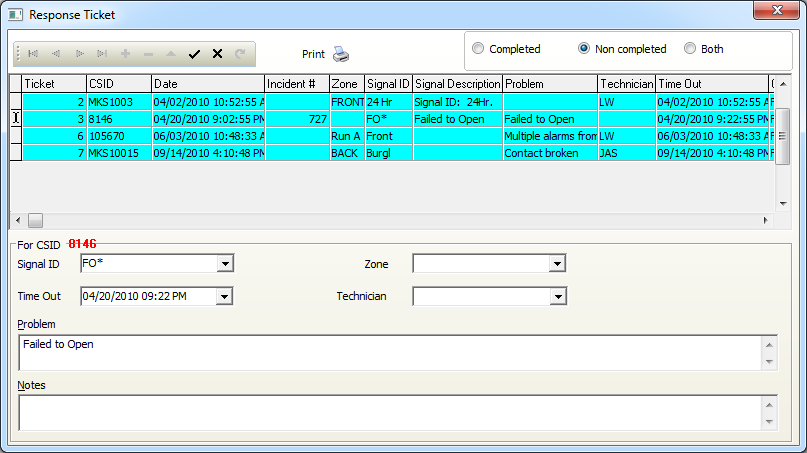
| • | The expanded Response Ticket dialog is displayed where the other required information may be entered. |
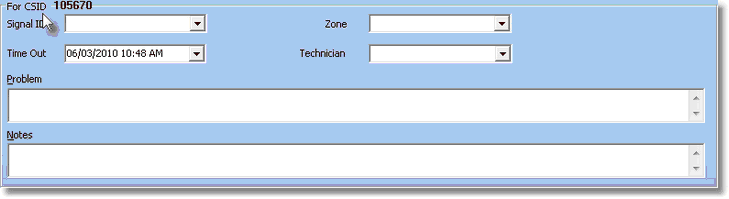
Manual entry dialog used to create a new Response Ticket
| • | Signal ID - Use the Drop-Down Selection List to Choose the Signal Identifier for the event needing the response. |
| • | Zone - Use the Drop-Down Selection List to Choose the Physical Zone (if appropriate) for the event needing the response. |
| • | Time Out - By default, the current date and time is inserted in the Time Out field when this Response Ticket is started. This information may be modified. |
| • | Technician - Use the Drop-Down Selection List to Choose the Technician (if appropriate) assigned to the event needing the response. |
| • | Operator Actions - The Operator should enter any appropriate Notes and Problem clarification, as may be required. |
| • | Problem - Enter a description of, or reason for the event needing the response. |
| • | Notes - The Operator may add any additional information that may be appropriate. |
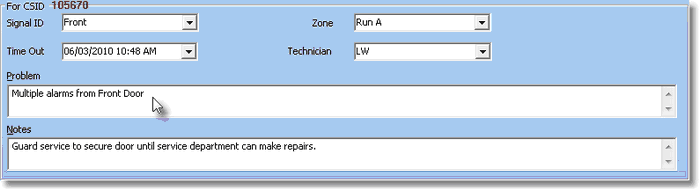
Information required for the Manual entry of a new Response Ticket
| • | Click the Save ("ü") button at the top of the Form to record the Response Ticket. |
| • | The information you entered above will be inserted into the new record line. |
| • | The new record will be moved to the bottom of the list. |
| • | Print - Click the Print at the top of the Form to produce the Response Ticket because this will be the selected record. |

