| • | The Details of a Work Order that is Selected within the Work Order Listing will be shown in the three tabs located immediately below the Work Order Listing. |
| 1. | Work Order - Shows basic information, time and charges for the currently selected Work Order record within the Work Order list. |
| 2. | Labor - Allows for the entry of the time and charges for each Technician that serviced this Work Order. |
| 3. | Inventory\Materials - Allows for the entry of Inventory Items and miscellaneous Materials expenses required to service this Work Order. |
| • | Work Order tab - Within the Work Order Listing, Click on (i.e., select) a Work Order record. |
| • | The current information about the selected Work Order will be shown within the Work Order tab (illustrated below). |
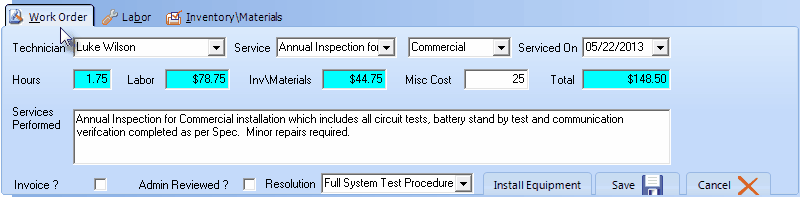
Work Order Invoicing/Review - Work Order tab
| • | Technician - If not entered, use the Drop-Down Selection List to Choose the Lead Technician for this Work Order. |
| ▪ | You may also attribute the Labor hours and charges for this Work Order to more than one Technician, as needed (following the instructions in Labor tab below). |
| ▪ | However, this Technician selection represents the "Technician of Record" (a.k.a. "Lead Technician") for this Work Order. |
| • | Service - If not entered, use the Drop-Down Selection List to Choose the Service Type that best characterizes this Work Order. |
| ▪ | Service Category - Use the Drop-Down Selection List in the field to the right and Choose the Service Category related to the Service Type that best characterizes this Work Order. |
| • | Serviced On -If not entered, use the Drop-Down Date Selection Box to enter the date that this service was performed. |
| • | Hours - This number represents the sum of all man-hours charged for Labor from all the Technicians that performed work for this Work Order. |
| • | Labor - This number represents the total Bill Rate charges for Labor from all the Technicians that performed work for this Work Order. |
| • | Inv\Materials - This number represents the total Retail Price charges for Inventory\Material items used for this Work Order. |
| • | Misc Cost - Enter any Miscellaneous Costs - beyond those entered for Labor and Inventory\Material. |
| ▪ | Comments may be entered in the Services Performed field to clarified this charge. |
| • | Total - This number represents the sum of the "Retail" Labor, Inventory\Material and Miscellaneous Costs, including Sales Tax. |
| • | Services Performed - Enter a description of the work that was actually performed. |
| • | Admin Review? - Check this box to indicate the an Administrator has reviewed this Work Order. |
| • | Resolution -If not entered, use the Drop-Down Selection List to Choose the appropriate Work Order Resolution for this Work Order. |
| • | Save - Click the Save < button to record this Work Order update. |
| • | Cancel - Click the Cancel button to abort this edit. |
| • | Labor tab - Click the Labor tab to add and/or update the information relating to the Technician(s) that worked on this Service Request, and the Labor Hours that are to be charged to this Service Request (Work Order). |
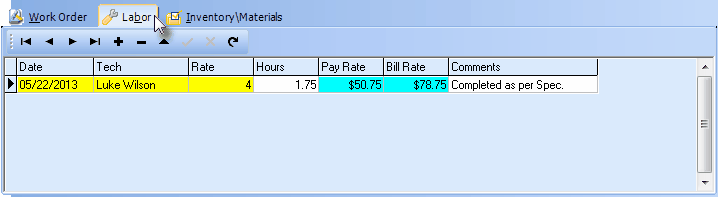
Work Order Invoicing/Review Form - Labor tab
| • | Date - Use the Drop-Down Date Selection Box to enter the Date that this Labor was provided. |
| • | Tech - Use the Drop-Down Selection List to Choose the Technician that performed this Labor. |
| • | Rate - Use the Drop-Down Selection List to Choose the Rate Code that will be used to calculate the cost and retail price charged for this Labor. |
| ▪ | Consider defining a "Warranty" Pay Rate for the Technician which would have the appropriate Internal Pay Rate but a Bill Rate of $0.00 |
| ▪ | In this manner, when Completing a Service Request, the "Cost" and "Hours" of Labor that was required may be properly tracked and a No Charge Invoice could be sent to the Subscriber indicating what was done, but that there would be was no charges to them. |
| • | Hours - Enter the number of Hours of Labor that will be charged to this Work Order. |
| • | Comments - Double-Click this field to enter a brief description (for internal use only) of the Labor charge. |
| • | Click Save ("ü") to complete the entry. |
| ► | Note: If you want to create a No Charge Invoice, : |
| o | Be sure to re-set the Price to $0.00 in all cost related fields. |
| o | Use a "Warranty" Pay Rate for the Technician which would have the appropriate Internal Pay Rate but a Bill Rate of $0.00 (see the Rates tab on the Employee Form for more information about this entry). |
| o | In this manner Labor costs and Inventory Usage may be accounted for, and the Work Order processing procedure can be properly "finished" . |
| • | Inventory\Materials tab - Click the Inventory/Materials tab to record the Inventory and other Materials and Expenses that will be charged to this Work Order. |

Work Order Invoicing/Review Form - Inventory\Materials tab
| • | Item - Use the Drop-Down Selection List to Choose the Sale Purchase Item that was used on this Work Order. |

Sale-Purchase Items Drop-Down Select Box list
| • | Description - By default, this will be the description defined for the selected Sale Purchase Item. This may be modified, if required. |
| • | Qty - By default, this will be 1. Enter the quantity of this item that was actually used. |
| • | Cost - By default, this will be the Retail Price defined for the selected Sale Purchase Item. This may be modified, if required. |
| • | Net - The result of the Retail Price times the Quantity used. |
| • | Tech - Use the Drop-Down Selection List to Choose the Technician that used this Inventory or incurred the Materials charges. |
| ▪ | Use the Drop-Down Selection List to Choose the Warehouse from which this Inventory Item was actually taken, if it was not the Default. |
| • | Click Save ("ü") to complete the entry. |
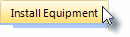
| • | Click the Install Equipment button located at the bottom of the Work Order tab to open the Add Installed Equipment dialog. |
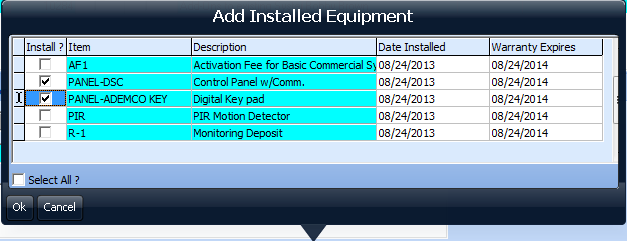
Add Installed Equipment dialog
| • | Date Installed - By default, the Date Installed will be Today. |
| ▪ | Use the Drop-Down Date Selection Box to change this component's Installation Date. |
| • | Warranty Expires - By default, the Warranty Expires will be one Year after the default Installed Date (see above). |
| ▪ | Use the Drop-Down Date Selection Box to change this component's Warranty Expiration Date. |
| • | Ok - Click the Ok button to record this information and Close the Add Installed Equipment dialog. |

