| □ | The Alarm History Lookup Form allows a User or Operator to locate, and view Alarm Signal History based on the selected Options (and append additional information, if the Alarm History Lookup Form was opened from within MKMS). |
| 1. | To perform an Alarm History Lookup, within MKMS on the Main Menu Select Maintenance and Choose Central Station then Click Alarm History Lookup. |

Initial Alarm History Lookup dialog
| ► | Note 1: If the Operator needs to Add Information to the Signal History Detail of an Alarm's Signal History: |
| 4) | Select the appropriate Signal. |
| 5) | Click the Down Arrow ‚ on the Add Info button |
| ► | Note 2: If an Operator needs to Cancel a Dispatch, (s)he may do so as follows: |
| 4) | Select the appropriate Signal. |
| 5) | Click the Down Arrow ‚ on the Add Info button |
| 6) | Select the appropriate Cancellation Option |
| 7) | Complete the required information |
| ► | Note 3: If the Alarm History Lookup Form is opened from within MKMSCS - either by Pressing Shift+F4 or Clicking the Alarm History Icon on the Shortcuts tab to open the Alarm History Lookup Form - the Add Detail option is not available. |
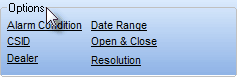
| □ | Options - There are six (6) search criteria Alarm History Lookup Options provided for defining what Alarm Signal History will be displayed: |
Alarm History Lookup Form - Filter Options
| • | Click the desired Filter Option to construct a Filter Statement. |
| • | Select the appropriate item(s) |
| • | The initially selected Option may be combined with up to two additional Filter Options to construct a Multi-Filter Statement. |
| • | Click the Execute button to initiate the selected Option(s). |
| • | To start a new Filter, Click Clear to remove any previously entered Filter Options. |
| □ | Alarm History Lookup Filter Options: |
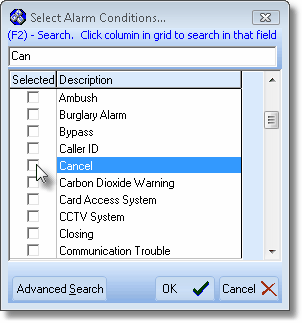
| 1. | Alarm Condition - Click Alarm Condition to open the Select Alarm Conditions dialog. |
Select Alarm Conditions dialog
| • | On the Select Alarm Conditions dialog, Check as many boxes in the Selected column as needed to look up the Alarm Condition(s) Alarm History that you want to examine. |
| • | All of the Alarm Conditions that are Checked will be included in the Alarm History Lookup list. |
| • | (F2) Search - If there are too many items in the Select Alarm Conditions list to easily locate the desired Alarm Conditions: |
| ▪ | Click on any Description name and then enter an Alarm Condition in the (F2) Search field to perform an incremental search to locate a specific description. |
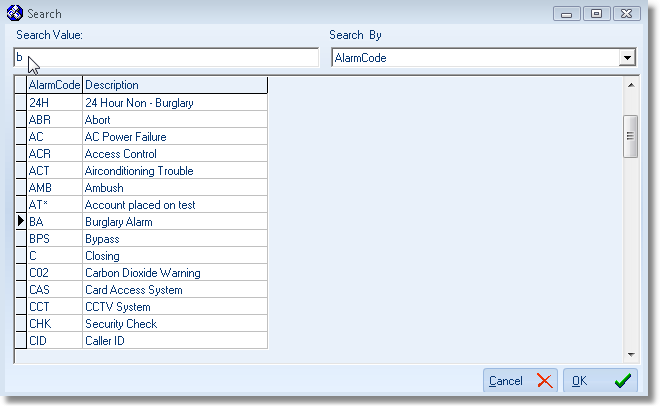
Alarm Condition Code Search dialog
| ▪ | The Alarm History Lookup Form, will be displayed. |
| ▪ | This Alarm Condition Code option (or any other option) may be combined with up to two additional Filter Options to construct a Multi-Filter Statement |
| • | Click the Execute button. |
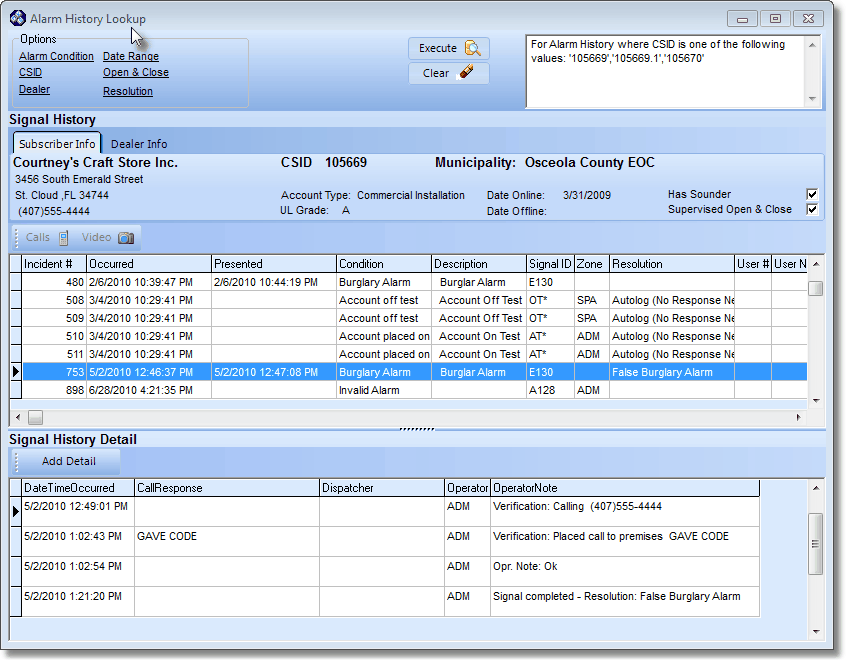
Alarm History Lookup Form - with Signal History and Signal Detail sections
| • | The Subscriber Information for the selected Signal History is displayed, and will list the Signal History including the Signal History Detail specified (see above) based on the Alarm Condition Code(s) that are Checked. |
| ► | Note 1: If the Alarm History Lookup dialog is opened within MKMSCS by Pressing Shift+F4 or Clicking the Alarm History Icon on the Shortcuts tab to open the Alarm History Lookup Form, the Add Detail option is not available. |
| ► | Note 2: If the Operator needs to Add Information to the Signal History Detail of an Alarm or Cancel an Alarm, open the Sub Info (F2) Form and Select the History option on the Panel Information Menu Bar. |
| • | The Signal History and the Signal History Detail column's width and location may be reset as desired on a User by User basis. |
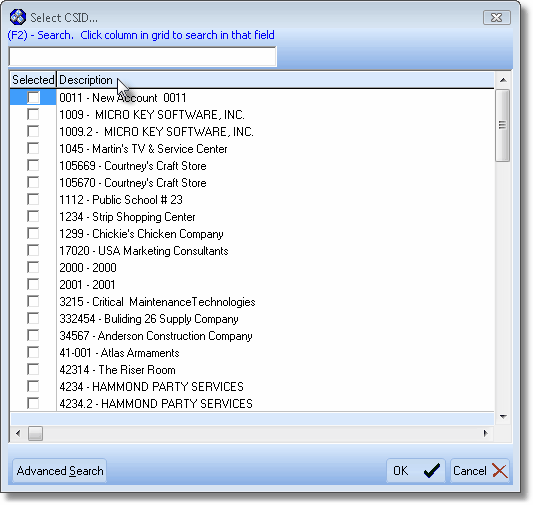
| 2. | CSID - Click CSID to open the Select CSID dialog. |
| • | On the Select CSID dialog, Check as many boxes in the Selected column as needed to look up the CSID(s) Alarm History that you want to examine. |
| • | Click the Description header bar to re-order the list from lowest to highest, to highest to lower CSID order. |
Select CSID dialog listing Subscribers in CSID order
| • | Search - If there are too many items in the Select CSID list to easily locate the desired Subscribers: |
| ▪ | Click any record within the Description field. |
| ▪ | Press F2 to place the cursor in the Search field. |
| ▪ | Enter the Search Value. representing the desired CSID. |
| ▪ | Your selection will be Checked on the Select CSID list. |
| ▪ | Repeat as needed until you have selected all of the required Subscribers. |
| • | Click the OK P button when finished making all needed selections. |
| • | The Search CSID dialog will close. |
| ▪ | This CSID option (or any other option) may be combined with another Filter Option to construct a Multiple Filter Statement. |

Alarm History Lookup - Multiple Filter Statement
| ▪ | Click the Execute button on the Alarm History Lookup Form. |
| • | The Alarm History Lookup Form will display the currently selected Subscriber, listing the Signal History and include the Signal History Detail. |
| • | Advanced Search - If you are unable to quickly locate a desired Subscriber record, Click the Advanced Search button to search by Subscriber Name or CSID. |
| 3. | Dealer - Click Dealer to open the Select Dealer dialog. |
| • | On the Select Dealer dialog, Check as many boxes in the Selected column as needed to look up the Dealer(s) Alarm History that you want to examine. |
| • | Search - If there are too many items in the Select Dealer list to easily locate the desired Subscribers: |
| ▪ | Click on the desired Item(s). |
| ▪ | Your selection will be Checked on the Select Dealer list. |
| ▪ | Repeat as needed until you have selected all of the required Dealers. |
| ▪ | This Dealer option (or any other option) may be combined with another Filter Option to construct a Multiple Filter Statement. |
| ▪ | Click the Execute button on the Alarm History Lookup Form. |
| • | The Alarm History Lookup Form will be displayed, with the currently selected alarm signal's Subscriber information, listing the Signal History and include the Signal History Detail specified. |
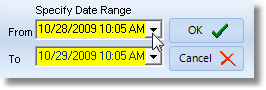
| 4. | Date Range - Click Date Range to open the Specify Date Range dialog. |
| • | By default, The By default, the current Month is inserted. presented is the immediate past 24 hours. |
Specify Date Range dialog
| • | From - Use the Drop-Down Date Selection Box to Choose the starting Date. |
| ▪ | Click on the Hours, Minutes, and/or AM/PM columns. |
| ▪ | Use the up and down arrows to adjust the time precisely. |
| • | To - Use the Drop-Down Date Selection Box to Choose the ending Date. |
| ▪ | Click on the Hours, Minutes, and/or AM/PM columns. |
| ▪ | Use the up and down arrows to adjust the time precisely. |
| • | This Date Range option may be combined with up to two additional Filter Options to construct a Multiple Filter Statement such as shown below: |

Two Filters applied including a Date Range selection Plus a Dealer Code selection

Three Filters applied including a Dealer code, a Date Range selection Plus Open & Closing Signals only
| • | Click the Execute button on the Alarm History Lookup Form. |
| • | The Alarm History Lookup Form will be displayed, with the currently selected alarm signal's Subscriber information, listing the Signal History and include the Signal History Detail specified. |
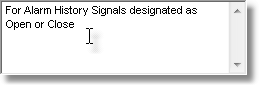
| 5. | Open & Close - Click Open & Close to view the Signal History of all Opening and Closing Events. |
| • | The events are displayed from the oldest to the newest. |
| • | Press the Control key plus the End key (Ctrl+End) to move to the most recent event. |
| • | Press the Control key plus the Home key (Ctrl+Home) to return to the oldest event. |
| ▪ | This Open & Close option (or any other option) may be combined with another Filter Option to construct a Multiple Filter Statement. |
| ▪ | Click the Execute button on the Alarm History Lookup Form. |
| • | The Alarm History Lookup Form will be displayed, with the currently selected alarm signal's Subscriber information, listing the Signal History and include the Signal History Detail specified. |
| 6. | Resolution - Click Resolution to open the Select Resolution dialog. |
| • | On the Select Resolution dialog, Check as many boxes in the Selected column as needed to look up the Resolution Code(s) Alarm History that you want to examine. |
| • | Search - If there are too many items in the Select Resolution list to easily locate the desired code Description: |
| ▪ | Click on the desired Item(s). |
| ▪ | Your selection will be Checked on the Select Resolution list. |
| ▪ | This Resolution option (or any other option) may be combined with another Filter Option to construct a Multiple Filter Statement. |
| ▪ | Click the Execute button on the Alarm History Lookup Form. |
| • | The Alarm History Lookup Form will be displayed, with the currently selected alarm signal's Subscriber information, listing the Signal History and include the Signal History Detail specified. |
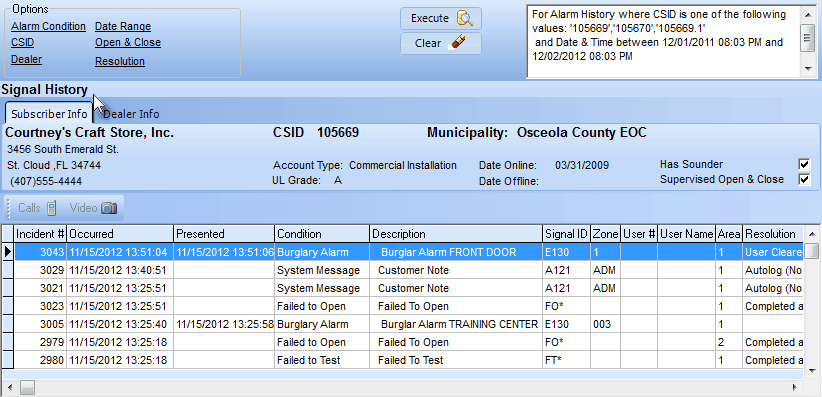
| □ | Signal History - This section - immediately below the Options box - offers: |
| • | Two tabs (Subscriber Info and Dealer Info), |
| • | A Calls and/or Video and/or Map button (these buttons will individually be activated only if those functions have been registered and the Selected Signal History record has associated Calls and/or Video and/or Map coordinate data) |
| • | The Signal History List based on the specified selection option(s). |
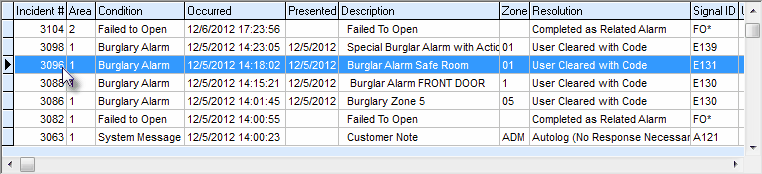
Signal History Form - Subscriber Info tab selected - Signal Incident # highlighted
| • | Subscriber Info tab - Contains specifics on the Subscriber whose Alarm Signal is highlighted |

Alarm History Lookup - Subscriber Info tab
| • | Dealer Info tab - If this is a Subscriber who is being monitored for another Alarm Dealer, that Dealer's location and contact information will be shown. |

Alarm History Lookup - Dealer Info tab
| • | Alarm Signals - All specified Signal History will be listed. |
Alarm History Lookup - Signal History List
| • | You may Click on a specific alarm signal record (see the mouse pointer in the illustration above) to display the processing information associated with that alarm signal record. |
| • | If the Alarm History Lookup Form was opened within MKMSCS, there is no Add Detail tab. |

Alarm History Lookup - Signal History Detail - No Add Detail
| • | If the Alarm History Lookup Form was opened within MKMS, there will be an Add Detail button. |

Signal History Detail section of the Alarm History Lookup Form - Shown with Add Detail tab
| • | Manual Signal Detail - If the Alarm History Lookup Form was opened from within MKMS, Click the Add Detail tab in the Signal History Detail section to manually enter additional (follow-up) Signal History Detail. |

