| □ | The Inventory Listing Report provides complete list of the Inventory Items - based on the customized based on the choices you make (explained below). |
| • | Understanding the Cost and Value columns on the Inventory Listing Report: |
| ▪ | Inventory Used in Job Costing (see the Inventory and related sub-chapters in the Job Costing section of the Help Files) |
| ▪ | Purchased (see the Bills chapter) |
| ▪ | Sold (see the Sales chapter) |
| • | The (Total) Value is the Cost times the Quantity On Hand. |
| ▪ | The (Total) Value uses the Cost assigned by that selected Inventory Valuation Method multiplied by the Quantity On Hand to calculate that (Total) Value. |
| • | To access this Inventory Listing Report, on the Main Menu Select Reports and Choose Inventory Reports. |
| • | Click the Inventory Listing option. |
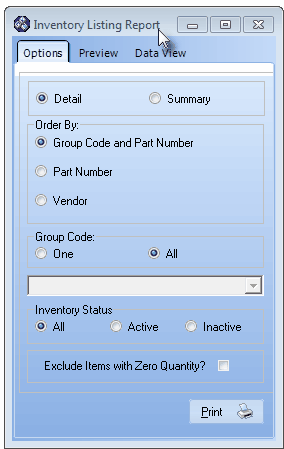
Inventory Listing Report Options
| • | Options - Initially only the Options tab is shown (until you make your Options selections and Select Print). |
| • | Detail/Summary - Select whether you want a detailed or summary style Inventory Listing report. |
| ▪ | The Summary choice will simply list the basic information for each Inventory Item. |
| ▪ | The Detail report will, additionally, breakdown the information by warehouse. |
| • | Order By - Establish the sequence the Inventory Items will be listed. |
| ▪ | Group Code and Part Number - The default - sorts the Inventory Items by Group Code, then within each Group, by Part Number (Item ID). |
| ▪ | Part Number - Sort the Inventory Items by Part Number. |
| ▪ | Vendor - Sort the Inventory Items by Vendor, then within each Vendor, by the Inventory Items Part Number (Item ID). |
| • | Group Code - If Group Code and Part Number order was selected, you may include Inventory Items for All Group Codes, or One specific Group Code. |
| ▪ | One - Click this button to report Inventory Items for only one Group Code. |
| o | Use the Drop-Down Selection List to Choose the appropriate Group Code. |
| ▪ | All - The default. All Inventory Items will be listed, regardless of Group Code or Part Number (Item ID). |
| • | Part Number - If Part Number order was selected, you may include Inventory Items for All Part Numbers, or One specific Part Number. |
| ▪ | One - Click this button to report Inventory Items for only one Part Number. |
| o | Use the Drop-Down Selection List to Choose the appropriate Part Number (Item ID). |
| ▪ | All - The default. All Inventory Items will be listed, regardless of Part Number (Item ID). |
| • | Vendor - If Vendor order was selected, you may include Inventory Items for All Vendors, or One specific Vendor. |
| ▪ | One - Click this button to report Inventory Items for only one Vendor. |
| o | Use the Drop-Down Selection List to Choose the appropriate Vendor. |
| • | Inventory Status - Retired Inventory Items - those Checked as Inactive on the Sale-Purchase Items Form - may be included or excluded in this list. |
| ▪ | All - All Inventory Items will be listed. |
| ▪ | Active - Only Active Inventory Items will be listed. |
| ▪ | Inactive - Only Inactive Inventory Items will be listed. |
| • | Exclude Items with Zero Quantity? - Check this box to prevent those Inventory Items which have a Quantity of "0" in all reporting columns from being included in this report. |

Inventory Item shown on Inventory Listing that has Zero Quantities is all categories
| • | Print - Click the Print button  to Preview and optionally Print (to a File or a Printer) this Inventory Listing report. to Preview and optionally Print (to a File or a Printer) this Inventory Listing report. |

Inventory Listing Report header showing the detailed information that is available
| • | Preview - The Preview tab presents the report which resulted from the Options selected above. |
| • | Up Arrow/Down Arrow - hi - Moves the report one line up, or one line line down, respectively. |
| • | Page Up/Page Down - Moves the report to the previous or next page, respectively. |
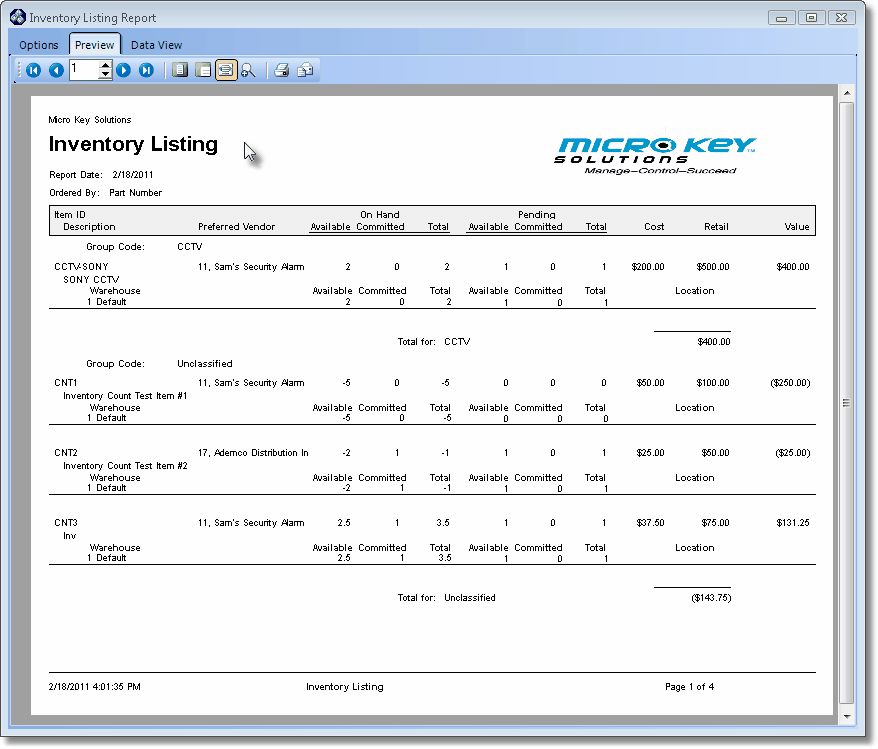
Inventory Listing Report Preview
| • | Home -  - Using either the screen icon or your Keyboard's Home key, moves the report to the top of the first page. - Using either the screen icon or your Keyboard's Home key, moves the report to the top of the first page. |
| • | End -  - Using either the screen icon or your Keyboard's End key, moves the report to the bottom of the last page. - Using either the screen icon or your Keyboard's End key, moves the report to the bottom of the last page. |
| • | Arrows - The arrows allow you to move back and forth, from page to page. |
| • | Number - Indicates the page number you are viewing. |
| ▪ | You may also type in a specific page number, Press 8 Enter and that page will be displayed immediately. |
| ▪ | If you enter an invalid page number, it will be ignored. |
| • | Fit To Page - Click the first button after the arrows to size a full page of the report to fit the screen. |
| • | Zoom To 100% - Click the second button after the arrows to display the page at 100% (of the printed view). |
| • | Fit To Page Width - Click the third button after the arrows to size the page of the report to fit the full width of the screen. |
| • | Zoom To Percentage - Click the fourth button after the arrows to re-size the page of the report by percentage. |

| ▪ | When you Click the Zoom To Percentage button, the Percentage selector will be displayed. |
| ▪ | You may then Click the Up or Down ‚ arrows to set the exact amount of Zoom you want. |
| • | Print - Click the Print button to Print (to a File or a Printer)  the displayed Inventory Listing Report. the displayed Inventory Listing Report. |
| • | Email - Click the Email button  to send the Report to an Email Address of your choosing. to send the Report to an Email Address of your choosing. |
| • | Data View - This view provides a tabular (spreadsheet style) presentation of the selected data. |
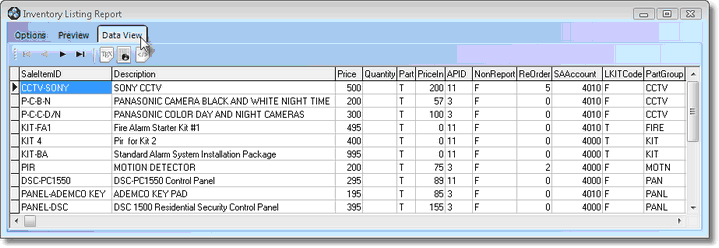
Inventory Listing Report Data View
| • | Arrows - Click the arrows to move through the record. |
| • | Export - Exporting the data from this Data View Form (note the "fly-over" help available on these buttons): |
| ▪ | Export to CSV - Click the first button after the arrows to export the data to a Comma Separated Values (CSV) file format. |
| ▪ | Export To Excel - Click the second button after the arrows to export the data to an Excel (.xls) file format. |
| ▪ | Export To Html - Click the third button after the arrows to export the data to an HTML formatted file. |
| • | Exit the Form by Clicking the Close button x on the right at the top of the Form. |

